Sunday, June 24, 2012

Dotted Your Eyes For You

We started 2 new students this week so you know we'll be seeing butterflies here.  But let's start with a returning student who we haven't seen in a while.

Fran has been keeping pretty busy lately but she has numerous projects to do so she's back in class.  She returned this week with a window that I'd forgotten she'd been working on-- her popular Diamond Fleur De Lis Window.  Made with Iridized Black Baroque Glass for the FDL and the border, this window always stands out.  Fran came in and gave her soldering a once over to smooth out any rough areas and in the end her window turned out PERFECT.  I can honestly say that she has the soldering process down pat.  It's without a doubt a beautiful window.


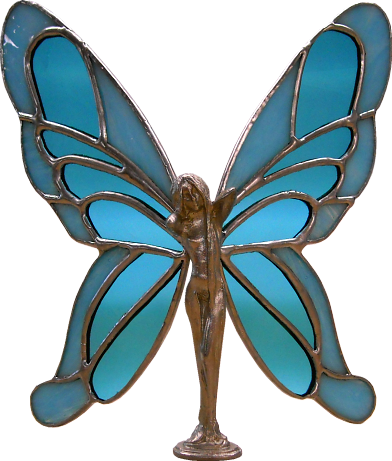
Next we'll look at the first of our2 Standard Butterflies this week.  This was made by Martha and let me tell you, Martha has taken to cutting glass like a fish takes to water.  From her very first score line I knew that she would have no problem making stained glass.  And her bright red and yellow butterfly proves that I made a good judgement call.


Shelley is our second new student of the week.  She decided to make a baby blue butterfly with the same yellow body that Martha had picked.  Now I hate to sound like a broken record but Shelley also had no problems when it came down to cutting or grinding her glass. Look at the uniform and smoothly curved pieces that make up her butterfly.  You couldn't ask for better work on a first project. 


Now, Roxie has had more than a few of her projects on our cutting table so when she makes a butterfly she wants hers to be more challenging.  The two Butterfly Lawn Ornaments that she cut out this week are each made out of 22 pieces of glass.  She'll also solder this together so the butterfly is 3D with its wings pointing upward.  I'll make sure to get a few different angles when these are completed which will most likely be soon knowing Roxie. 


Aubrey is moving along wonderfully with her Silhouetted Trees Window.  Everything but the sun is cut and she's even got the bottom 2 layers of the land ground and fitted.  Right now she's busy grinding her branches and once they're done she'll wrap them and then tack all of what we see here together.  Then we'll set the glass that forms the sun behind the piece and cut out each of the pieces for a perfectly aligned sun.


In our last post I asked what you call a cow with just 2 legs, but then I noticed that Cindy's Cow Window has NO legs so..... Q) So what do you call a cow with no legs?  A) How about Ground Beef?  (OMGSMN*)   That being answered, Cindy's cow is very much taking shape now.  She's been grinding it (as you can tell by the pins) and the background which is going to be a black and white checkerboard is about all there is left to cut. This will be a perfect Kitchen decoration.


Lynn has made some major progress on her Flamingo Window.  In fact, everything is cut out save for the branches in the upper right and the lower left.  That means that Lynn will be at the grinder when she comes back into class.  We had a slight incident with the sky but we have a wonderful work around that we'll reveal when it's all complete.  I have to hand it to Lynn, she isn't afraid to forge ahead and move right along.


Patty has all of her Lady In A Bathtub ground and ready to be wrapped.  There's still the small flower and the leaves to take into account but that's barely worth mentioning and will be handled when she returns for her next class.  Mark my words when I say that Patty will be wrapping this up soon!


Sonia has most of her praying hands complete but it didn't go as smoothly as she'd hoped.  While she was grinding one of the pieces she managed to cut one of her fingers bad enough to require a band-aid (you can see the bandage in the picture).  It didn't slow her down at all though.  there's just 2 pieces of background glass and then a border and this will be completed!


Lastly, Terry's latest Bird Window is really moving along.  She has the majority of this window ground and fitted together and since all the glass is cut (save for the border) I think this will be all foiled and ready for solder before we know it.  She's cut out some off-white eyes for these birds and I've placed black dots of glass paint onto the centers of them (thus effectively dotting her eyes) that she'll 'fire' on using her oven in the new kitchen that she's just had installed!    Something tells me that this wasn't kind of cooking that she planned on doing though...


I'm going to call this a Blog and post this now.  We'll be back in 7 days or so with further progress and more finished works.

Paul

*Oh My Goodness Shoot Me Now


(Jesse Pinkman recommends Funyuns)

Friday, June 22, 2012

Eat, Bleed, Pray

Things are really starting to pick up again in classes here.  We have a lot of completed windows and a lot of  projects that will be completed soon enough.  So let's take a look at just what's been on our cutting tables during this past week.

Terry has completed her latest Egret Window and like the others before it, it's a nothing short of a masterpiece.  It seems that Terry will pick a design and then end up making 4 or 5 similar renditions for other people before she moves along to her next subject matter.  That trait seems to be holding true with her Egrets/Herons as you will see later on.  :-)


faer·ie  (fâr-ë)
n. pl. faer·ies
1. A tiny winged being in human form, depicted as clever, mischievous, and possessing magical powers.
 2. Any of the (naked) women with wings that Roxie has made over the years here in stained glass class.

As you can see, Roxie has this pattern down to a science.  She'll be sticking with the colorful wing motif and will be making at least 2 more butterfly lawn ornaments during her next class. 


Myrt's Semi-Victorian Window has officially been completed.  Last week she left with only the second side to solder and that's exactly what she did when she came back in.  It's was a a bit different working on a full sized window after having abandoning it for a number of weeks to make about 10 mirrors and crosses.  I haven't a clue as to what Myrt will be doing next so I can't wait to see what she comes up with after she returns from her first retirement vacation.  Congratulations Myrt!


Susan's got her 3rd Flag completed and I believe that after this she plans on making some Pumpkins (on a stick).  In fact, as I type this out I distinctly remember her tracing out pattern pieces on Spectrum orange glass so when she returns I know we'll be seeing something that will decorate her yard for the Fall season.   I'll say this for her-- she's keeping on top of the holidays since her flags are finished and it isn't even the 4th of July yet!


Remember what I was saying about Terry up above?  Well, have a look at Terry's next Egret Window.  She brought it into class for the first time this week and it's already almost 100% cut out!  Terry certainly loves making stained glass (and Egrets!) 


What do you call a cow that only has 2 legs?  Lean Beef.  (groan) Cindy's working on the first cow window I've seen in about 20 years.  She's been cutting and re-cutting glass to make sure the colors work out just right because black and white cows are easy to pick out colors for whereas the brown ones are a lot more difficult.


Aubrey is making this beautiful Silhouette Window for her first stained glass project.  There will only be 4 colors of glass in it: Orange, Yellow, and 2 shades of black.  The blacks will blend into each other and won't be discernible when the window is on the table but trust me when I tell you that this window is going to really draw a lot of attention when it's hanging up.  I love the pattern and the colors already.


Meanwhile, Lynn is busy with her Flamingo Window.  This pattern is one of those perfect first projects because it isn't too easy and it's not too difficult.  There are a few cuts that are very challenging and then there are others that are almost a straight line.  And Lynn has picked enough colors  to make it stand out in a crowd of windows.  I can't wait to see more of this cut out so we can really get a feel for the pattern.


Ok, we might have to make this Blog R rated from here on out-- or at least until Patty finishes her Lady in Bathtub Window.  Just look at those long legs.  It's all cut out now save for the flower that will be coming out of the vase.  To make sure the stem of the flower is absolutely perfect she'll cut the stem lines into the wall after everything else is wrapped.  Patty's begun grinding this project so it's another one that's moving along quickly!


Sonia had her choice of 2 patterns to pick from when she came in this week.  She could either make her Charlie Brown Window or her Praying Hands Window.  Guess what she decided to do first.  The main reason for her choice was that she knew she could get these Praying Hands done quickly.  See, when you finish a project quickly you get on a roll and actually get psyched to tackle more elaborate patterns.  And her Charlie Brown Window is definitely the more elaborate of the 2.  That said, there's nothing wrong with this pattern at all and I suspect we'll see it finished soon.


We have just one more blog to go and we'll be 100% up to date again.  Look for the next post sometime late Sunday.

Paul


Tuesday, June 19, 2012

You Aren't Putting That In My Glass Rack

Ann's Flower Window is leaving the shop.  In other words, it's finished.  At first she was able to transport it back and forth from the shop to her house so that she could work on it at both places but once all the pieces were wrapped it was just too large to be moved in and out of the shop.  I completely understand why she didn't want to risk transporting it but now that it's completely soldered it's a nice and sturdy window.  And colorful too! All in all,  I believe that Ann had a fun time making this.  There were times that she was a little leery about how it would all come together but as you can see it did so very well.  Or I should say that Ann did very well.

 
The Pokeno Girls are officially walkin' out the door.  Sonia's border glass was a chore to decide upon but I don't think she could have picked a more perfect color for the trim of this window.  It's colorful and vibrant yet it doesn't detract any attention from the subject of the window-- The girls.  As with all of Sonia's windows I have to say that this is a very nice window indeed.


Susan's being very patriotic and has completed a second American flag Lawn Ornament.  She also managed to cut out and grind another while she was in class.  She's taken those pieces home with her to wrap and I expect to see her soldering it together when she returns next week.  That means that we'll be looking at the last of her Trilogy Of Red, White and Blue Lawn Ornaments in our next update. 


Long time readers of this Blog know that when we see one of these butterflies it means that we have someone new to introduce.  This pattern is our standard first project so we see a lot of these but the color choices make them all different and worth looking at.  This is Aubrey's Butterfly and as you can see, it turned out perfect.  It's really more of a blue hue to it but for some reason the camera is making it appear more gray than it really is.    


Lynn's Butterfly (yes, we have 2 new students this week)  uses a nice almost olive/green glass for the wings and a teal body.  As you can tell from both of these butterflies, both Lynn and Aubrey made sure that everything was symmetrical and that there were no sharp corners or ragged cuts in the long runs of the glass.  It's little things like these that make a project look professional.  


Roxie worked on her latest Stained Glass Faerie by grinding all of the pieces that she cut out last week.  Once it was all ground and fitting together she began wrapping her glass.  The pieces making up the wing on the right are all wrapped in copper foil, the wing on the left isn't (but will be soon).  Next week this little lady should be flying out the door.


Terry has the front of her Egret all soldered and the back side has been started.   She's decided to go with a zinc channel to surround it and give it some added stability.  Brass channel will protect the edges of a window but it will still allow the window to flex and possibly break if it isn't handled carefully.  Zinc channel adds a lot strength and once this window is completely soldered it will be VERY sturdy.


Myrt has finished her mirrors and crosses so she's back to work on her semi-Victorian Window.  This week she wrapped the final border, tacked it into place and then ran some brass channel along all four sides.  Then she started soldering.  Yes, they are her hands in the picture holding a roll of solder in one and a soldering iron in the other.  I don't get enough shots of projects actually being worked on so this one is a treat for me.  Myrt could be a hand model if she wanted to be one! :-)


Patty finished her Dragonfly Window last week and came in not sure of what she wanted to make next.  After a little thought she decided to do the Lady in A Bathtub window that Roxie made 2 Christmases ago.  It's something she's been talking about doing for a while now so it's a good choice no matter how you look at it.  She managed to get a lot of it cut out this week so I wouldn't be surprised if this isn't completed very quickly.


We're starting to fill up with new students so space is going to be getting tight in the shop again.  Expect to be seeing more butterfly suncatchers!

Paul


Thanks Girls!  You made 51 fun.  :-)

Secret Garden

Wow, didn't Patty's Dragonfly Window turn out to be absolutely stunning?  Not being sure on which way she wants to hang this we put holes for hooks on all four corners which means that this window can be hung 4 different ways.  This pattern is so nice that there's already talk of someone else making it! 


Susan's American Flag Lawn Ornament is another winner.  She'll be working on a few of these and then branching out into pumpkins soon enough.  Susan's moving along nicely on her own now and her confidence is at an all time high thanks to completed projects like this.   


Patty and Sonia's Sister was in for a visit and rather than skipping a class they both decided to bring Amy with them to stained glass class and let her make a butterfly.  It was a great idea because Amy's butterfly turned out perfect.  It's a shame she won't be able to stay for 4 or 5 more weeks to make a window because I believe Amy has what it takes to make stained glass.  I guess it's safe to say that it runs in the family.  :-)


Speaking of Sonia, the front of her Pokeno Girls window is now complete!   With only the back side of this window left to solder (or would you actually call it the front side???)  I will safely assume that  this will be a finished project next week as well as a featured picture in the Blog Update Notice.  I'm hoping for a sunny day when it's washed and cleaned up so we can see this colorful window with some good light behind it.


Meanwhile Roxie is looking to populate her Secret Garden with Fairies, or Butterfly Ladies, or Wood Nymphs.  Call them whatever you want but Roxie certainly makes the nicest one's I've ever seen.  She realizes that attention to detail is a must on these and she always achieves perfection.


It looks like both Ann and Sonia are at the same point in their respective windows-- both of them have the front of their windows soldered and will begin soldering the back sides when they return.  Hopefully I'll be able to help Ann solder the back of this when she comes back in.  With 2 of us soldering there's a chance this will be completed!


That's about it for this post.  We're about 2 updates away from being completely up to date again and in our next post you'll get to see the butterflies that Lynn and Aubrey's  made during their first day in class. That will be in our next update sometime around Wednesday.

Paul
Bayou Salé GlassWorks

Thursday, June 14, 2012

Indo $@#& nesia

Butterflies.  And I'm not talking about the beginner project variety.  I'm talking about the colorful, big, bold and the beautiful ones that Bonnie and Roxie made this week.

And the first one we're looking at is Bonnie's.  What you don't see are the 6 (or was it 8) hooks on the back side that will each hold a length of fishing line that will be connected to 6 (or 8)  pieces of colored glass that will act as wind chimes.  This was Bonnie's idea from start to finish and she really did a great job through the entire process.  I think it's safe to say that she has really got the hang of this stained glass making business.  :-)


Our next featured Butterfly was made by Roxie as a sort of 'in between' project.  She wanted to make something quick and easy but nothing that was plain or run of the mill.  This Lawn Ornament Butterfly attaches to a metal rod that she can push into the ground and decorate the yard with. The wings on this are offset at an angle so it has a very prominent 3D effect that's hard to see here.


This Dog Window that Cindy made was done as a memorial for a friends pet that had recently passed away.  It was drawn from a picture of the actual dog so it's pretty exact right down to the 2 different colored eyes.  Cindy has a nice eye for detail and it shows in her work.   I'm sure someone is really going to love this window.


Myrt 'knocked out' another cross this week and it's a beauty.   She even went around the outside edges of this one herself (which is something I usually do for our students).   All these crosses that she's making are going to be gifts and I have to say that these make really excellent gifts.


Myrt also got this cross cut out and ground while she was in this week.  She'll probably foil this at home and come in with it completed next week unless she gives it away first.


I have to admit that I may be crediting this Flower Hand Mirror to the wrong person when I say that it is being made by Cindy.  There's a good chance it was cut out by Myrt but the burnt and well used pattern makes me believe that Cindy is the person making this flower hand mirror.  


There's no doubt, however,  that this is Ann's Large Flower Window.  She has the border on it and she's ready to solder this window!  There's a lot here to solder so it won't be completed next week but Ann is clearly headed towards the finish line with this project.  The hard part is completed and the rest of the work is just nice steady soldering.


Patty agonized over what color border to use on her Dragonfly Window and many, many pieces of glass were looked at but in the end everything looked flat, dull and boring next to her fancy background glass.  Sooooooo, we decided that the best thing to do was to forgo the border entirely and just use some strong zinc channel to frame out the window.  The zinc also gives the window a lot more strength than the brass channel would have.  I think we'll be seeing this one completed real soon now. 


Sonia's Pokeno Girls Window had a lot of glass out of the rack this week as well.  When you have 5 bright, vibrant colors in the center of a window you don't want one of them repeated in the border.  Sonia finally settle on an off-red piece of water glass that, in my mind, set off the women perfectly.  You may not be able to see it now but just wait until this is lit up from behind.  PERFECT!


For some reason Terry's window keeps coming up at the end of the Blog and the new version of Blogger makes moving pictures around so much harder than it was before.  I'm sure there's an easy way to do it but I haven't found it yet .  Anyway, Terry's window is completely wrapped now and she's ready to tack this and then decide what color glass to use as a border.  She's leaning towards a root beer (brown) glass and i think it will look great.  Trust me!


Lastly, because I happened to have a picture of it on the camera I'm posting a look at the top of our Last Supper Window for St. Jules Church.  At 4 feet tall it's a big window.  The bottom portion which features Judas scurrying away was tacked together yesterday so I'll be attaching the borders on it over this weekend.

That's it this time around.  We'll see you again on Saturday when I post the next update.

Paul
Bayou Salé GlassWorks