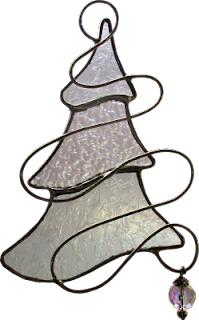
Sometimes a finished piece needs a little extra to make it look complete. That little extra may be as elaborate as adding wire (see Betty's Christmas Trees and Lara's Bluebird a little further along in this post) and other times it's as simple as adding a drop of paint to make a pupil or an eye ball (as in Angie's Frosty the Snowman). When I use paint people always ask what kind it is and I answer "Pébéo Vitrea 160 paint". It's made for glass work and comes in assorted colors by the bottle or in a paint pen. The instructions state that you should put the painted glass into an oven for 40 minutes at 325 degrees to allow the paint to set more firmly onto the glass but on small paint jobs I see no difference and usually skip the oven step. Should you chose to use the oven remember to paint your piece after it's been ground but BEFORE wrapping it in foil. You want the single piece of glass in your oven, not the finished stained glass piece!
That said, I've found that nail polish works wonderfully on glass and I've used it frequently throughout the years. It's available in MANY colors and doesn't come off the glass unless you actually scrape at it. I've never put it in the oven though and I would advise you NOT to do that with nail polish.
So then, first up this week we have Cindy's M.C. Escher inspired Marble Swirl is finished and looking nothing short of marvelous! I love the 3D effect and when it was hanging in the shop EVERYBODY commented on how nice it looked without ever noticing the cracked piece in the (very obvious) center which we fixed when Cindy came back in with the matching glass. After that minor repair I can say that this is perfect.
Ann completed her Purple Rosebud Window just in time for the holiday and I believe I heard an audible sigh of relief come from her once it was hanging and we took this picture. With it's smaragdine colored leaves and inner border, this window has a style all its own and is another example of Ann doing another wonderful job both quickly and efficiently.
Lisa soldered, washed and colored four Crosses, two of each design that you see pictured. She attached two small posts to the bottom of one of the blue crosses and then drilled two matching holes into a wooden stand so that the cross could be mounted onto the pedestal. I believe she'll be gifting these and anyone who receives one will surely be pleased.
Mary Grace can rest easily now that her Address Window is completed. People worry needlessly that the numbers and the border have to be cut from the same glass but in a word: Nope. As you can see, two different shades of purple not only work wonderfully together but probably even better than if she'd used the same purple. It adds more shading while maintaining a two color (purple and amber) color scheme.
This is just one of Susan D's three Reindeer that she finished this week. They are shaded differently but the big difference on this one is that if you look close enough you'll discover that he is Rudolph The Quintessential Reindeer! He's a red-noser for sure, that one is!
Linda F wrapped up all the work on her Joy Panel by finishing her soldering and adding some brass channel. Angling the letters of the word makes this far more interesting than a straight out JOY, don't you think? It also somewhat follows the rule of thirds which we talked about a few months ago.
Started and completed in just one night, Lara's Bluebird looks stunning. The separate feathers on the wings are actually formed by tacking eight think pieces of wire across a solid piece of glass. You can easily make these as cuts but the thinner wire gives an added touch of elegance to the design.
Helen wrapped up the work on her LSU Window but the colors didn't display as brightly as I'd hoped in the picture. Nonetheless, this is another window that Helen can be proud of especially since she does so much work while at home out of the class room.
Check out Angie's Frosty the Snowman! The coal eyes and buttons are just dots of glass paint put on after this was completely finished (washed, patinaed, waxed). I can see this being a replacement to the other snowman that our students love to make because there's less dealing with small pieces and a much easier paint job to finish it off. And yes, I made a copy of this pattern because I can see this being a big hit next Christmas.
Beth finished her Fish Suncatcher and as I always say, you can't go wrong using assorted greens throughout all of the pieces that make up a fish. Beth wasn't sure what to use for the fins and some of the head pieces but it all worked out wonderfully. And believe it or not, that mauve colored belly is from the same sheet of glass that the green back was cut from!
Betty turned out six more of these Swirling Christmas Trees and has the wire work down to a science at this point in time. Even attaching the jewel that hangs from the lower right (giving this piece an extra boost of charm) became child's play for her once she learned the trick. What is that trick? Cut the wire a bit larger than you need, wrap it twice, and then cut away any superfluous wire. It's all in the wrist!
Talk about a production line-- Annette got another six of her Praying Angels finished before she left class. She was under the gun on these but rose to the occasion and came in to class with the six of these Baby Angels only needing to be soldered. Below is a look at just two of them because I'm just plain lazy and don't want to photoshop out 4 other backgrounds.
Here's the deal. Cheryl completed a window this week but she was down to the wire putting the finishing touches on it so she left with it only needing to be washed, patinaed, and waxed. That, she said, she could do at home. Here's a look at the completed window (made out of stock bevels) looking somewhat fluxy and with no light behind it. I think you get the picture though.
Next we take a quick look at all three of Susan D's Reindeer including the one we looked at earlier with the red nose. Although they are each made from the same pattern the different color schemes give each Reindeer their own personality.
And now we get the part of the Blog where we look at projects that are still being worked on. Here's Susan R's Bird Feeder with the side sections joined by three base pieces of glass. I've mistakenly been calling this a Bird House in previous posts but I know what it is now so from here on out I'll have it correct. All this needs are the two semi-elaborate sections that make up the slanted roof (let's just say that it's shingled) and then this will be finished!
Kerry began a Nicholls Window and has the logo cut out and practically ground already. Now get this-- what you see is only the bottom portion of this window. A dog's face will grace the top of this two piece window. I'd show you that but I haven't drawn it up for Kerry yet. We'll see what that ends up looking like when we return next year.
In the past seven days Linda L has been as busy as can be because she got three more sections of her LSU lamp assembled! She still needs to solder these and then attach them so they form a 4 sided lamp after which she'll attach a brass cap to the top. All of that could possibly happen in her next class but it's sort of hard to say because lamps ARE time consuming. At any rate you can see that these look Grrrrreat! Wait a minute, that's the wrong tiger I'm quoting there.
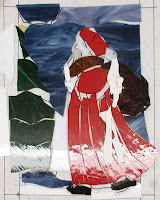
Santa Clause may come just once a year but sometimes he stays late as in the case with Jan's Santa Claus window. She's to the point where this just needs to be ground and wrapped and that means that she'll EASILY have this ready for display next Christmas.
Betty also spent her time in class cutting out the background for a Mardi Gras Panel. The mask itself is already ground and tacked together so all she had to do was cut a piece of glass the size of her background, place the mask on top, trace around it with a Sharpie, and then cut on the lines. the next step for this will be cutting a border. You can even see all six of the Swirling Christmas Trees that she made resting above her Mardi Gras Mask.
With just one piece left to cut and then a pair of borders, Bee is just about ready to to have that big question asked- How much is that doggie in the window?! I have to give Bee special a special round of applause for altering the pattern so very much and making it entirely her own. Only the curtains, the shower head, and part of the floor remain.
Here's a Gingerbread House with a bit of a twist-- you can't eat it! Linda F had already gotten so very far on this window while only having worked on it one day. This will be finished VERY early in the new year for sure!
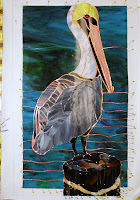
Martha DID change the lighter gray that she had used for her Pelican's back feathers and once they were ground and fitted into place she resumed her wrapping duties. As always, I love how the Pelican and the post he is standing on cuts into the border. It literally makes the subject matter stand out. This is going to be a big feather in Martha's stained glass cap once it's completed.
MiMi's waiting for her wooden doors to be delivered before she begins grinding and assembling all of her Hexagon Windows so in the interim she's made another Sunflower Heart. It's been cut, ground and wrapped leaving only the soldering left to go. You've got to love these and, as always, MiMi's work is flawless.
Shawn got her Christmas Ornament Window all tacked together and then worked on the border which is a beautiful red/green mix. Just like MiMi's project, there's only soldering left to go on this so I don't think it will be long now. I just wish we could have gotten it completed in time for Christmas.
So that's it. Another year older and deeper in debt. We certainly hope that 2021 works out better than 2020 did but do you know what? In terms of work accomplished I don't think we had a bad year at all here in our classes. We certainly had a lot of laughter and we surely needed that so I'm thinking that we really can't complain.
See you again next year!
Paul


