Monday, January 25, 2021

Effective Scoring

When soldering suncatchers a common problem is seamlessly joining the lead lines to the edge of the piece.  The general cause of the problem comes from moving the tip of the soldering iron too far to the edge thus dragging the lead over and off off the piece.  Just remember that the heat from your iron  radiates outwards from the tip.  You can (and should) actually stop moving your iron when you get to about a quarter of an inch from the edge of your project.  Once the iron stops moving you can easily watch the solder continue to flow outwards to the edge of the glass all by itself.   Once the lead reaches the edge gently lift your iron off of the glass and you'll have a perfect join every time.  Remember, practice makes perfect.

First up we have MiMi's first Hexagonesque Door Insert now completed and fitting like a glove. (I guess we won't be acquitting).   This is one of many more to come and we'll be seeing these coming together in all different sizes over the weeks and months to come.  In fact, you'll be seeing another one in this exact same size a little later on in this post.


You say Bird House, I say Bird Feeder!  Either way this is a wonderful design and the multi-colored roof is what really sets off Susan R's latest project.   The next one may be done a little smaller but even though this was larger than most people thought, it works wonderfully.


Linda L made a wonderful Masonic emblem as a Lawn Ornament which brought up a number of questions.   Here are the answers:   Freemasonry involves the teachings and practices of a secret fraternal (men-only) order of the Free and Accepted Masons (the largest worldwide secret society.) Spread by the advance of the British Empire, Freemasonry remains most popular in the British Isles and in other countries originally within the empire.  Also, the 'G' in the emblem stands for 'Geometry under the Great Architect of the Universe'.  So mote it be.


Cindy has four more suncatchers under her belt as she put the finishing touches on a purple and gold Fleur De Lis, a very stylistic tulip, a purple, green and gold Mardi Gras Mask, and an Angel complete with a wire halo.  It's the small things that sell the quickest and Cindy understands that perfectly as she makes items to sell.


Helen made her first Swirling Christmas Tree this week and she plans on displaying it in an easel rather than hanging it in a window.  Since we didn't have the easel in the shop we weren't sure if a jewel would fit on the lower right of this stylish suncatcher sooooo we left it off.  It can always be added later on however, this looks great even without it.


Barbara H got her three Tulips pattern this week and I think it works very well indeed.  With her flowers already cut out there are only a few pieces left to go before she begins grinding this 6 x 6 inch window!  She's requested a Louisiana Iris for her next project which means that this is part of a series of small flower windows. 


Bee has begun work on a new Flower Window using four colors that always work together perfectly.   You can't lose when you combine blue, green, red, and yellow/amber.  Throw in some purple and you have the colors that make up the backgrounds and borders of most church windows and they pick those colors for good reasons.


Ann's large Cross Window is really moving along quickly.  She already has all of the cross cut out as well as the two-toned brown corners that that changes the shape of the overall design from oval to rectangular.  After all of these pieces are ground and tacked together she'll cut the clear background glass using the cross itself as a pattern thus ensuring an absolutely perfect fit.


Cheryl's up to the clouds with the grinding on her Lighthouse Window.   I'm still impressed with that sky glass and I won't forget about it the next time I make a window that features a prominent sky. 


Melissa's Wine Cats Window is really taking shape now.  She has almost all of the lower left corner ground as well as the plant section in the lower right.  Once the bottom half of the window is ground the top half will go quickly since it only consists of a dozen or so pieces.  The end is near.


The top sections of Kerry's Nicholls Logo Window features their mascot which is clearly visible now that Kerry has a night of grinding under his belt.  In fact, next week I'm thinking that we'll see this with some foil on it if not also tacked together.


Here's a look at the Butterfly Lawn Ornament that Mary Grace cut, ground and finished wrapping during class.   She'll surely have this soldered upon her return so look to see this amongst our completed projects section in the beginning of our next post.


Lara has five buildings in her Townscape Window and now two of those five buildings have their Windows and doors.   That leaves three to go and I know that she's finding these easier and easier to cut and fit into place now.


This is Linda L's next project and she plans on making a LOT of these.   All she's doing is bordering a clear diamond bevel with colored glass after which she'll etch initials into the center of the bevels with etching cream.  These are going to make wonderful personalized gifts.


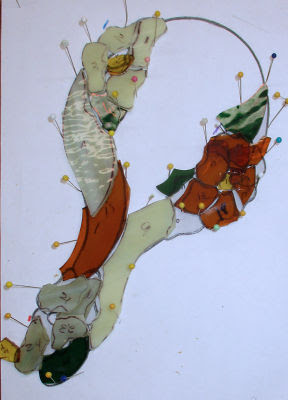
With all of her glass officially cut out, Tracey is ready to begin the grinding process. Alas, as you can see there won't be much grinding necessary to get this window to look like a Cardinal because that's as plain to see as the nose on your face.


Sherri has all of her background glass cut out but since she went with a lightly textured clear glass it's very difficult to see in the picture.   She's already begun grinding all of those pieces and once that task is through she'll have to decide on what color she'll be using to border this window.


And here's a look at MiMi's next hexagon window all ground and more than half way foiled.  It appears to me that once the pieces are all cut out these windows come together pretty quickly for MiMi.


Angie has her newest Address Window all tacked together and ready to be soldered.   Once that's done she'll add some zinc channel to surround it and call this a done deal. 


Betty just can't seem to shake that ol' Christmas Spirit as she works on more Swirling Christmas Trees and some Angels as well.   All of these have been cut out in assorted clear textured glasses and that may suggest that Betty plans on leaving the lead silver on these which is always nice with clear glass.


So there you have it.  Another busy week leading to another post bursting with creativity.  Make sure you come back next week for even more!

Paul

Monday, January 18, 2021

Here Comes A Cheeseball

Our tip this week is about pattern placement on your glass.  A common mistake is to arrange your pattern pieces as you see below.  Everything looks great and there's a good quarter of an inch (which we always want) between each piece but there's one big error.  Do you see it?

Our biggest piece with the inside curve (shaded in red below) should first be cut with a straight line beginning at the starting point of the curve to the ending point of the curve (thus following the red dotted line).  We call this 'Cutting Point To Point' and it's essential to begin inside curves with this straight cut first.   As you can see this results in two other pieces being split in half due to bad pattern placement.  Technically you could curve your cut around the two problem pieces but that makes what could be a very simple cut into a more difficult cut with a good chance of you breaking one (or more) pieces.

The solution is simple.  When tracing out your pattern onto your glass remember not to cross that point to point line with other pattern pieces as we did in the figure below.  Many people ask if it's okay to place an entire piece to the left of the line as the square is in the image above but this isn't a good idea because you will most likely need to take the curve out in multiple cuts ending with your eventually cutting through any pieces you've places to the left of the Point To Point line.

That said, to avoid having to imagine the Point To Point line, simply position that inner curve along the edge of the glass so the Point To Point cut has already been made by the edge of the sheet of glass.  That way you don't have to worry about the other pieces placement.  Keep in mind though that the grain of the glass may not allow you to do this at other times so always keep in mind that imaginary Point To Point cut and don't allow your other pattern pieces to cross it.


So then, how much is that Doggie in the Window Bathtub?  Bee has completed a pattern that she rebuilt practically from the ground up.   In fact, the only thing unchanged is the shower curtain.   A wonderful job all around, Bee's daughter is really going to enjoy seeing this decorating her window each and every day.


Barbara put the finishing touches on the small (7" x 7") Flower Panel that she began last week and by the end of class she had a completed a very elegant stained glass panel.  She's thinking that this size is something that would make great gifts and wants to make a similar panel with three tulips in it.  I'm currently leaning more towards a pair of tulips but we'll see what I can come up with for that small area.


Betty's Mardi Gras Mask Panel is ready to be mounted into it's frame and displayed proudly in her yard.  She's been doing her backgrounds, her borders and her channels by herself and has really picked up on how to do these tasks quickly and efficiently.


Cindy has three of her suncatchers completed and I really love the design of all three of them.  Each measures about 5 inches tall and any one of them would brighten a empty window.  She's got 4 more different suncatchers under construction which we'll see later on in this post. 


Mary Grace's Fuchsia Angel gained its wings this week and looks wonderful.  The icing on this cake is her inclusion of a small gem that the angel is holding.   It's a nice extra touch that MG added at the last minute which makes this piece downright sparkle.


Next up is Helen's Nicholls Logo Window all completed after she added the border and then started and finished soldering it in just one class.  The red N is striking, and the gray sword is right to the point.  Each window that Helen makes expands upon her stained glass knowledge.  This is going to be a wonderful gift.


Annette has completed her Praying Angels has now finished her first Butterfly Lawn Ornament.  I see she's got more than a few of these cut out and ready to be ground so I think we'll be seeing a few more of Annette's Butterflies being made in assorted colors over the weeks to come.
 

 Our last completed project is the first of two leaded Christmas Ornaments that Susan D began working on last week.  This one is, shall we say, 'out the door' and the second one is only one foot behind this one.  We'll see her second ornament next week and Susan says she has a few more of these lined up after that so we'll be seeing more of these.


Ann has begun her latest and greatest rendition of her large Cross Window albeit in a slightly smaller size.  It's still a large window measuring in at about 21 inches wide by 27 inches tall but this will fit in a standard window without any problems while her last version  required a large window to fit into.  Ann's already cutting glass so she's on a roll now.


Cheryl's Lighthouse window is looking very good indeed.  I love her colors and her cutting is really improving with each new piece she makes.   She's begun grinding this from the bottom upward and will resume grinding when she comes back in next week.


Here's what appears to be a montage of suncatchers that Cindy is in the midst of making.  You can see her three finished pieces here which means that she only has a Mardi Gras Mask, a Tulip, a Fleur De Lis, and an Angel left to go.   Last week I mention that her Fleur De Lis needed a bit of a redesign but when I had the pattern in front of me I realized the she only needed to add 2 pieces to make it sturdy again so the redesign is off.  We'll examine that issue closely when Cindy finishes that piece.


Angie has begun a new Address Window and in just one class she traced out her pattern and got all of the glass cut for it (save the border).  She's taken it home with her and she has a grinder so it will be interesting to see just what this looks like when she walks back in the door with it next week.


And in just one class Kerry managed to color in the pattern for the top Mascot section of his version of the Nicholls Window and then cut out all of the glass as well.   This dog with sunglasses is certainly stylish and looking good.  He's chillaxin'!


Next up we look at the Bird Feeder that Susan R is working on.   This week we get a real good feel for what the finished project will look like because she now has one of the two roof sections attached.  That leaves just one side left to go and she's already got that ground and more than halfway wrapped.  I really think this is going to be a completed project next week.


Lara has begun making windows.  For her houses that is.   This week she cut out, ground and wrapped 10 small windows, then traced them into place on top of one of the glass houses and then cut out the opening for the windows.  After a little grinding she had two balconies completed.   Next week she'll move onto another building and continue likewise.


Shawn is in the process of making a large Mini Mouse Suncatcher.  We've seen these done before but this one is so large that that the pattern doesn't even fit on a single piece of legal paper.   As you can see, Shawn is ready to solder this when she returns and then get started on something new.


Tracey now has has all of her background and all of the leaves cut out for her Round Cardinal Window.  She's got the magnolia petals all traced out onto glass and ready to cut so I think this will see some rd cardinal feathers added to it when we see this again.


Linda L's Mason Logo was started and nearly completely cut out in just one class.   Sizes are a little hard to judge when all you have to go by is a picture but let's just say that this isn't nearly as big as you might think when you first look at it.   Fact is, this suncatcher will only be 7" wide when it's finished.  That makes for some tiny pieces!


I love the glass choices that Melissa has chosen for her Wine Cats Window.  The water and sky is perfect and she's gone the extra distance and  added spots to each of the cats.  Those spots may be hard to see now but she's already begun grinding so this is going to take shape quickly.


Lisa is working on a Coast Guard Window for her son.  This will be assembled in three separate sections (the top USCG rectangle, the middle square Anchor section, and then the bottom 2021 section).  Once each section is tacked together they will be joined together to form one large window which will then get a border around it.   She already has her letters and numbers cut out but right now she's concentrating on the center anchor section.


Martha has decided to go with a double border on her Pelican Window so the first thing she did was cut and attach her first clear border.  Once that was finished she cut a thicker outer border and then broke it down into its individual pieces.   Sadly, this last border BARELY fit on the board that she's got this  project on so she removed the pieces before I could get a picture of it.  But that's okay, there's always next week.


MiMi's second Hexagon Window is taking shape as she spent the night grinding and making sure her straight lines are all straight.   She's using what looks like a random placement of her different textures but there's some human intervention in there to help make it look more aesthetically pleasing.  Sometimes random can be jarring.


Mary's Cross and Dove Window is so very close to being completely cut out now.  With the thin outer red border tacked into place and the accent circles and diamonds in position Mary is now cutting the black center background pieces and grinding them to fit.   You can see where she started at the 3 o'clock position.  Next week I think we'll see most of those black pieces in place.


Sheri finished wrapping all of her Koi Fish and Water Lilies and was about to begin cutting her background when she realized that she didn't have her pattern pieces with her.  She ended up selecting and tracing out 2 suncatcher patterns so her class wouldn't be wasted but we'll see more progress on this Koi Window next week.


And there you have it.  Our classes are becoming hectic again as more and more students get deeper and deeper into their new projects.  That's great news because it means that we will have plenty of completed windows to admire in the weeks to come.
 
Paul

Monday, January 11, 2021

Don't Let Paul Give You Any Craft

What's the most important part of a suncatcher?  The outside edge.  Why?  Because it defines the shape of the object.  Edge pieces should ALWAYS line up and form a perfect line be it straight or curved.   Look at the examples below.  The heart on the left lines up with smooth curves and edges that align correctly.   The heart on the right is off in almost every possible way and it shows in extremely obvious ways.   Which do you prefer?  The answer tells what you should strive for in all of your work.


Linda L finished her LSU Lamp and it is incredible.  She did such a wonderful job from start to finish on this.  Maybe, if we're lucky, Linda will be able to snap a picture of this on the base that she had made especially for it so we can see it in all of its splendor!


Next up we have another project that sets the bar  higher than ever .   Shawn's Christmas Ornament Window was completed and there's no doubt that it elicits a Christmas warmth when you see it.   I just wish you could see all the iridescent glass that was used throughout this window because it really makes this sparkle.


Our final completed project this week is another Praying Angel that Annette is becoming at expert at making.   That said Annette says that she has two more of these to go and then she says she's done with this design and moving along to butterfly lawn ornaments.


Cheryl began working on a Lighthouse Window to start the new year.  After tracing out and coloring the pattern to her liking she cut apart the paper pattern and then traced the sky onto a beautiful blue/white glass which she now has cut out and resting in its place on the pattern.


And Cindy has begin the new year by starting a veritable slew of suncatchers.  I see that we have to make an adjustment on her Fleur De Lis so I hope I can catch her in time to stop her before she wraps and tacks it together.  Okay, I caught her in time.  After having texted her I can tell you that she'll have a sturdier modified version of the FDL when we see it again next week.


Kerry got the bottom portion of his Nicholls Window tacked together and is now ready to tackle the top section which features the school mascot. Yes, this window will have a dog on top of it!


Susan R's Bird Feeder has one side of its roof ready to be wrapped and then tacked together.  She'll solder the top side of each roof section before attaching it so that she won't have to balance the entire feeder on her lap to get a level soldering surface.  We should see one side of this firmly attached when she comes back in.


Martha's Pelican Window is ready for its border and then she can solder this beast!  This is already stunning and her work is fantastic.  I just can't wait to see what color she picks out for her border.  The end is near!


Mary Grace came in with a Fuchsia Angel pattern and left with a Fuchsia Angel all ready to be wrapped in copper foil.  That's some nice quick work there and I have no doubt that this will be finished upon her return.


With all of her background tacked into place Mary began working on the intricate border that surrounds this gorgeous dove.  She'll work on the border one row at a time and she already has the thin inner red border cut and ground.   Next she's going to skip the middle section and grind the final thin outer border. It may be out of sequence and an odd way to work but it will ensure nice round lines which define this piece.


Barbara wasn't sure at all about what she was going to make when she came in.   She didn't want to do anything large so she settled on this simple flower panel.   With the flower all cut, ground, wrapped and tacked together, she only has to cut out 3 background pieces and a border when she comes back in.  It looks like Barbara's going to need to decide what she wants to make next already!


Check it out!   This is the first of many Honeycomb Windows that MiMi has been working on for the past 2 months.   She said that wrapping all of those hexagons wasn't difficult at all and that's a good thing since she has around 1,500 of them left to wrap!  This window is tacked together and ready for solder so we'll surely see it completed when MiMi returns.


Susan D is working on 2 different sized Beveled Christmas Ornaments.  All of that copper that you see will be completely covered in lead while the one on the right will have a regular colored glass border surrounding it.  These are just about finished already so it won't be long now.


With all of the her glass attached and the front side completely soldered Bee is just about ready to call this Puppy in a Bathtub a completed project.  There are only a few lead lines left to go on this so I believe this will also be featured as a completed window in our next post.


Tracey began cutting out glass for a familiar pattern of hers with a somewhat new spin.  She's taken the corners off of her square Cardinal Window and is making it round now.  She's already got most of her background glass cut out so this will certainly be getting a little more color added to it when she comes back in.


Ann started another Hand Mirror while she was waiting on a pattern to make for her next window.  She'll be remaking a cross window that she made a few years ago but she's scaling down the size a bit to make it more manageable.  We'll see just what that looks like when we return.  Meanwhile, she got all of her hand mirror cut out while her Cross pattern was being drawn up.
 
 
Lastly we look at a rough drawing of the panel that Melissa has begun working on.   Bee has worked on two of these in the past (or were there three of them?) and Melissa found the pattern charming enough to want to make one herself.


And there you have it-- the start of a new year at Bayou Salé GlassWorks!


Paul

Bayou Salé GlassWorks