Tuesday, May 27, 2014

The Itsy Bitsy Spider


Well, it's been an interesting week.  We ended up cancelling all of our Wednesday classes due to Russ being in the hospital from Monday until Thursday due to an infection in what was most likely a spider bite.  I was still able to have classes on Tuesday evening and all day Thursday so there's still a lot to cover.  Russ is feeling much better and his hand looks good now with the swelling reduced to just his wrist area.  Let's hope this doesn't happen again though!

Okay, so much for Cindy taking her time on a window.  Here's a look at her Texas A&M Window after she completed it.  When she brought it in all it needed was a zinc channel and a good cleaning (she left the lead silver on it).  I think I finally have the lighting situation under control in the shop so we can get decent pictures during the night classes when there isn't any natural sunlight coming in the windows.  Cindy did some really quick work on her window but the quality of her work didn't suffer at all.


And this is the Feather Window that Cindy also completed.  This one just needed two hooks and she was all set.  It's colorful, most certainly 'Indianesque', and exactly what the customer requested. 


Our last completed project of the week is Janet's Multicolored Cross.  She's made this pattern before so she's a pro at it now, especially since she did such a great job beading her edges of this cross.  Slow and steady wins the race and that's exactly what Janet did with this Cross.


Becky B really did some excellent work this past week when she cut out the mountains and the horse portions of her window.  The mountains were an exercise in learning how grain lines flow and how to line pattern pieces up according to the grain on the sheet of glass that you're cutting from.  Becky persevered and now her mountains have continuity and depth.


Poor Martha!  She told me (through a text message) that she wasn't happy with her lettering and I have to say that I suspected that she was over reacting.  Then I saw what she had accomplished and I knew I was correct.  The lettering that she did looked MUCH better than the lettering I had done on her first Louisiana State Police Window.  It took everyone in the class to make her understand that she'd done an incredible job and that she shouldn't start over from scratch but simply redo the letters she had scraped off.  And then she dropped and subsequently broke the piece that said TROOPER.  :-(  A concrete floor can be VERY unforgiving.  But you know what?  She'll survive, and Martha will get her window finished without anything to worry about.


Carol's Wood Duck Window is all ground and almost completely wrapped as well.  Actually, the sky isn't ground yet, or even cut out for that matter but it will be when she comes back in.  Once this is tacked together Carol is going to have a beautiful sky with grains lines that flow and match throughout the width of her window.  (Note the use of the metal square that she's using to maintain straight lines and right angles.  That's a thumbs up right there!)


And Rowena is making this Humming Bird and Fuschia Window look downright simple.  She added her final border and then began soldering the first side during class.  He soldering was nice but she was having some difficulty deciding how much solder she should be applying to the foil.  When  she turned it over to do the second side we had her pay more attention to the melted lead at the tip of the iron rather than the line that she's soldering and her second side is looking GREAT!   It's more than halfway finished so this will certainly be completed when she comes back in to class.  I just love to be there to see everything come together for a student.


Terry began working on this Fleur De Lis Window during class and she's got it all ground, tacked and ready for a quick border (or two).   Terry cut the background out of one piece of glass so the pattern in the glass is never disjointed and flows perfectly behind her Fleur De Lis.  It's an effect that you can't always achieve when working with glass, but when it can be done it's well worth the effort.


Janet has her Guitar Window all ground and ready to be wrapped.  She already began foiling her pieces in class so I don't think it will be long before you get to see this window with some light behind it revealing the varying densities of the glass which really make this window stand out.   Janet has come a long way since she first started and should be proud of her progress.


Paula has her two suncatchers all ground and ready to be wrapped.   She's taken them home with her and if she comes back in with all her pieces foiled then I have no doubt that Paula will be walking out the door with completed projects by the time her next class ends.  She did a great job on grinding these pieces, especially the Treble Clef which relies heavily on perfectly aligned pieces and nice fluid curves.


Brenda started working on her Dog Window this week and although I believe the dog's name is Baby  I could very well be wrong-- my memory isn't what it once was.  The one sure thing is that when Brenda cuts out the name and adds it to the bottom of the window there will be no longer be any doubt to the dog's name (at least in MY mind).


Jeannette's begun work on her Grape Cluster Window and it's going to be spectacular.  I love the glass she picked for her leaves and we found the absolute perfect glass for her grapes which she'll begin cutting when she returns next week.  This is a great pattern and Jeannette tackled the leaves with no problems at all.  I can't wait to see this one lit up.


Becky S resumed work on her Cowboy Boot and it's a good as done.  What you're looking at is the second side and the soldering is almost complete.  She's taken it home with her where she's going to try to coat the brass channel that surrounds this with lead and decorate it with her own hand made metal filigrees.  Then she'll bring it back for hooks and begin working on her next project.


And that about rounds things up for this wee.  It will be good to get in a full week of classes next week.  It's amazing how many people we missed seeing (eight) by missing just one day of classes last week.

Paul

Tuesday, May 20, 2014

Going Tapeless

We've had a few issues with people's patterns shifting while they are tracing them out so I want to take a few seconds and tell you all the easiest way to ensure that your pattern won't slide during the tracing process.  Simply scotch tape your pattern to the poster board that you will transfer the image to and then slide the carbon between them.  We've been seeing a lot of people pinning their pattern to the table and although that helps it's far more stable and less likely to move if you use just two or three pieces of tape instead.  It's what I do, and my patterns line up perfectly every time.

Ok then!  Linda L has completed her Poodle Window and everyone loves it.  I even heard it described as 'Precious beyond words' in one class.  Linda had always planned on using black for the outer border and when the time came to cut the glass we discovered a beautiful black and white baroque glass that worked so much better than the wispy black she had originally considered.  Sometimes a last minute change can be a window's best friend.


Mary Grace has completed her Large Iridized Fleur De Lis Window.  I was a little concerned that the Fleur De Lis might get lost in all the clear glass but as you can see that isn't a problem at all.  With a nice mix of bevels, clear, and iridized glass, this window looks great!


Becky S completed her Multi-Colored Cross and very successfully managed to go over the edges with just the right amount of solder.  Too little solder makes the edges of the foil easy to tear, but too much solder makes the edge irregular an very unattractive.  In this case Becky got it just right.


Then we have Myrt who put the finishing touches on her own Beveled Cross Window and ended up with this beautiful color combination.  Her work is excellent-- all her lines are all straight, her curves flow smoothly, and her soldering deserves a special call out on its own.  She's got another Cross variation in the works for her next project that we'll see next week.


I C double!  Yep, Brenda has officially completed her CC Window which some of you may know stands for Central Catholic.  Or is it Carbon Copy?  Anyway, the logo was altered slightly so it could be done in glass and the end result is perfection.  Two thumbs way up for Brenda's double C's.  (Now get your mind out of the gutter!)


Carol finished cutting out all of the glass for her Wood Duck save for the sky which we're leaving until the very end.  Cutting it after everything is fitted together will allow the pattern of the glass to remain intact and give a more realistic look to the sky.  Carol has begun to grind her duck and has about 75 percent of it fitting together already.  Once it's all tacked together she'll simply slide a piece of blue glass behind her window, trace around the leaves and then have a perfect sky.


Janet resumed work on her Guitar Window and I love the Modern Art look of it. She has a very transparent amber/purple glass for her background which, on paper, looks far more solid than it really is.  The top of the guitar may look lost right now but it won't once this is off the table.  In fact, the color choice is spot on if you ask me.  With just the background left to grind I'd say that Janet has this well under control


And this is Jeanne's latest Beveled Fleur De Lis window.  She could stop right here and begin soldering it but she plans on adding one more border to this.  She'll be using the same glass that she used for the background so it will all tie in beautifully. 


Next we take a look at Betty's newest window which is an Iris and Water Lily design.  She's a little worried about all the stems and leaves in the center of the pattern but I know she has what it takes to handle it.  Besides, it's not nearly as difficult to do as she thinks it is.  But we're going to make things easier for her by doing the window in three sections:  the upper Iris, the lower Water section, and the center stems and leaves.  She'll do the top and bottom sections first and even go so far as to tack them together before she begins the center.  This will stop any shifting from occurring and  make the stems and leaves easier to deal with.


Well, it looks like I was wrong yet again!  Ann isn't putting a Fleur De Lis in the center of this window, she's making another 'L'.  Her next version will forgo the letter and replace it with a larger circled Fleur De Lis.  This week she cut out the circular L section, ground it and then wrapped and tacked it all together.  There's only 12 pieces of glass to go and then this will be another completed window under Ann's belt.


Lynn's Ballerina is all cut out save for the final border.  I think we discussed going with two borders, a thin, inner border followed by a final thicker one.  All in all, she could just put a channel on what you see here because the 'stones' act as a border themselves but I have to admit that I'm partial to double borders and this window would really look great with a thin inner border done in an accent color.


Paula has begun work on two suncatchers: a pair of Ballerina Slippers and a Treble Clef.  She started with the slippers and once they were cut out she asked if she should start grinding them or move on to the next suncatcher.  I always feel that when you are on a roll you shouldn't change things up so Paula took my advice and then cut out her Treble Clef.  She'll be ready to grind and wrap these when she comes back in.


Rowena's Humming Bird Window is 100 percent officially all cut and ground.  She took her border pieces home with her so she could wrap them throughout the week and then come in with them all ready to be tacked into place.  Once that's done she'll begin soldering.  And since there's not a lot of soldering in this window I suspect that it will go quickly for her.


Abita just needs its top section cut and ground and then Susan will have this completely under control.  The thing is, I suspect that she's added more pieces to the top section rather than subtracting pieces.  Nonetheless, she has the pattern pieces all traced out onto her red glass and will start cutting when she comes back in.


Shelley started a 3D LSU window this week and she's really blowing me with how much she's accomplished.  There are only seven background pieces left to cut and then she can start grinding this.  I remember when this would have easily taken her three or four classes to cut this much glass. Now that's what you call improvement.


Martha's LSU Badge Window is just about ready for borders and lettering.  Martha took the Stained Glass Paint Pen home with her to apply the letters and she's texted me a few times asking for advice.  She sent me a picture and I think that it looked just fine but I don't think she's happy with it.  needless to say, I can't wait to see what she comes in the door with.  And remember-- we are always our own worst critic!


Cindy was supposed to be taking her time on her Texas A&M Window but apparently she only works at one speed--fast!  With just the Blue Bonnet pieces left to cut out, Cindy has told me that she plans on having this ready for channel and hooks when she comes back in.  And I believe that will be the case.  The amazing thing (to me) is that she was able to also knock out this Four Feathers window as well!  That one just needs solder and she assures me it will also be completed next week as well.


Lastly we take a look at the pattern that Becky S is going to start working on. It's a variation of an old favorite interlocking border design that I've used on various occasions that always turns out great.  And as you can see, the letter 'C' is certainly popular this week since it appears 3 times inside of 2 windows in this update.  Look to see some cutting getting underway when Becky returns.


And that about does it for this update.  Come back again next week when we'll have a smaller update due to several missed classes.  I'll fill you in on all the details then.

Paul
Bayou Salé GlassWorks

Tuesday, May 13, 2014

The Sophistication Factor

It's been a busy week but we're going to start things out with a little lesson about making sure that your corners line up on your borders.  Nothing ruins the aesthetics of a window quicker than corners that don't fit.  The lines that make up corner pieces should line up perfectly with the rest of the border.  Stair stepping should never be overlooked or brushed off as unimportant.  In the picture below you can see how the corner piece doesn't follow either of the natural lines on the border.  I've traced its crooked path with red lines from both left to right as well as from top to bottom to highlight this very common mistake.


This next picture shows the end result that stained glass crafters should always achieve in their windows. Pay close attention to how all of the lines in the border and corner line up perfectly, again illustrated with 2 red lines.


Not only are straight lines essential to making a professional looking window, but curves should be graceful and flow without wavers or points within their path.  The window below has four corners that line up perfectly with the border.  It also has flower stems made from lead lines that flow gracefully and smoothly from start to finish.  I find very little to complain about in the picture below.


This next picture has none of the appeal that the window above has even though it's the same pattern.  The lead lines forming the stems stutter along their paths, the corners never meet with the border correctly, the border itself is more wavy than straight, and the lines that break the border into three pieces are crooked.  If you're having a hard time spotting these problems be sure to click the picture to enlarge it.  Once you know what you are looking for you'll have a hard time seeing the window for all of its flaws.


Well, now that we have that out of the way let's start things off by looking at the completed projects that we have this week.  We all know that stained glass can be a beautiful medium to express yourself in but like any other form of art it has its fair share of limitations that you learn to work around. Over the years I've discovered that cartoon stills (or 'cells') lend themselves perfectly to stained glass and Carol's Winnie The Pooh Window just proves my point.  Yes, we had to paint and 'fire' the eyes and mouth onto a piece of glass, but the end result turned out spectacular.  Like Scar just a few weeks ago, this window shows how wonderfully an animated piece can look when done in glass.  But the biggest reason this window looks so good is because Carol's workmanship is top notch.  Even the best pattern can turn out poorly if attention to detail isn't there.


I love this window as well.  Betty's Iris and Dragonfly Window is modified from a pattern that she found online.  I loved the idea but found the execution to be somewhat clunky and filled with excess lines that drew the viewers attention to all the wrong places.  So we tweaked it a bit and ended up with the gorgeous window you see below.  For comparison I've done a side by side at the end of the blog to show you what we changed.  I think you'll agree that Betty's is stylistically superior to the original.


We really are on a roll here this week because we have six completed windows and they are all nothing short of spectacular. Just look at this Magnolia Window that Cindy has completed.  This is actually Terry's design with a tweaking of the bud done by Cindy.  The colors, the work, and the textures, all make this another window that Cindy should be very proud of.  If you're looking for faults you won't find them here.


And then we move over to Paula, who is our newest student.  This is her first window with us and I'd say this window makes other students first projects look pitiful (students learning from most other instructors of course!)  Paula made this window look easy and I have to say that I'm expecting big things from her in the future.  I just love to put the pressure on!  Seriously though, this window is nothing if not perfection itself-- just look at those perfectly straight borders!


And then we have Terry's latest Duck Window.  She has this wonderful duo of ducks floating by some reeds while leaving a small wake behind in the water.  Terry went the extra mile by grinding holes into the center of the ducks heads to set the eyes thus eliminating an extra lead line in the ducks heads.  It may not seem like much but it makes a huge difference in the finished work.  And Terry's work always speaks for itself.


Also this week, Bonnie took a standard pattern and did something a little different to it that really brought her window to life.  By adding a thin colored border around the cross Bonnie has completely removed it from the background and defined it perfectly.  And using a similar yet different glass for the outer border really makes her window stand out in a crowd.  Another job expertly done.


Now we're moving to windows that are still under construction and I have to state for the record that I'm starting to think that Ann can make these small and intricate corner Fleur De Lis in her sleep!  She has all four for her newest window all cut, ground and wrapped which means that she'll most likely begin the larger (and infinitely easier) Fleur De Lis that will go in the center circle next week.  And then it's just background and border!


Becky B has started her next project and as you can see it's a Pony Window. But it's not your every day, run of the mill pony window-- it's an imaginary Pony.  Does it have special powers?  Perhaps so.  I'm sure I'll learn more as the weeks go by and Becky works on this.  She already has her ground cut out and will be working on the mountains and sky when she comes back in.


Then we have Becky S who decided to make this multicolored Cross Suncatcher that she had seen Janet make a while back.  Part of the reason she's making this is to gain some extra experience on soldering the outside edges of pieces that aren't covered in channel.  When she brings this back into class she's going to have me demonstrate how I bead my edges and then I'll let her do the second half while I watch.  The key is actually very simple-- move quickly yet thoroughly.  You want your lead to melt completely but you don't want to stay on the edge long enough to cause the foil to lift from the glass.  I have no doubt that Becky will do fine and I promise that you'll see this completed when she comes back in.


Brenda began grinding her CC window and discovered that the interlocking C's weren't readily recognizable when they bumped against each other in two places.  To fix the problem she cut a thin sliver of red glass and inserted it just below the top right end of the upper C and now she has perfection.  It's amazing how just a small 3/8 of an inch piece of glass can make something more readily recognizable.  I have no doubt that we'll see a border on this when Brenda returns.


Upon completing her Winnie The Pooh Window, Carol began working on her newest project-- a Wood Duck Window.  This is a fancier duck than we're used to seeing and although there are some tiny pieces throughout the head and bill of the duckI'm confident that Carol will be able to handle it.  After all, did you see the work she did on her Pooh window?! I can't wait to see this one completed.


Cindy has started working on this Texas Boots and Blue Bonnets Window.  This is another window with tiny pieces in it and to be honest, there are a LOT of them.  But Cindy likes working with smaller pieces of glass and will do what she normally does by working on this at a steady pace (Cindy doesn't know how to work slowly) until it's completed.  And then it will certainly be a sight.


Janet started this Modern Art interpretation of a guitar and I think it's a very original and eye catching piece.  I have no clue what she's going to use for her background but I suspect that whatever she picks will go wonderfully with the theme of this window.  She's got the hardest part of this cut out so the few remaining pieces should be a piece of cake for Janet.


Jeanne has started another Beveled Fleur De Lis Window.  She's discovered the importance of measuring rather than eyeballing measurements.  The points of a Fleur De Lis may look correct when you're place the pieces without a pattern but when you radiate lines from the points you will instantly see if a they are off their marks.  That said, this Fleur De Lis is perfect.  She has the beveled border for this already wrapped and the background glass was being cut when I took this picture.  Expect big progress next week when you see all three sections of this together.


Linda L's Poodle has certainly got a lot of compliments throughout our various classes and they've all been good.  She got her final border cut, ground and tacked into place and then applied a nice sturdy zinc channel around the edges during class this week.  The eyes and mouth on this poodle were a little more challenging than the other cuts but Linda persevered and is ready to begin soldering this puppy when she comes back in.


Lynn's Black Swan Window is really looking great.  I loved the pattern when I first saw it but having the majority of the glass cut out and seeing color on her pattern reveals just how beautiful this window really is.  Although the stone arch wasn't exactly planned for I think it really looks great and the remaining bricks talong the top will give this window a regal sense of style.  If Lynn plans on going with a border I'd go the full 9 yards and do a double border using a thin brighter color followed by a larger more muted color.


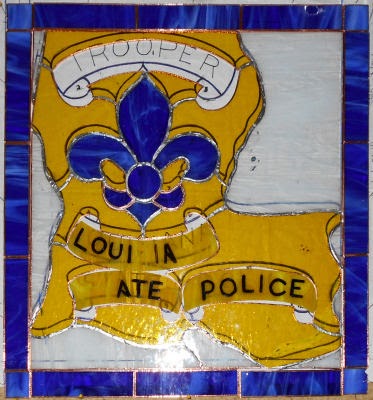
Martha's State Trooper Window is just about complete now.  With only the little 'turnovers' left to cut and just seven pieces of background glass I suspect that she'll be soldering this before you know it.  And the fun will really happen this week when Martha adds the text to the curved scrolls.  After this is completed I think that we'll be seeing Martha engrossing herself with a nice Octagon Iris window (which should occur in the not too distant future.)


Myrt has the front side of her Cross Window soldered and has taken it home with her to work on the second side.  The soldering job on the front is perfect and I have no doubt the second side will match the first.  And that means that this will be a completed project when she returns so we'll probably see  her next project get started when Myrt returns for her next class.


Rowena finished the grinding on her Humming Bird and Fuschia and then wrapped her pieces with copper foil.  She pinned them to her pattern and then proceeded to tack them together all the while being careful not to drip any solder over the edges since she didn't have her background glass cut yet.  Once the bird, flower and leaves were solid she placed them on top of a piece of her background glass and traced them out.  It's hard to see in the picture below but the two largest pieces of her background are cut and ground.  That leaves only 7 pieces of background left to cut before she adds her first border (which will be bevels).


And after completing her Duck Window Terry started working on her Flying Pig (I kid you not).  This isn't the first time we've seen this pattern done-- I know that Cindy has made a few of them and I even suspect that Terry has made on in the past.  I'll verify that rumor when she comes back in.  There's just something about that corkscrew tail...


And before we go I'd like to show you the original picture that Betty originally brought in to class so we can compare it to her finished window.  We've removed a ton of superfluous lead lines (which are always distracting), and made the flowers and bud more natural and less 'stumpy'.  Then we made sure that all the leaves lined up (just look at that mess to the right of the lower Iris in the original).   Finally, we drew in a more realistic dragonfly, and added a long, tall leaf to add balance the top left of the window.  I may be biased but I do have to say that Betty's window is far more graceful, flowing, and realistic.


And that about wraps things up this week.  Classes are set to start again tonight so the fun begins yet again!  Come back next week for a report on what happens next on our cutting tables.

Paul