Monday, June 24, 2013

Put your Sunglasses On

I've been stressing good soldering a lot lately and it's been paying off in spades here.  All of our students have shown great strides in achieving perfect solder lines and there's marked improvement in everyone's work in general. It's always nice to see a student finish something that doesn't require excessive touch ups and I know it makes our students feel proud!  With that said let's look at what everyone has been doing.

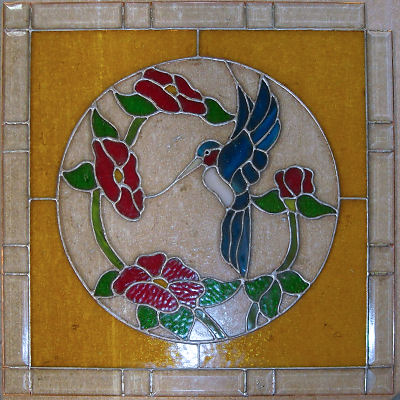
Mary Grace has put the finishing touches on her Flowers/Humming Bird Window so it's left the shop never to return again.  After she made the circular insert with the bird and flowers she told me that she wanted to use bevels as a border so we laid them out,  measured the inside edge and cut the yellow glass to fit in the opening.  Since bevels only come in certain sizes you always have to adjust the size of your center to fit whatever opening your bevels create.  Mary Grace, luckily, mentioned bevels in time to adjust her pattern by adding and extra inch and a half to the height and width.  And it all came together making this window look GREAT!


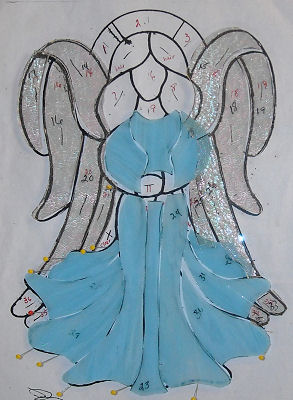
We also saw Betty complete her latest Angel window and as always, it's a real show stopper.  She soldered this at home and I have to say that it didn't take me but a minute or two to touch up a few rough joints here and there (basically on the back where it's harder to solder). Betty's soldering is coming along nicely and she's making project after project to make sure she doesn't forget anything that she's learned.


Brenda came in with her Purple Cross Window completed save for some hooks to hang it by.  I've been dwelling on soldering lately and I want to mention that I think Brenda's soldering is showing great improvement with each passing project.  I think our students are understanding that moving slower with your soldering iron is the key to a very even and clean application of solder. And this window proves it!


Martha didn't manage to solder her window while she was at home during the week but as I suspected, she managed to completed it during class anyway.  And I'm talking about soldering both the front AND the back of her window!  She had a few difficulties on the second side but that was only because she picked a very bumpy glass for her background which makes the soldering tougher than normal.  But, as you can see, that didn't stop her window from coming out picture perfect!


Terry had two completed windows this week and this is the first of her completed set.  She decided to make a beveled cross of her own using five diamond bevels which worked out perfectly.  I'm always impressed at the way Terry will take a basic idea and then run with it making it her own.


Terry's second window was a Fleur De Lis that incorporates some of the same glass that Martha used in her FDL window.   Terry went with a different interpretation of the Fleur De Lis but the end result is always the same-- a stunning window.


Not content with just having two completed windows Terry also worked on yet another variation of a Fleur De Lis as well.  This one is amber trimmed with a translucent black glass for some added drama.  It's hard to see right now since the pieces are in the process of being ground but just wait until you see this next week!
.

Look out because here we go!  This week we take a good hard look at the lamp that Bonnie is making and it's no longer just a jumble of pieces.   What you're seeing is one third of her lamp which will be repeated 2 more times to make the complete lamp.  Every last piece has been cut, ground and wrapped and Bonnie now has all the pieces in place so they'll transfer quickly onto the mold.  This is a project I'm really anxious to see completed!


It appears that Fleur De Lis' are back in fashion again because what we have here is a look at the window that Ann started (and nearly completed) this week.  The only thing left for her to do is solder it which is what Ann plans on doing when she comes in for her next class.  I don't see anything preventing this from being a completed project next week!


Susan's newest project is our second lamp this week.  This one is a panel lamp and she's already made a lot of progress on it.  The pieces of wooden yardstick have been nailed into a wood board to form a template that she'll construct each of the the four sides of the lamp in.  This will ensure that the angles of each section are all identical so that they line up perfectly when the four panels become one lamp.  And judging by Susan's cutting I'd say that this is going to fit together wonderfully because what you're looking at hasn't even been ground yet!  And that's the benefit of cutting off your lines while you are cutting your glass pieces.


Shelley's Dog Window is amazing me more and more each week.  With just the ground surrounding the water, and the dog itself left to grind I'm saying that this is a project that Shelley can certainly be proud of already.  We're not exactly sure how she's going to do the face but we're leaning towards painting the eyes on the glass since they're just too small to cut.  We're a 'fly-by-the-seat-of-our-pants' kinda operation here at times but as they say, 'Necessity is the mother of invention' which is just a more verbose way of saying that 'We Always Manage.'


Betty resumed working on her Fleur De Lis Window by tacking it all together and then added two borders. You might recall that the original pattern only had one border but that doesn't stop us from adding as many as we want at any given time.  I think the double border  makes the window look rather classy myself.  And I have to point out how perfectly Betty's diagonal cuts line up-- they're perfect!  That is the most important step to make this window look correct and Betty has most certainly done it.


Brenda is certainly on a roll with her beveled cross windows.  This is a look at her second pass on this particular variation.  She's using blue glass for the cross and maybe even possibly the border but we'll know for sure when she returns next week to finish this up.


Cindy has just blown my socks off with the workmanship she's showing in this window.  Not only is she moving quickly but she's also managed to achieve absolute perfection with her cutting and grinding.  There's not a single piece out of place here  and I couldn't possibly do a better job myself.  Nice work, Cindy!


And speaking of nice work, Linda's Vegetable Window is more than just 'coming along'.  Her pieces all fit together wonderfully, her colors are spot on and it's a sure bet that the lion's share of the work on this window is well behind her now.   When this is finished it's going to make the Faux-Glass panel that she had in the opening look downright bad!  And I don't think it's going to be too much longer before this is finished.


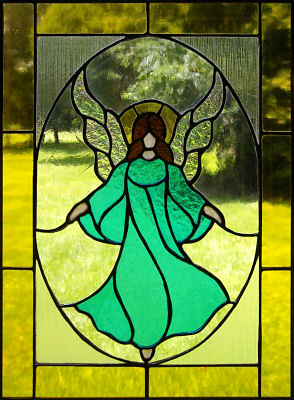
And Mary has done some marvelous work this week as well.  Her Stained Glass Angel is almost completely wrapped which means that she'll either be soldering this or already have it soldered when she comes back to class.  I was most impressed with Mary's cutting last week.  the toughest part of this will be soldering around the outside edge, but it's like riding a bike-- one you do it there's no way to forget how to do it.  Just wait until you see this all lit up (possibly next week!)


Myrt has a sky!  Or rather her Hot Air Balloons have a sky.  Everything is now tacked together and she spent the last portion of her night with us trying to pick out the perfect color for her border.  We've gone through scads of glass and think that the answer lies in a light, honey amber glass that matches the Fleur De Lis balloon.  Since all this needs is a border I can safely say that Myrt will be soldering this shortly!
 

We're going to sign off with a look at Mary Grace's second project with us.  This is a flower that she cut out that will form the top lid of a box that she started this week.  With the flower cut out and ground I'd say that she'll easily have the top lid completed when she returns to class in 3 weeks after she gets back from her vacation in Alaska (yep, I'm jealous)!

Wow, we have full classes all throughout the week and it makes for a lot of picture editing and writing once our classes are over.  I've been doing a decent job keeping things up to date lately  and with this many students (18!) I'd best not fall behind for fear of never catching back up!  LOL
 
Paul
Bayou Salé GlassWorks

Monday, June 17, 2013

Don't Wrap Your Scraps!

Separating your scrap from your finished pieces while you cut is something that can help keep your table from becoming too cluttered. I personally like to drop all of my waste directly into the trash rather than onto my work surface and I also like to place my cut pieces directly onto my pattern.  Doing this not only shows the progress that you're making but also prevents you from mixing scrap pieces in with your good pieces and, even worse, throwing any of your good pieces away!

So first off on our completed projects this week is Terry's Flower Bouquet Window.  It's a fairly large window at almost 2 feet by 2 feet and it's a perfect design to go wild with color.  Terry drew up the pattern herself and when she asked me to touch up the back side because she 'messed it up' I was expecting some major work ahead for me but Terry was making mountains out of mole hills because there was hardly any touching up to do.  And you can see that the front side is soldered perfectly as well!


Next we take a look at Ann's Geometric Window.  This will be the last time we're going to see this project because as you can see, it's now completed!  I was going to give Ann the Gold Star of The Week for soldering because her work on the second side just went above and beyond, but there was another student that did just as wonderfully as Ann and I can't possibly pick between the two of them since both did exceptional jobs.  But I will say again that Ann's soldering was something to behold on this window which places Ann in a tie for first place for soldering this week!


Betty completed this Modern Art Window and finished it off with a thicker Zinc Channel to give it some extra stability.  Whenever you have a window with straight lines running the complete length or width of the window you know you need some extra bracing to prevent it from 'folding'.  Another way to help stabilize the window would be to add a border but this window doesn't really lend itself to a border.  Luckily, it does work exceptionally well with the thicker zinc channel.  Betty's cut lines are all perfectly straight which really makes or breaks this design so this is another project that she can certainly be proud of.


Donna has been working far too hard at her new job but she was back in class this week and made another of the 3D Stars that seem to be so popular again.  I must confess that I usually make one or two of  these in December and watch as most of the students make 2 or 3 of them themselves for gifts.  Donna appears to be very well be ahead of the game in this respect and her work on this is stunning.


Jane started this panel at home and came in with the amber Fleur De Lis cut out, ground, wrapped and tacked together.  While she was in class she cut out the background, fit the borders to the 4 square bevels in her corners and then soldered it as I watched.  And I have got to say that Jane is the second person to get our Soldering Award this week.  Watching her solder this window was amazing to me because I saw so many of my techniques come into play as she flowed the 50/50 lead onto all of the foil.  I didn't have to touch up a single line or joint  and I'm thrilled with both Jane (and Ann's) soldering this week.


You know when you see our standard Stained Glass Butterfly that we have a new student in class.  This pastel violet butterfly was Helen's first project with us and judging from her work on it I'm going to say that it will be the first of many great projects.   Helen had no problems at all so I can't wait to see her move along to a full fledged window (the pattern of which will remain a surprise until next week).


Betty started cutting out this advanced Fleur De Lis window while she was in class and I'm impressed with the progress that she made in just one class.  When you get right down to it all of her cutting is completed (save for the border) so that means that she's free to begin grinding it.  Her background is a very heavily textured amber and the actual FDL is solid black.  It looks great already!


Brenda's Cross Window is all cut and ready for the border to be attached.  There's something very elegant about this window and I'm not saying that just because I drew it up--  I think it's the use of the five Star Bevels throughout the cross.  And the idea of matching the border to the cross glass allows the viewer appreciate the design rather than the distracting them with extra color.  Brenda will most likely have this very classy window completed next week.


Cindy started working on her version of Terry and Brenda's Red Fish Window.  She's changed the background completely to make this her own and is doing a great job.  Cindy is grinding everything as she goes along which is something that I generally frown upon, but she's been making stained glass for so long now that I know her cutting will be spot on without any need for adjustments later on.


Wow, just look at the progress that Linda has made on the Vegetable Window for her kitchen.  The pattern comes from a faux stained glass window that she's had for years and now that she's making real stained glass she's decided to replace the fake one with this.  We've readjusted a line or two so that the cuts will all be possible but by and large this pattern is almost identical to the original window.  And just look at all the glass that Linda cut this week!  It's really taking shape quickly.


And speaking of vegetables, Bonnie is about as happy as a rabbit in a carrot patch now that she has all of the pieces for her lamp cut AND ground!   As our regular readers know she's already begun wrapping her pieces at home and this week she took the remaining pieces.  That means that we'll start seeing progress real soon rather than looking at her mold each week.  That's not to say that she's been doing nothing-- far from it.  With a lamp you don't see all the work that's been done until it starts going onto the mold.  And Bonnie will be doing that shortly now.


 Here's another Fleur De Lis and this one is being made by Martha.  With her double border all tacked in place and the brass channel attached I'll say that she certainly sees the light at the end of the tunnel now!  Honestly though, Martha made this window look easy.  It's perfectly symmetrical and perfectly square and all the curved lines even line up as well.  If all goes well she'll have the front soldered when she comes in but that's going to depend on her schedule at home-- she's a busy one!  Nonetheless, this is very near completion now with just the soldering left to be done.


What a difference a little grinding makes!  Last week it was hard to see just what Shelley's window was going to look like and now that she's got one class of grinding under her belt it's all coming together.  And, as she even pointed out herself, she got this far pretty much on her own with no hand holding.  And that means that Shelley is officially past the beginner student stage.  :-)


Mary finished her Iris Window last week and began making this large free standing Angel this week out of a light, pastel blue glass.  She already has the gown and wings cut out leaving only ten pieces to go before she moves onto the grinding stage of this project.  Her cutting is proving to be her strong point and I have no doubt that we'll see this completed very quickly.


Mary Grace had the front of her Humming Bird Window soldered and then moved onto the back side.  By the time she left  class she was more than three quarters of the way through it.  Her soldering has improved dramatically and this window will certainly be completed when she comes back in on Wednesday. 


Meanwhile, Susan is doing something completely different for her latest project.  She's decided to make a four sided panel lamp based on a classic geometric stained glass window design which I think translated to a lamp perfectly.  there's no doubt that this is going to be stunning.  You can already tell just by looking at the pattern.  Susan has traced out a lot of pieces onto her background glass and is now ready to begin cutting.


Terry not only finished a window this week but she also started working on a small Beveled Cross as well as a classic Fleur De Lis window in amber tones (which also seems to be a trend now).  I love how when Terry hits a lull in a project she'll begin another project that she can continue working on rather than sitting by idly!  That's why Terry always has two or three windows in the works.


And Tim has decided to do a 5 inch Christmas Ornament based on the classic Nativity scene.  Here we have the star, Mary, Joseph, and a swaddling baby Jesus.  Tim took it somewhat easy this week (which is understandable considering just what he's been accomplishing lately) but he's got everything picked out for this and is ready to go.


And that about does it for our weekly update.  There's rarely a week that goes by without at least one completed project and next week looks like it won't be an exception to that rule.

Paul
Bayou Salé GlassWorks

Monday, June 10, 2013

You Have 45 Seconds to Leave The Premises

Before we jump into things we're going to talk a little bit about taking your time to finish a project faster.  I know it sounds counter productive but you must trust me when I say that when it comes to stained glass, slowing down can actually save you time.  There are numerous examples and I'll name 3 of them just off the top of my head.  1) When you cut your glass it always pays to slow down and be as precise as you can.  Yes, the grinder can fix cutting errors but the grinder should not be used as a replacement for your cutter.  You can either spend 2 minutes cutting your piece of glass INSIDE the line and then 30 seconds at the grinder or you can leave the line on your glass and then spend 4 or 5 minutes trying to fit it into the correct shape.   2) Remember that your soldering will only be as good as your foiling.  There's no way to fix a badly wrapped piece once it's been tacked into place.  Take your time wrapping and you'll find that soldering is MUCH easier and quicker.  And finally we have example number 3) DON'T RUSH YOUR SOLDERING!  Having to re-melt solder while applying more from the spool takes FAR more time than it does to simply slow down and do it correctly on the first 2 or 3 passes.  I have re-soldered many  windows in my life it inevitably takes 4 or 5 times longer to re-solder a window than it does to just take your time on the first pass.  Remember that if the lead isn't completely melted you cannot press onward. I know that time is of the essence but if you can't bake a cake in a half hour no matter how much you rush it.

Those are the biggest tips I can give anyone when it comes to making stained glass.  Rushing to finish something only slows you down in the end.

So with that out of the way what will we start the Blog off with this week?  Let's start with Mary's first completed window with us-- Her Octagon-ish Iris.  Sadly, the wispy white sky has blended into the background so you can't see how perfectly the grain lines up on each piece but trust me when I tell you that if this picture were taken in the daylight you'd see one of the most perfectly cut skies that you could ever hope to do.  Even though it's not exactly visible in this picture you can't deny that the work that Mary did with this window is exceptional. 


Meanwhile, Linda completed her Classic Pattern stained glass window this week also.  She took her time to make sure that everything fit together with a little extra room for some foil between each piece and the end result is a project that anyone would be proud to hang in their window.


Next we look at 3 different shots of Susan's stained glass Fleur De Lis box.  Some readers haven't understood the concept in the past so rather than just posting one picture I've taken multiple pictures with the lid slightly ajar so you can see exactly why we call this a box.  Susan took her time and in the end this was a quick project that needed no touching up at all.  Way to go, Susan!


And Tim went hog wild this week and completed a Mini 3D Star, a Mini Beveled Snowflake, and a beautiful beveled cross.  Any of these three beveled pieces in a sunlit window will throw tiny rainbows of light into the room which is sure to catch anyone's eye.  Tim really has the hang of things as you can tell by his impressive work with us.


Cindy also made multiple suncatchers this week.  Her two flowers are a perfect size as well as her flying pig!  And her soldering is something that I have to sing praises about because in the end I didn't have to touch up anything on any of these 3 projects.  Even Cindy's edge work was perfect and that is the sign of a student who's learned her stained glass lessons.  Way to go Cindy!


Now we'll take a look at what we have that's still under construction.  Martha worked on her latest Fleur De Lis Window and now has her background all cut and ground.  She also has most of it wrapped so she'll be doing borders when she comes back in.  I don't know how Martha feels about borders but I always look at them as the light at the end of the tunnel!


Brenda decided to make another cross window but this will be slightly different from her past 2.  This window features the cross centered in the background without an oval surrounding it.  There will be 8 places where she'll need to use the small grinding wheel to get the cross to fit perfectly but the end result will be stunning.  Brenda will just take it 1 grind at a time and before she knows it she'll be ready to add the border to it!


Ann now has the front of her window soldered and only needs the back side to go before it's completed.  I'd say that this will be headed home when she comes back into class so expect a completed picture of this when she returns next week.


Mary Grace was certainly hard pressed to pick a color for the 4 corners of her Humming Bird Window.  She narrowed the choices down to 3 different colors and in the end used the luck of the draw to chose between them for a winner.  As you can see the Yellow/Amber glass came out the victor!  (She more or less flipped a coin to make the decision!)  And it looks GREAT!  She's brought it home with her to solder so I can't wait to see what this looks like when she comes back in for her next class with us.


Myrt's back to work on her balloon window and she's now got everything cut but the sky.  She managed to knock out both the land and the mountains this week which leaves only 5 pieces of glass left (plus a border).  That means that this is yet another window that we'll see tacked together next week just needing solder to finish it off.


And speaking of solder, Terry's bouquet of Flowers are now ready to be soldered!  She has the front  finished already and that means that with only the back side to go she'll most likely wrap this project up and put another notch in her lipstick case next week!  I have to admit that we've already looked at it held up to the light and it's definitely a keeper!  You'll get to see that view of this window in our next post.


Lastly, just when Shelley thought she has all of her glass cut out for her Dog Window she ended up dropping one of the large pieces of grass.  No big deal though-- at least it wasn't the incredibly complex water piece!  It will be easy enough to replace it and then I suspect that she'll be working at a grinder getting this to all fit all together and really start to take shape.


And that about does it this week.  I suspect that we're about to be overcome with completed projects over the next two weeks so look for our update notices and check out our posts to see the finished versions of the projects you read all about this week.

Paul
Bayou Salé GlassWorks

Monday, June 3, 2013

The Garden Club Has Abducted Myrt!

Something I've been hearing a lot in class are questions like these:  "Is it ok to make a Fleur De Lis using amber glass?", "Can I use this glass as a background?" and "Can you have a red flower next  to a yellow one?"  My favorite question, however, is "Should I use this glass or that one, which looks good to you?"   Rest assured that by and large there is no right and wrong when it comes to picking colors.  It's a personal choice and as I always say, "Don't make a window to hang in your house in the color scheme that I like-- I'll  likely never see it after it walks out the door.  Please yourself with your colors!"  That said, there are obvious places where you may not want to use a certain color.  Do you really want to make black daisies or an orange rabbit?  There are only a few rules that I use when it comes to making glass and I'm going to assemble them and begin posting them over time.  The problem is coming up with these rules because stained glass is an art form and everyone knows that in art rules are always begging to be broken--it's called Artistic License.  The simplest way I can explain it is as follows: if it doesn't look flat out wrong then it's a valid choice.  Follow your heart!

So with that out of the way let's look at Brenda's Red Fish Window which is no longer giving her any more grief because it's been hooked, skinned and placed in the freezer which, in glass terms, means that it's finished.  In fact, I think it's safe to say that by this point in time it's most likely hanging in the window that Brenda made it for.  Isn't her orange-red border a perfect fit for this window?  Brenda had originally picked a more orange glass (which would have been fine) but in the end she decided to match a color that was already used in the window.


Jane returned this week with a scar on her wrist but plenty of determination to complete this Angel Window that she was working on before she had her carpal tunnel surgery.  She said that she wasn't really up for cutting yet but all that needed to be cut were the strips for her border so I cut them and then sectioned them off so she could easily skim them at the grinder, wrap them and then spend most of her time soldering this window.  By the end of the night she had it completed and ready to go. Voila!


Tim started and finished a 3D Star made from smaller bevels than the standard Star (which is made using 3x3x3 bevels).  This one is half the size and features a circle bevel in the center rather than a square.  The circle actually fit too precisely so we had to skim it a bit to make sure it would fit within the empty square the triangle bevels form when joined together but the end result is something that was really unique and wonderfully compact when compared to the openness of the 3x3x3 version.  Sadly, the larger ones are more cost effective since 2x2x2 bevels cost almost double the price of the larger ones (and are harder to find).  But if you're making this for yourself it's a very nice addition to our 3D Star lineup.


Linda continued working on her Traditional Stained Glass Window by adding her final two borders.  We always add borders last, one at a time, to ensure a perfect fit and that's exactly what Linda did with this window.  Once the center section was tacked together we cut the strips for her inner border and once that border was tacked into place she cut the final clear border which matches her background glass.  Now that it's all cut and tacked together I suspect we'll soon be seeing this featured as a completed project.


This week we also got to see Betty learn the basics of cutting the four corners that square out an oval window.  The trick is to start with a perfect right angle on each of the corner pieces and then grind the curve to match  the oval.  Then once it's all tacked together you can cut your strips for the border and call it ready for solder!


Martha started working on a Fleur De Lis window this week and she's moving along nicely.  With the centerpiece all cut, ground, wrapped and tacked the toughest part of this project is easily behind her.  Next week she'll work on her background and possibly do some border work also.


This is it!  This is officially the home stretch of Ann's Geometric design window.  This week she completed wrapping all of her pieces and then tacked the large half circle together.   To save space while she's been working on this I've truncated the pattern by squeezing it in from both ends so in reality it's a bit wider than what you see here.  You'll see it's full length next week when Ann cuts the background glass which joins everything together before she adds her border.


Mary continued working on her Iris Window and by the time she left class she was ready to begin soldering her window.  She had cut the glass for her sky last week and when she brought it back into class she had it already tacked into place.  The unique octagon shape of this window made cutting the border a bit tricky but once you know the trick of measuring out the angle with the next piece of glass it goes quickly enough although, for some reason, I always have to re-grind a piece here and there to get it to fit perfectly.  Nonetheless, Mary now has this window ready for soldering and we'll certainly apply the brass channel to it next week.  In fact, it may even be completed when we see it again!


Susan managed to cut out the background to her Fleaur De Lis Box and got the border done as well.  Since the Fleur De Lis actually cuts into the border on the left and right sides she needed to take her time to make sure everything lined up perfectly.  In the end it certainty did and she was also able to add a hinge across the top as well as solder and color it as though it were a finished piece.  With the top 100% complete there are only 5 pieces of glass left to cut and assemble to form the box bottom and that means that this will be finished when Susan returns.


Bonnie continued cutting out the glass pieces for her 16 inch Baroque Lamp and believe it or not everything is now cut!  Alas, she also thought she had everything ground but then she looked in her box of pieces only to discover a few dozen more that still need to be ground.  But that's just a  small bump on the road to her completing what is sure to be a beautiful lamp very shortly.  Rather than showing you a cardboard box filled with random glass pieces we'll take a look at a drawing of what her finished lamp will look like. 


Shelley's been hard at work cutting the glass to her Dog Window.  Her colors are muted and flat which lend to the cemetery setting of the window and will also make the vibrant blue dog itself stand ot prominently in the scenery.  With just the dog itself left to cut I'm going to guess that Shelley will be grinding this when she returns for her next class.


Terry's Flower Window is certainly turning into a very colorful bouquet.  She has violet flowers next to pink flowers, yellow flowers next to blue flowers as well as dark green leaves mixed with light green leaves.  The basic color scheme here is pastels when it comes to the flowers but she isn't limiting herself to those shades (as made apparent by the deep red and purple scattered throughout). As you can see she has it all ground and will now be spending her time wrapping all the pieces that make up this colorful window which will surely impress all who see it.


Lastly we look at the project that Cindy started and pretty much completed in class this week.  It's her famous Flying Pig Suncatcher!  She started out by cutting the pattern and then tracing it all of it onto her glass and by the time she left for the night the front side was even soldered.  With just the back side to go I'm sure she'll be working on a new project when she returns next week.


In wrapping this up I'm going to go back to our conversation about what's right and wrong in color choices.  The projects our students make are an expression of themselves and if something looks good to you them then it will most likely look good to others.  Everyone has a basic understanding of colors so it's really hard to go wrong but if I see someone about to make a bad choice I always suggest that they rethink their choice.  When I was a child my grandmother had about 15 coloring that my sister, my Aunt and I would color in when we would visit.  There was a Hansel and Gretel coloring book that I will never forget because our 'rule' was to color the pages in colors that made no sense.  Hansel might have a red arm and his other arm might be green.  The grass might be purple on one page and the bread crumbs might be black on the next.  When the book was completed it was really something to see and made quite a statement.  So much, in fact, that although I can't recall what any other of the coloring books were I can easily remember the Hansel and Gretel coloring book. Although it was all 'wrong' it was something  striking and not easily forgettable the way our stained glass should be.  In other words, don't be afraid of color--embrace it!

So until we return in about seven days time we hope you all have a great week and keep coming back to look at all the great work that our students push out on a regular basis here in the shop.

Paul
Bayou Salé GlassWorks