Monday, September 27, 2021

One, Two, Three, Four

If something bothers you about a pattern, fix it.  Over the 40+ years I've been doing stained glass I've seen countless patterns both good and bad but more than anything else I've seen great ideas that were handled poorly (in my opinion).  Long ago I began 'tweaking' little things about patterns I'd make (even though I had no artistic skills) and over those 40 years I've become competent when it comes to pattern drawing.   Even if you feel you don't have the skills I can guarantee that you can make simple adjustments.

Below is a pattern that one of our students sent to me asking if I could resize it to fit within a certain set of measurements. The adjustment was fairly simple-- I only needed to stretch it a few inches wider than the original but the cardinal itself just looked incredibly off to me especially around the face, legs, and 'branch' areas.   The lead lines were also very distracting with most of them being completely unnecessary so I looked for different cardinals online and found a free Spectrum pattern that I thought looked much, much better.

After drawing out the borders to the size needed we simply scanned the free cardinal pattern into the computer and then printed it out to the width we needed.  We positioned it inside of the empty borders and then drew lead lines running outward towards the borders ONLY where they were necessary.  We also changed the branch that the bird was standing on from a lead line to a thin brown piece of glass.  We did the same for the birds legs but in all honesty the free spectrum pattern did that for us.  The difference is night and day.  The original is on the left and our modified pattern is on the right.  Which looks cleaner and more recognizable to you?


So them first up we have Mary's Dueling Hummingbirds and just as I thought, they are beautiful.   What amazed me most about this was that Mary said she was going to do an easy window.  then she showed me this pattern.  Easy is not a word I would use to describe it!   There are  a lot of tiny pieces in it but in the end all of those small pieces are what make this project look so good.  Her use of mixed colors throughout the birds helps as well!  Gorgeous.


Okay, so I've been talking a lot about Christmas but Halloween is going to arrive even quicker than Christmas!  We aren't seeing much done in terms of Halloween projects but maybe it's because Kerry's Red Haired Witch just looks so darned great!  I thought witches were supposed to be ugly but then again, this IS only her back side.


Judy's Cardinal Window again in a slightly larger view.   The end result is stunning and her elaborate border draws your eye to the entire window rather than just the border itself.  That can be a difficult balance but Judy surely pulled it off nicely.


Cheryl finished her Wedding Box just as I expected.   Once the top lid section is completed the box itself is only 5 pieces of glass cut out on a strip cutter.  It can't get any easier than that.   The amazing thing is just how elegant the finished product looks, don't you agree?


Sheri's latest is a Humming Bird Suncatcher.  Sheri has come a long way and works quickly and efficiently while at home. 


And a one, and a two!  Here are Susan D's latest Christmas Ornament-  these having been made with colored glass rather than as solid lead.  I have to say that it's a good look either way these are made.


Ann started tracing and cutting two Christmas Ornaments and already has one cut and ground while the other only has four more pieces left to cut out.  Christmas may be coming quickly but so are Ann's Ornaments.


Barbara got her Cardinal Panel ground and wrapped and then proceeded to tack it together.  Once that was done she realized that she still had time to get her border cut.  This could possibly be completed when we next see it.


Lara's working on a beautiful multi colored Sunburst design and colors are surely not getting in her way. This just has such an abundance of color that you can't help but love it.  This is going to rock.


White on white-- it's my bane as a stained glass photographer. Below you see Sheri's newest creation but what you can't see is the essentially white moon face while it's resting on top of the white pattern paper.  More will be revealed, especially after this is wrapped, in the weeks to come.


Cindy's stack of books is about halfway cut and ground and her use of color is also off the charts in a great way.  There will be nothing boring about this LARGE suncatcher when it's completed. 


Bee came back this week and her five Flowerpots Window is almost completely ground now.  With just the center flowers left to go I think Bee will be wrapping this before you know it.  Once it's all round you'll love these blooms!


Here's something I haven't seen made in class since I was teaching in Pennsylvania 21(!) years ago.  This will be a 3D Chess Board when Kerry completes it but it can also double as a Checker board as well.  For this to go together neatly and evenly a strip cutter was used to cut 32 red 2 x 2 squares and then 32 green squares in the same size.  The cutting went so quickly that Kerry now has 64 squares all ground and wrapped. 
 
 
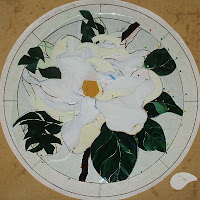
Tracey managed to finished wrapping her Magnolia Window and after it was tacked together she got a green border cut out as well.  It won't take long to grind these to fit and then, after wrapping them, Tracey will begin putting a finished solder bead on this project.


Martha's window is all cut out now and she's just grinding her letters so we can see what it all says.  'Tiald Lore' is what it looks like to me right now but when it's finished I guarantee that it will clearly say, "Build Your Life".   All things in time.  Oh, and Martha will attest to the fact that text in stained glass IS a beach!


Jan's Eagle is not only completely tacked but the front side is completely soldered as well.  I have to say that her soldering on this was astounding as I only finished about fours lead lines at the end of class so I could report here that the front is now completely soldered.  No touch ups required.


Melissa filled in the missing pieces of her Butterfly Window and the butterfly's Antennae are a work of beauty.  It's all too easy to not get the pieces properly aligned and end up with a disjointed antenna but not when Melissa is doing the work.  She also got her first border cut and ground which means that she only has one more border to go before she begins soldering this.


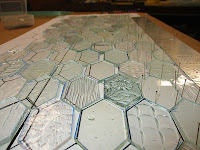
Here's MiMi's latest Cabinet Door Insert.  If you look closely you can see that there are only 3 complete columns of Hexagons in this latest version.  This is down from upwards of nine columns in some of her previous windows.   I'm thinking that this will be finished before you know it.  In fact, I'd call this the Home Stretch now.


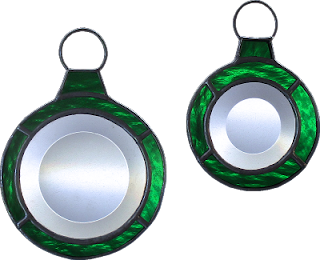
You saw two of Susan D's latest Christmas Ornaments at the top of this post and we're ending it by looking at her next six.  It's always about numbers with Susan.   1, 2 ,3 ,4 come on baby say you love me, 5, 6 7 times! 


And there you have it!  A VERY, EXTREMELY, AMAZINGLY early post straight from the Bayou Salé GlassWorks computer.

Paul


Monday, September 20, 2021

Is That A Dollop Of Whipped Cream?

Get ready for a BIG, big tip.  As soon as you open a new roll of foil be sure to take out your marker and write the size of the foil on the center core.   If it's black or silver backed foil note that on the core as well.  If you use your foil outside of your own glass workshop (such as here in our shop) then also include your name.  It's a huge time saver and your name ensures that even if you forget your foil in class that you'll end up getting it back.   Your name should also go on all of your tools as well.  One quick glance tells me that this roll of foil is 3/16 black backed foil and it belongs to the shop.   That's surely easier than borrowing other rolls of foil and trying to match their size against your unmarked foil, isn't it?


Shelley put the whiskers, eyes and mouths on her Squared Cats Window and called it a day!  Actually, she finished soldering it and cleaning  it so that I could take a picture of her cats but they didn't have the eyes or mouths on them when she left because she was going to do that at home.   What you see below is me photoshopping eyes and mouths onto her windows.  I was going to post it without them but they looked so soulless that I had to do something!


Lara's Flower Hair Band is incredible mainly due to the delightful colors that she used.  She made quick work of this and once again her unique pattern attracted a lot of attention in our other classes.  Looking at the finished piece it's easy to say that it's no wonder people are asking about it!


Cindy's Bubbling Champaign Glass  is another magical piece.  I'm rushing through getting this post done on time so I didn't go into detail about how this was so easily cut out but that will happen next week for sure.   Meanwhile, let's make have a toast to Cindy's wonderful window!


Sheri's Green Bay Packers Helmet was completed this week and the end result is perfection.   I have to say that her soldering is incredible even though it's hard to see on this piece. Sheri also plans to print the number 13 on the black ear piece of the helmet with a paint pen when she gets home to help personalize this for her customer.  Go Green Bay!


Number 6 is officially out the door.  Or should I say IN the door???  Here's MiMi's latest window as we saw it in the shop.
 
 
And here's MiMi's insert mounted into place with its 5 brothers and sisters.  She has more than a few more of these to make but from here on out the inserts will be much narrower than the ones you see here.   MiMi did what I always do-- she did the toughest pieces first.  That makes it easier and easier to see the light at the end of the tunnel! 


Ann completed the cross that she began last week and you can see how she arranged the pattern pieces on her sheet of glass to that each arm of the cross contains only one dark piece (as well as the center).  Many people just place their pattern pieces however chance lands them on the glass but you can make things look much better with planned glass placement, as Ann proves here.


Susan D has two more Angles finished and the gold one was made with Van Gogh Glass.   The picture actually came out very clearly and shows you exactly what Van Gogh glass is--  Glue Chip glass with a colored mirror backing.  Perfect for an Angel, don't you think?   


Barbara H started a small Cardinal Panel and to do that she'll cut, grind, wrap and tack together the cardinal (and the leaves) before cutting any background glass.  As you can see, she's well on her way to completing the first step in the creation of this panel.


Cheryl has a wedding Invitation box to make and she's starting her series of boxes with a nice simple yet elegant design that frames the invitation with two different borders.   She's got the top of the box completed which means that the bottom will be done as soon as she comes back.


Cindy has begun working on a large stack of books which will end up becoming a large suncatcher. She's making this one book at a time using mostly scrap glass and I think it's the perfect way to handle this many multi colored piece.


Last year Shawn made a Christmas Ornament Window  and this year she's making the ornaments that were found in her window as separate suncatchers.  Ann is also planning on making some of these and Martha also expressed an interest which is why I already had the ornaments scanned as individual pattern sets.  Shawn, though, is the first to start these.


Christmas has very much been rung in here at our shop and Annette has also decided to start making Holiday Suncatchers.  She's begun working on a Mary And Child suncatcher and she's already set to begin grinding her first one.


I only have two words to say about Martha's latest project:  Build Life.   Why?  Because those are the two words that are the only things left that Martha needs to cut out.  She started with the word YOUR this week and by the end of class she's pretty much decided that cutting out letters is for the birds (so to speak).


Jan got her Eagle and Flag tacked together and then she filled in four missing pieces before adding her first (and final) border.   This is the last of the Blue Baroque that we're likely to see.  Barbara has been holding onto a small piece since Spectrum went out of business a few years back. Jan asked us if we could get her a sheet of it and when we told her that it was no longer made Barbara graciously gave Jan enough to do her border.


It does NOT take Tracey long to cut and grind a window.   She had about a quarter of this ground when she walked in the door and just three hours later the rest of it was ground as well.  Her window is now ready to be wrapped in copper foil.  This Magnolia design is always a winner but I think it gets better and better with each one that we see made.


Everything has been cut, ground and wrapped for Mary's Dueling Humming Birds Suncatcher and when she comes back in she'll begin soldering.  There's actually a chance that this could be finished next week and I'm just about dying to see this with some light behind it because I already think that it looks incredible!


Judy M got the elaborate border of her Cardinal Window ground and tacked together which means that she'll begin soldering this when we see her next.  Everything has come together nicely for this and once the channel is attached the edges will become perfectly straight again.   That's the beauty of using channel and NOT using a square to line things up.  It allows any flaws to be hidden by the channel. (Not that this has  any flaws!)


Kerry's Witch is another window that is  so very close to being completed.   In this class Kerry got both the front and back sides soldered as well as getting a channel attached.   With the back side soldering looking perfect the front side only needs to be gone over and smoothed out before Kerry can call this a completed window.  Expect to see this finished when we return with our next post.


Melissa is getting closer and closer to finishing her Butterfly and Iris Window.   I have a sneaking suspicion that she'll get her two borders attached next week and after that, well, let's just say that soldering is all down hill for Melissa!


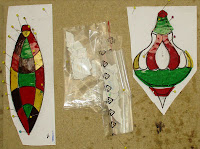
As I said, Christmas is in the air here in our classes!  Or should I say that the threat of Christmas fast approaching is making our students panic to start working on their Christmas Stained Glass Wish List!  Susan D has four more Ornaments started but these will be done purely in glass rather than lead coated glass.   A little color can be a good thing indeed.


And there you have it.  Yet another productive week in the shop!
 
Paul

Monday, September 13, 2021

Shave That Thing!

There's been a lot of talk about hinge points lately so let's discus them.  Hinging occurs when you solder two straight lines together.  They can easily fold because the only thing holding them together is the adhesive of the foil.  That said, a line doesn't have to be perfectly straight for it to be a hinge issue.  Even a slight curve can create a hinge point.  In the pattern below the wings can easily be bent along the both sides of the body highlighted by green lines.  Many times I see people post that the piece needs some wire following the green line to strengthen the piece but that's very bad advise because it does nothing at all to support the weight of the wings.   Wire needs to be run perpendicular through the hinge point, not parallel with it.  


 Below you can see that I've altered the butterflies body so it had more curve to it.  That will go a long way to make the wings more solid but it's still not enough to completely fix the hinging problem.  To fix things once and for all I've also split the body into two separate pieces and lined up the split to connect with two lines on either side of the wings.  Now I can add some wire (about 14 gauge) along the back of the butterfly following  the red line.   The wire with be covered with lead and will not be visible at all.  The strength that this solution adds to this butterfly suncatcher is amazing.


Alright, with that out of the way I'm going to ask, "What do you do when you need a square window with a beveled center but you can't find a beveled cluster that you like because they mostly tend to run far long than taller?"   Well, you can make your own cluster using stock bevels!  That's exactly what Barbara H did in her window.  Elegant?  You bet!  Even though there are many bevels in this it's made entirely of stock bevels which are less expensive than clusters yet still give a refined look to the finished piece.   What a beautiful window Barbara created but I don't think she'll be making something of this size again any time soon.  At 36 x 36 it's a big one!


Cindy's pair of Ice Cream Cone Windows are finished and aren't they something else?  They are stunning and they will be making a very bold statement  in the window of The Lamp Station Ice Cream Shoppe in Franklin.   In fact I've just found out that they're already hanging in the window now.  I'd imagine that Ice Cream Cones will be selling briskly after people spot these from the street!


"All you touch and all you see is all your life will ever be."  Those are the words that run through my mind when I look at Annette's stunning rendition of Pink Floyd's The Dark Side Of the Moon Window.  This looks so amazing because the Annette used black patina on the lead which makes three of the lead lines (running from each point of the triangle bevel) almost completely disappear into the black background glass for a seamless look that matches the album cover perfectly.  I ask you, what's not to love about this?


Shawn's large Butterfly Suncatcher has been finished and you might recognize it from the tip I posted at the start of this blog.  Although we altered the body so that it didn't contain straight lines I still felt the need to add a bit of wire for some extra support.   Looking at the finished product you'd never know that we added  wire and a lot of that has to do with the fact that Shawn's cutting, grinding and soldering (especially her soldering) was spot on.  This is what a colorful stained glass Butterfly should look like!


Susan D has even more Flower Angels and Leaded Beveled Christmas Ornaments under her belt.  Sadly one of her Angels had a crack in its wing but we're going to fix that next week and add it to her finished items when we see Susan again.


Although it's hard to make out the champaign glass in her window right now, Cindy's Bubbling Champaign Glass is already nearing completion just one class into its creation.  We'll go through the process of how she's making this window as soon as it's completed which could actually be as soon as next week.   It's an interesting process and it doesn't follow the path you might think that it would.


Mary's Dueling Hummingbirds suncatcher has been tacked together and all she needs to do it fit a few background pieces into place and then solder this.   We've held it up and all I can say is that it looks even better than anyone expected it to and let me also tell you that expectations were already running high!


Ann is back in action after taking the summer off to teach out of the area.  As you can see, those few months that she stopped doing stained glass didn't slow her down in any way because in just one class she was able to cut, grind and wrap her newest Cross Suncatcher.  This will surely be completed upon her return.


Sheri is working on a large Green Bay Packers  Helmet and she wasn't sure if the helmet should have the number 12 in it or the Green Bay Packer Logo.  In the end she settle for the logo so we simply drew up an oval with a G in it and she cut ground and wrapped those pieces which she will next tack together before making the rest of the helmet.   She'll then drop the logo into the position where the 12 was drawn in the original pattern.


Lara's so close to completing her Geisha Girl Suncatcher.  She's only got the flowers on the back of this piece left to solder and then this will be finished so expect to see this hanging up with some light behind it when you next see it.


With all of the glass cut out for her Magnolia Window (save for the border which we ALWAYS cut after the window has been tacked together), Tracey stood herself in front of a grinder and began fitting all of her pieces together.  She's a good quarter of the way there so she's speeding through this project in a nice precise manor.


Kerry got his witch window all wrapped and tacked together before calling it a night.   that means that he'll add a border as soon as he comes back to class and then be set to start the finishing solder bead on it.  That means that this will be completed in plenty of time for Halloween.


Shelley has the front side of her Three Cats Window soldered leaving, of course, just the back side to go.   When she's through with that she'll add wire whiskers to the noses and then paint on the mouths.  Boxy kitties are very stylish, don't you think?


With only a handful of pieces left to wrap Melissa is getting excited about finishing this window.  It still needs a double border added to it but that won't take long at all especially since she's already decided on the glass that she'll be using for the borders.


MiMi has got this window is just about in the bag.   Number 6 has got its zinc channel attached and its front side has a good deal of a finished bead on it so MiMi should be starting Number 7 before you know it!


Lastly we see that Susan D has got another Flower Angel well under way.  She's certainly a pro at making these now!


We're missing a lot of students due to the effects of Hurricane Ida.  I know that all of our students are eager to get their lives back together and their stained glass back on the cutting table so things can get back to normal for them!
 
Paul