Monday, October 25, 2021

How Do You Please Three Women

Your Glass Cutter is a delicate instrument and far smaller than you might actually think.   It's the Cutter Wheel that does all the work by scoring the glass as it rolls over your glass.  This wheel is positioned in a slot an the bottom of your cutter which one of the red arrows is pointing to in the picture on the lower left.   As time goes by this slot will likely fill with grit and dirt which can stop your Cutting Wheel from spinning freely.   In the picture on the bottom right you can see that the slot on my cutter is completely clogged (you can't see through it) and needs to be cleaned. 


Cleaning your cutter takes less than 5 seconds.  Simply take one of the pins that you use to hold your glass pieces in place and gently push it into the slot behind the cutting wheel to force out any grit and grime that has accumulated there.  It may take a few pokes to clean it out but after you've made a few passes with the pin you will hopefully be able to see through the slot (as you can in the picture on the lower right).   If your cutter has a long oil wick you may not be able to see completely through the slot but you will still see a lot of dirt and debris come out.   Taking care of your cutter is an important part of stained glass crafting because you will only ever be as good as your tools are.   Also, remember to oil your cutter again after performing this procedure.  Just a single drop on the cutting head will do.


Now Melissa's Butterfly and Louisiana Iris Window was certainly worth the wait!  Her attention to detail may slow her down some but in the end that extra attention pays off in spades!  How can anyone say 'no' to a window as beautiful as this is? What impresses me most is Melissa's beautifully subtle blending of colors.  There's nothing harsh or super contrasting about it, it all just flows together.


I have to say that adding that scrolling topper to this rounded version of the Bathtub Lady was a stroke of genius on Susan R's part.  She had a choice between either an Art Nouveau or Art Deco style but in the end the Nouveau version was easily the best choice for this stunning piece of art.


These adorable Boy and Girl Baby Suncatchers are the perfect gift for a newborn.  Mary Grace did a bang up job on these and I know that they will bring a smile to the new parents of the respective babies that these will be delivered to. 


We haven't seen a Business Card Holder made in a while but when Sheri said that she needed to buy one I told her that she could easily make her own in well under a half hour.  A half an hour later she proved me correct.  The nice thing (that's hard to see) about this is that the color scheme of the holder completely matches Sheri's business cards!  That's called attention to detail.


Here's the Angel Window that Linda L began working on last week.  Yep, it's been completed and she's ready to finish her next Angel using colors that SHE wants to use!  I have to say that I like this one though-- everything from the colors to the craftsmanship shows what Linda can accomplish in just a short amount of time.


Ann came in knowing that she'd be soldering the five Ornaments that she had foiled last week and by the end of class they were soldered, washed, patinaed, washed, and finally waxed.  Once these were completed she began cutting out even more of them because, well, they just look THAT good!  


Betty actually had two more Cutlery Dragonflies completed this week but I only took a picture of one of them.   Of course she also finished her latest Beehive as well so yes, it's safe to say that Betty has been busy as a bee!


Shelley finished her Butterfly Suncatcher but opted to wash and color it at home.   Still, you can easily see how good this looked even when it's covered in flux and has no light behind it.


Who's been busy during the week between classes while at home?  Cindy!  This vehicle (I don't know the make of it but I will next week) has so much hidden detail in it only because it hasn't been wrapped yet.  Trust me, this one one VERY impressive window!

Annette has her newest Angel all ground and what a great job she did on it!  What I admire most is her ability to maintain symmetry in this piece which I usually have to adjust for students when they think they are finished grinding.  Balance in something like this is extremely important and this Angel is surely well balanced.


Sheri's begun work on a colorful  Abstract Face that reminds me of a colorful Tiki Statue even though I know that isn't what it is.   This piece is all about having fun with colors and I think that Sheri has succeeded in that respect while cutting glass for this project.


Kerry began a Parrot Window this week and it was almost completely ground by the time class was over.   There are only the yellow and upper red feathers left to grind and even in their un-ground state they look like they fit in place pretty darned well.  That means that there's only a little grinding left to go on this so perhaps this parrot will get its border attached when we next see it.


Mary decided to turn her Madonna and Child into a window rather than a suncatcher so after she tacked it together she added a background and then a border.   By the time class was over with she even had both side soldered which means that it only needs a brass channel attached to it to finish it off.  Consider this panel to be a done deal.


Jan's Holiday Windows each got their respective backgrounds cut and tacked into place.  Once that was accomplished she picked out borders for her two panels and now they're just about ready to be soldered.


Bee had a busy night as she ground her border, wrapped it, attacked it, added a large zinc channel to the window and then filled in the three missing pieces by placing glass under her window and tracing the perimeter of the opening onto the glass.  A quick cut and a skim on the grinder had the missing pieces fitting perfectly and once they were wrapped and tacked into place Bee began soldering.


Linda F finished cutting out her Stylized Cross and then spent some of her time grinding it and the rest of the class wrapping it.   It looks like there's only three pieces to go so Linda will most likely start something new when she comes back in next week because this is surely going to be finished.


Ornament are everywhere.  Here's Susan's sextet of Beveled Christmas Tree Graces all ready to be soldered.  The end is neigh!


Shawn also got three more Christmas Ornament cut out while in class and she even has two of them ground already.  It looks as though she'll be applying foil to these when she comes back in.


Here's Linda L's third and final Angel.  She only needs to wrap her background pieces, add a border and then solder this to finish it.  That may sound like a lot to get done but trust me when I say that the lion's share of the work has been completed on this window and this Angel's end is near!  (oh dear!)


Speaking of the end being near, our lost picture shows us that Betty has at least five more Cutlery Dragonflies in the works which only need solder and chain attached so she can be finished with this batch.  There's never a dull minute for Betty.  Have glass, will cut!


And there you have it!
 
Paul


Monday, October 18, 2021

Jim and The Twins

Here's something that I've discovered not many people know when it comes to these blog posts.  If you click on a picture you will get an enlarged view of it!   I usually crop each image so that it is 400 pixels high or 400 pixels wide, whichever is bigger.   Any of the projects that I post which are not yet completed can be seen in a larger view if you just click on the image.  That said, I try to post any finished pieces of stained glass in their large size which means that clicking on it won't give you a bigger view.   The exception there is when two or more items are shown in the same picture.  In short, any images of projects currently under construction can be enlarged by clicking on it as well as images that contain more than one project such as Cindy's Corner Spider Webs below.  

 
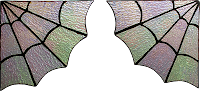
Here are Cindy's pair of Spiderweb Corner Decorations.   Made from a single piece of clear textured iridized glass they are quite simple and incredibly quick to make.  The best part of these is that the colors come out randomly on their own because of the nature of iridized glass.  Click on them to see a bigger version.


Up next we have Cheryl's Scales Of Justice Window.   She's used some dark glass in this and since she comes in a night it was difficult to get this to light up correctly from behind.   The best picture I could get had to be front lit, but you get the idea.  Week by week Cheryl is getting better and better at this.


I love this Wednesday Addams Suncatcher that Kerry made, start to finish, in just one class.  Some students have suggested that a face be drawn on it but I found a picture online and photoshopped it on to Kerry's project only to discover that it made Wednesday took creepy in a very bad way.   Thus, I wouldn't change a thing about this.


Betty made a wonderful Leaf Collage and then took that idea to the next level by making a Leaf Wreath.  Both utilize a hoop but one is visible while the hoop that makes the Leaf Wreath so stable is completely hidden.  I love the delicate look of this surprisingly strong wreath.


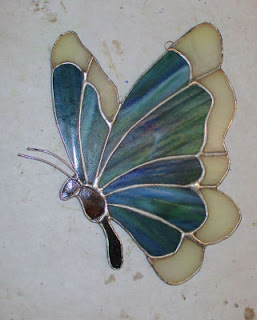
Next we have Linda F's latest Butterfly Flower Pot Ornament.  What exactly IS a Flowerpot Ornament?  It's a suncatcher, in this case a three dimensional suncatcher, that has been mounted on a small stake that you push into the soil of any flower pot that you want the butterfly to adorn.   The next time one of these are completed I'll be sure to show the stake as well.  


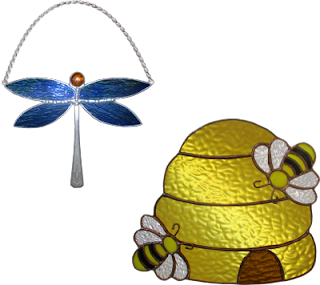
Sheri made her own Beehive Suncatcher this week and she went with assorted ambers for the different levels of the hive.  The wire work that she did on her bee antennae proves to me that she's capable of bending wire to any shape that she may ever need.


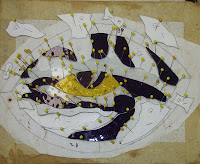
Cindy also knocked out this LSU Tiger Eye Football which she said was fairly easier to make.   I've got to warn you though-- while the Spider Web Corner Decorations are very easy indeed, this Tiger Eye is not something a beginner would want to tackle even if Cindy makes it look easy.  


Linda F also completed a Beehive of her own.  She went with a single colored hive which proves that you don't have to perfectly match pieces that you see online, or follow the colors that might be listed on a pattern.  It's gorgeous!


Our last finished pieces are two more of Betty's Dragonflies made using silverware for the Dragonfly's bodies.   She's given two pieces of her 'decapitated' silverware to two other students so I think we'll be seeing more of these in the weeks to come especially since Betty has three more sets of wings cut out herself.


Lisa was very busy cutting out the glass for four Unicorn Suncatchers while she was in this week.   Once they were cut she decided to call it a day so she could grind them at home where she could work at her leisure throughout the week.


Annette says that she's making Christmas gifts from here on out until the New Year.  This week she decided to begin an Angel and got her all cut out and ready to be ground.  Next week you'll better see how this looks when all of the pieces fit together perfectly.


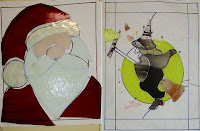
Jan has the 'Holiday Fevers' as well.  I say 'fevers' in the plural form because she hasn't settled on just one holiday but two!   Here are what her Christmas Witch and Halloween Santa looked like after she got them all ground.  Wait a minute, maybe I should put those holidays the other way around on these characters!  
 
 
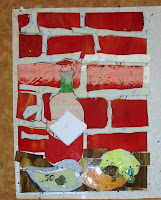
With all of the glass cut out for her Louisiana Hot Sauce Window Judy moved on over to the grinder and started grinding her pieces from the bottom up.   At the end of class she said that she wished she had started from the top and worked her way down but I like to do the toughest part first so that things get easier as I move along.   With her table, oyster and peppers nearly completely ground the rest of this will move along much faster and easier for her.


Ann is making a HUGE dent in her 'Christmas Suncatchers to be made' list by getting five ornaments (each different) ground and wrapped.   I even think we'll be seeing some of these completed when she comes back in next week.


Meanwhile, Shawn cut put two more Christmas Ornaments of her own  which she plans on grinding next week.   Ornaments are apparently the thing to make and when they look this good it's no wonder!


Well, well, well, what have we here?  Six more ornaments!  Susan D is ready to wrap these, solder them and hang them on a tree or in a window.   If you click on the picture to enlarge it you'll see that she's already begun wrapping these.


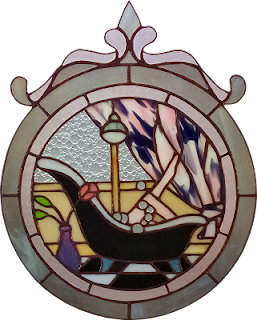
Speaking of 'Susans', next up we have Susan R's Bathtub Lady in the round.  However, as you can see she's literally put a twist on this circular design by adding a simple but ornate scrolling art nouveau trim to the top side which REALLY sets it all off!  With only a little bit of soldering left to go Susan should be finished with this when we see it again. 


With everything wrapped and the front side tacked together Belinda got her border cut out and plans to wrap and attach it while at home.   Once that's done she'll be ready to begin the soldering phase of her Flowerpot Window.  True, there isn't any channel on this window yet but that should be applied AFTER the front side has been soldered and preferably the back side as well.  It's all comes down to stability, especially with a window this long.


MiMi's first thin 'beehive' window has its front side soldered and a row of two of the back side as well.  We've attached the channel to this so MiMi can possibly finish it during the next two weeks so that she can start grinding another window this exact same size when she comes back in.  That won't happen next week though because MiMi is a travelin' gal and she'll be out of state.


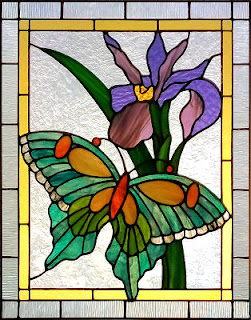
Here we have another project that has been flipped over so the second side can be soldered.   Melissa's Butterfly and Louisiana Iris Window is so very close to being completed that I'm going to call it and say that the next time we see this it WILL be finished.  I can't wait to see this with some light behind it and that wait won't be long now.


Mary got her Mary all ground this week and the profile of Mary's face is spot on.  I've seen these made all over the internet and most times the face is where people screw things up.   She's supposed to have a nose because Mary is pictured in profile, alas most times I see a strange lumpy mess.  I'm proud to say that doesn't happen in our classes because our students take their time to do things right like Mary did here.


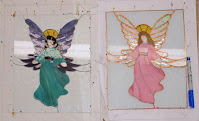
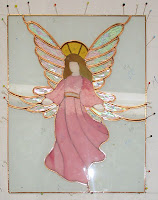
When we last discussed Linda L's last Angel window I told you about how she was going to re-cut the wings so she could sell it to someone who requested purple wings after she had started this.   Then he decided we wanted the robes to be cut from either teal or turquoise glass.   With that much to re-cut I wondered if Linda would just opt to make an entirely new window.  As you can see, she's re-made the window and will be keeping the pink robed angel for herself.   With everything cut and ground for the new Teal Angel, I can honestly say that Linda has made some seriously quick work of this.


Lastly, I believe that this freshly started Beehive belongs to Betty, but it could belong to either Linda or Sheri as well. My best guess is Betty though because I seem to recall cutting two pieces out for her.  It's Hell getting old!


And that's that!
 
Paul


Monday, October 11, 2021

The Ones With The Unruly Hair

We're jumping right on in this week starting with Linda L's first of two (possibly three) Angel Panels.  This one features a blue robe while her second angel (which you'll see later) has a pink robe.   She also has an order for one of these but the person wants different wings so Linda was just going to cut new wings and use what she already had cut out.  However, now he wants the dress to be changed as well.  We'll see if Linda decides to cut an entirely new window or if she just swaps out  the almost complete angel in the weeks to follow.


Sheri's completed her Moon Panel and luck was with her because she was able to find a piece of the dark blue rough roll at home that was big enough to repair the piece that broke in two last week.  After the quick fix Sheri ended up with this very peaceful and serene look at the nighttime sky.


Kerry's Chessboard is off the work table and ready for a game of chess.   If you look at the corner of the board you can see how we angled the final border which actually raises it off the table by  almost 2 inches.  To support the center we added four pieces of glass that formed a 'box' of sorts directly in the center of the board.   Now it can certainly withstand even a cat jumping on top of it!


Linda L also finished these two Bluebird Flower Pot Ornaments.  True, she had cut out and ground them while she was at home during the week but she also got that blue angel up above soldered as well making this a VERY productive week for her.


Betty found some old spoons and forks, cut off the utensil side of the cutlery using a hack saw, and then soldered the remaining handle to 4 wings and a round glass glob to make this unique Hanging Dragonfly.  When it was completed she didn't quite care for the look of it until I showed her how to attach solder balls to the joints which really set this off perfectly.  This is what decorative soldering is all about.  Expect to see more of these as the weeks go by!


Jan's happy to tell you that her Eagle/Flag Window is finished.   I have to say that she did wonderful work on this and that it didn't take her nearly as long as she thinks it did.  Everything fits together wonderfully and her soldering on this is some of her finest work to date.  


Tracey must surely have this Magnolia pattern memorized by now.   Her work is flawless and her glass choices are nothing short of perfection.   You can't lose with a classic design like this unless your workmanship is off and Tracey is, without a doubt, completely on her game when it comes to workmanship.  Don't you agree?


This is Annette's first of many Mary and Baby Jesus Suncatchers and what a start she's shown here!  This is actually a somewhat complex suncatcher since it deals with a round halo and the profile of a face, both of which are harder to achieve than you might believe. They say that practice makes perfect but Annette's first of this series is about as perfect as you can get.


Shawn's got her second Christmas Ornament Suncatcher ready for her tree.   AT first she thought that she couldn't hang this in an actual Christmas Tree but surprise, surprise-- you can!  And if you position it in front of a light then it's even more the spectacular!
 

Cindy's got another Louisiana Football Tiger Eye in the works and she's flying through this project as fast as she can so that she can start working on a Corvette Window when she comes back in.  Her talents are very much in demand and Cindy doesn't disappoint.


 Do you know who else was VERY productive this week?  Jan!  First off she finished her Eagle/Flag Window (and was very happy about that) and then she moved on to this Santa Face and Halloween Witch.  Not bad at all!


Lara has the background for her Sunburst Window all cut and tacked and she's decided to finish this off using a beveled border.   Hmmm, I actually don't know if she plans on using one or two borders so perhaps the bevels won't actually 'finish' this off. We'll see when she returns next week.


With all of her glass ground for her Flower Pot Window, Bee has begun to wrap her glass.   If you look closely you'll see that she is actually missing two pieces.   These things happen, especially when working on a window with this many pieces.  Sometimes a paper pattern gets put in the wrong pile and either gets cut out of the wrong color or not cut out at all.  If you've discovered this after a lot of pieces have been ground (as in this case) it's best to just leave a hole in the window and then fill it in AFTER the window is tacked together by placing the glass you want to use under the window and tracing the outline of the opening onto the glass.  It's just much, much easier that way.  And that is what Bee will be doing with her two missing pieces.


Betty is working on a slew of Autumn Leaves as you can clearly see below.  Some of these will be used in a Leaf Wreath which will be very interesting since it's the first time one of these will be completed in our classes.   We'll see what that looks like next week!


With the front of her Scales Of Justice Window all soldered and just the back side to go I'd say that Cheryl could very well complete this next week.  There isn't all that much left to go and she got the front side completed in one class so I think it's a pretty fair assumption.


Judy's Louisiana Hot Sauce Window is very close to being completely cut out already.  She actually has a lot (if not all) of the gray mortar that goes between the bricks cut out but she put all of them in a bag for safe keeping just before I snapped this picture.  


Linda F loved her last Butterfly Flower Pot Ornament so much that she has a second one cut and ground already.   Then she went ahead and cut and ground a new Beehive as well.   For the record, I looked up the word 'beehive' and suspect that since you readily find it spelled as both a single word AND a pair of words, it doesn't matter which way you spell it.  Just don't expect me to be consistent week to week!


This is the Pink Angel that Linda L is making.  As you can see it's almost completed already.  If she decides to change the wings and the dress she can simply re-cut the hair, hands and feet and turn this into a suncatcher.  We'll see what she plans on doing when she comes back in.


With the front side of her Round Bathtub Lady all soldered, Susan R flipped it around and began soldering the back side.  What I completely forgot was that she wanted to add a decorative top to hang this from.  I have two ideas and we'll see which one that Susan decides to go with when she returns.


With both of her borders attached Melissa has begun soldering her Butterfly and Louisiana Iris Window.  Even though she says that this has taken her forever to make I think that she's just being hard on herself.  The end is near and it's looking VERY good!


Here's a closeup of MiMi's latest Cabinet Insert.   That line that you see running down the right side of the window is a stopping point for either an insert that she's already finished or one that she needs to make yet.   The beauty of this pattern is that if you make one large pattern (as MiMi did)  you can just draw a line to show where each insert needs to stop.  You don't need to retrace all of those Hexagons to create separate patterns for each window.


Next we see that Susan's on a roll with her Christmas Ornament Suncatchers.  It looks to me as though she's almost completely ground eight more of them this week. Apparently she can't make these fast enough!


Shelley is a bit in between projects so she decided to make a quick Butterfly Lawn Ornament while she hammers out a mermaid pattern of her own design.  Her Butterfly is all cut and it's all ground which means that this will certainly be finished when we next see it again.


Look, it's another Beehive and this one is being made by Sheri.  She's using assorted ambers for her version of what is quickly become one of our most popular patterns.


And that's if for this week.   I never considered what our tip of the week should be for this post so I kind of got caught off guard, especially since I was thinking that Sunday was actually Saturday which means that I sort of lost a day during the weekend!  That's never good, but even though we don't have a tip this week, we're still on time.

Paul