Monday, July 25, 2016

It's All Fun And Games Until Somebody Loses An Eye

Following The Broken Line

Grinding to a pattern always involves following the lines and although the pattern can be altered here and there without consequence, there are other times when it can't.   Sometimes there are hidden lines that need to be followed because although you can see a line, one exists in your mind and breaking it will cause the pattern to 'fall apart'.  The red arrows in the picture below point to blue lines that I've added to the picture to show you that the edges of the amber glass should form a circle.   If these amber pieces are off the cross will just look wrong because something doesn't quite line up in your minds eye.  Although it's not a line you can point at your mind can see it as plain as day.


Here's a great example of the same effect done correctly and incorrectly.   Can you spot the difference between the two?  In the picture on the left the stem appears to connect even though there is another stem crossing its path.  On the right the stem doesn't line up and the flower no longer looks correct.  It's a subtle difference but it's the difference between good art and bad art.  Always be sure to pay attention to hidden lines by watching how pieces connect when they are crossed by others. 


You know what? Linda L's Wine Bottle Window turned out even better than I'd expected, and let me tell you that I was expecting quite a lot.  Her soldering on this was nothing short of amazing and hopefully the two pictures show you how the bottles make this window 3D.  The round bottle bottoms on the right of the window have been cut so nothing pokes out on the back side of the window but the complete bottle on the left is centered within the window so that half of it is poking out of the front  and half of it is poking out of the back.  This was a lot of work but it's beautiful.


Ann's Acadian Flag Window is officially complete and it features some fancy wire work on the top of her castle towers.  The deepness of the red glass makes it hard to see in the picture but trust me when I tell you that it adds another dimension to this window.  And just look at those tiny pieces in the Fleur De Lis!  That's a lot of work!


Terry has finished the top (and final) section of her spiraling window and she's thrilled to be moving on to a new project.  These big windows have a way of sucking the life out of you when the weeks turn into months, but in  the end it's always worth the effort as you can plainly see here.


Lynn finished her Beveled Fleur De Lis Window an decided to leave the lead silver rather than coloring it with patina.  The choice is perfect when you consider the colors in the window and Lynn's work was top notch.  By the time she got to the second side her solder line were forming into nice smooth lines.  Practice makes perfect and I don't think it will take Lynn but one more project before she achieves perfection.  (I love putting the pressure on!)


Jeannette completed her second Beveled Insert and this week we get to see what it looks like inside of its wooden frame.   Just imagine two of these side by side because that's what Jeannette has in her home now that this one is completed. 


Cindy has even more Suncatchers completed this week including two etched glass pieces, a Christmas Candle, and her rendition of the Peacock and Flying Pig.


Ann started cutting out this Stylized Fleur De Lis Window after she finished soldering her Acadian Flag Window and she's already got a lot of it cut out. I love her colors and even though she didn't plan on making (needing) this I think she's going to be very pleased with the final piece.


Barbara has begun working on a Crab Window of her own and will learn how to cut a background from the completed subject very soon.  She's got all of the crab itself cut out as well as the leaves that work as accent pieces throughout the window.  Now she's grinding everything and once it is ground she'll tack it together, place it on top of her background glass and cut everything perfectly.


Becky S's version of the Eagle/Flag Window is all cut and ground.  She's using a glass eye rather than a dot of black paint and now Becky knows that the small 1/4 inch grinding head can also be used to drill  hole into a piece of glass.  Only the small round black pupil will be wrapped but the lead that surrounds that foil will easily hold the piece into position.  It's a little more work but the window will never need it's eyes dotted again.


Carol's back!  It was great to see Carol again-- she's certainly been missed.  Although she didn't bring her oval Iris Window she did return with a Fleur De Lis Window that is completely cut out save for the final border.  She does know what glass she'll be using on that final border and we'll see that along with her Iris Window when she returns next week. 


Myrt has moved along to a widescreen version of a Mermaid Window which is already proving to be popular this week.  We almost had two other people start the pattern that this was based on. This pattern was actually derived from a naked woman pattern and we'll show you side by sides comparisons of them next week.


Mary Grace has all of the scenic section of her WELCOME window cut out and has begun grinding it to fit together.  We've gone over the 10 steps of grinding and Mary Grace now understands why grinding as you go can make things more difficult rather than easier.  Still, this window is  already looking great.  And Mary Grace's sky has been cut from one piece of glass and that alone will make this look better than the average stained glass windows that you see in stores nowadays. 


Linda is grinding what I thought was a geometric design but upon closer inspection it turns out that it's flowers.  Calla Lilies to be exact! Sometimes I associate things with patterns from the past and see what I want to see rather than seeing what is plainly in front of me.  The grinding is moving along wonderfully and soon the flowers in this window will be readily apparent.


Susan R already has most of the work completed on her Pineapple Welcome Window.   In fact it looks like she's just about ready to cut out the two background pieces for the actual pineapple section already.  She's got colored bevels in her corners and I'm sure we'll see a border attached to this when we see it again.


Jan has all of her Large Basketball Window cut, ground and tacked together.  In fact, she even has the zinc channel cut to size and ready to be attached but that's something that we'll handle when she comes back in next week.  Look for some big time soldering to have happened on this when you next see it.


Rowena's got all of her Long Tall Iris Window cut out and now you can clearly see why this has always been a favorite window of mine.  Rowena's colors really shine on this window which you will clearly see when it's lit up.


Meanwhile, Lara is working on her own rendition version of the Mermaid window that was inspired somewhat indirectly by Shelley.   Lara got her pattern picked and already has her Mermaid hair cut out which is VERY nice progress for a first days work.  I love how the various shadings from the same sheet of glass make the hair look lifelike rather than flat.


Roxanne's American Flag/Eagle Window is coming together at an astounding pace.  You can tell Roxanne has paid attention in her weekend workshops with us because she's moving along quickly and confidently.  With her glass all cut out she's begun grinding already!


Sheri started work on this dragonfly window which although is on one pattern now, she'll make in two separate sections and then merge together.  By cutting and grinding the background as if the dragonfly weren't going to go in the middle of it everything will line up perfectly.  Once the dragonfly is completed it will be tacked together and the traced out on top of the fitted background pieces. This ensures that nothing will become distorted and the final piece will look as good as possible.


Cindy also found time to begin work on this Christmas Bulbs Suncatcher.  It's certainly colorful and is made from all of the tiny pieces that Cindy loves to work with.


Shelley had no clue what she wanted to make when she came in but after sorting through patterns she decided to make this straight line String of Birds.  The beauty of this is that you can use a lot of small scrap pieces to make the birds and that's just what Shelley is doing as she works from right to left on this pattern.  She's got one down and just nine more (okay, eight and a half) left to go!


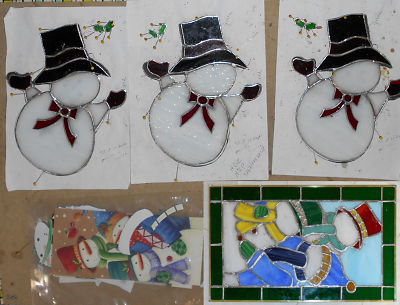
Betty continued working on her four snowmen and has them pretty much together now.  At this point all they need is a corncob pipe and a button nose with two eyes made out of coal.  Next week she'll finish these up and move on to spring projects.


And lastly we have Brenda who is working on a beveled Transom window (and it's a biggie).  At only 12 inches tall by 67 inches wide we've decided that the best plan of action for this window is to split it into three sections to make transportation easier and to avoid any breakage that such a long, thin window is so susceptible to .


And that marks the end of classes for the week of July 17th.

Paul
Bayou Salé GlassWorks

Monday, July 18, 2016

Like He Wants All Of That!

Which Piece?

I often have students ask which piece they should grind to get something to fit and the question is invariably answered without my even having to look:   "The one hanging over the pattern line."  Any piece that is over the line needs to be ground and most times that means that BOTH pieces in question need a trip to the grinder.  In the picture below you can see that the white piece with the red arrow pointing to it is over the line on its left.  You could get things to fit by simply grinding the two sides of the amber piece where the blue arrows point but that only makes the pieces fit together.   Just because something fits together doesn't mean it's correct.  You can get a round peg in a square hole if the peg is small enough.   The lines on the pattern aren't there as a recommendation,  they are the guidelines that all your pieces need to fit within if you want your project to look like the pattern.


Next you can see that I've ground my pieces perfectly so that none of the glass hangs out over the black pattern lines.  This guarantees a perfect fit and (most importantly) a finished piece that isn't distorted.

Here's my cross suncatcher after everything has been ground.   Black line shows around all of my pieces which means that there's room for foil without having to worry about anything twisting out of shape due to the thickness of the foil pushing pieces out of place.  We'll be coming back to this picture in future weeks to describe other aspects that you need to pay attention to while making stained glass.


Now that we have that out of the way we can move along to Betty and her completed Pelican Window! You'd never suspect that a section of her sky was replaced unless you've read our earlier Blog Post a few weeks ago when we discussed how to blend in replacement pieces. Betty really likes her choice of glass for the water splash and I concur, it looks perfect.


Barbara H put the finishing touches on her Heron Window this week so we have her finished piece below.   Allow me to state for the record that she's doing great with her soldering.  She had the perfect amount on her window which meant that touching it up and giving it a little finesse was really very easy to do.   In the end Barbara walked out the door with a very beautiful window as you can easily see for yourself.


Brenda has her Red Fish Window all wrapped up and out the door!  I knew that this was going to look great and any trouble that Brenda might think she had while making this should be wiped away when she looks at her finished results.  It's not about how quickly you can make a window, it's about how good the window looks when it's completed.  And Brenda's soldering is in a class all by itself.


Jeannette has completed the first of he beveled cabinet inserts and it's as elegant and stylish as it could ever hope to be!   She's got one more of these all ready to be soldered when she returns so expect to see an identical window next week.


Cindy's been working on multiple over-sized Suncatchers and these are a few that came completely together this week.    I have to ask though, what's with all of the Christmas suncatchers in July??? (You'll see what I mean when you scroll down further.)


Susan R completed her Garden Trowel Lawn Ornament and it's ready to be staked into her front yard.  Susan did this project completely on her own including the wire work that so many people have problems with.  For Susan, however, it was no problem at all,


Our other Susan, Susan D, completed two of the 'living' items for her Cornucopia.  I specifically took the picture of her humming bird and bee from a side angle to help show the 3D effect that these incorporate.   It's not easy to capture the effect in a  picture but I think this view helps show what Susan accomplished here.


Becky S has gotten all of her Eagle and Flag Window cut and a good major portion of it ground as well.  Becky will go the full nine yards with this window and cut a black glass pupil into the yellow eye which will be a learning experience that I know Becky enjoys working through.  And we'll explain how hat is done in a future Tip Of The Week.


Jeanne's Tiger Face is really taking shape now.  With a lot of the white cut out as well as the all important eyes, this cat is starting to look downright ferocious.  Jeanne paid particular attention to the eye color and let me tell you that this was the color that really worked this tiger!


Paula is another student who has moved onto the back side of her window.   There's a lot to solder in this New Orleans scene and the number of thin pieces are almost staggering.  Because of this Paula has to jump all over the place as she is soldering so that her pieces won't crack due to heat build up.  This is truly some beautiful work on Paula's part and I cant wait to see this hanging.


Mary Grace resumed work on her Welcome Window and it's also really coming together.   She isn't going to cut out the word 'WELCOME' out until the top section of this window is tacked together and at this point in time it doesn't look like it will be long before all of the glass is cut for the top picture section.


Roxanne is our newest student in our weekly classes but she's worked with us in four or more Weekend Workshops.   Because of this, we've decided to forgo the standard butterfly project and let her start things off with an Eagle and Flag Window.   This is the same design that Becky S is making but slightly smaller.  As you can see, Roxanne has the cutting process pretty well mastered because there's only the white feathers of the Eagle left to go before she can start grinding this for a perfect fit.  I must say that this is quickly  becoming a popular pattern here in class.


Linda F has started working on this medium sized Flowing Geometric Window and already has it completely cut out.  True to form though, she's worried about her cutting abilities because it isn't fitting together perfectly but that's just the way things go when you are working with glass.  I know that this fits together wonderfully and as long as she's at least cutting ON the line (which Linda is) then she's doing just fine.   I honestly don't think this will take her very long to complete.


Linda L's Wine Bottle Window was completely assembled this week and she's even begun soldering the front side.  Russ had a great idea which allowed Linda to add a faux label on the full wine bottle that I think really sets this off in a wonderful way. I wish I'd have thought of it myself.


Susan R also found time to get this Welcome sign of her own started.  This one features a Pineapple which is pretty much the universal symbol for Welcome!  Her text is almost all cut out and the rest should be fairly easy for Susan.


Terry has all of the glass attached to the top half of her Spiraling flowers Window and even has the zinc channel on it as well.  She's got the front completely soldered and has flipped this over to start working on the second side now.  A new project will most certainly be in Terry's future.
 

Sheri's Pig Window is just awaiting a border at this point.  This week she cut out the remaining pieces of her background glass (including the large tricky curved one atop the pig) and then took it all home to wrap and tack there.   I wish I had a picture to show you of what she's accomplished but I seem to have forgotten to use my camera so you'll just have to look at this Photoshop enhanced picture that I took of her window last week.  At any rate, it's time to decide on a border now!


And Rowena continued working on her Long Tall Iris Window which is coming together wonderfully at a nice brisk pace.  There's no doubt in my mind that this will be all tacked together when Rowena returns to class next week.


Next we see that Cindy still has some smaller items under way as well as oversized suncatchers.  Here she is working on an etched cross suncatcher, a Christmas Candle, and a flying pig of her own.


And Jan has gotten her ball and net all wrapped and tacked together.   When she comes back in there will just be a few background pieces and a border left to go. Jan's become far more efficient at wrapping her glass which proves that practice makes perfect.


Okay, so it must be a hot summer for Betty because she's trying to cool down mentally by working on Snowmen!  She's moving along nicely on these and I have no doubt that they'll be completed in time for the holidays.  It's just a shame they can't really help you cool off though.


Martha's Seafood window is being foiled with the same attention to detail that the rest of the window received.   This is going to be a spectacular window when it completed, mark my words .


Ann's got her Acadian Flag Window completely tacked together and she's even got a good portion of the front side soldered as well.   With just a channel left to add around the edges and some soldering left to go on the back I'm going to go out on a limb and predict that this will be a completed project next week.


Bonnie made this John Deere Business Card Holder but you can really see it in all of it's glory with a card in it.  That's not to say that it isn't wonderful though, you just can't easily see the yellow and green color scheme that makes it perfect for a stack of John Deere Business cards (which I don't have)...


And lastly there's Myrt who made this flying pig for her sister.  I only hope that there's no significance behind it.  Now that this is completed I believe that she'll start working on a Mermaid window when she comes back in.


And that about wraps up what happened in our classes for the second week of July.  It all starts again tomorrow so the fun is about to begin again!


Paul