Tuesday, June 26, 2018

Passionate About Soldering


"Do you think I can cut this curve out?"  I hear it every week.   My first instinct is to say, "No" because the student is already doubting their ability by asking me if I think they can do it.  Still, there is a GENERAL rule that you can use to determine if you want to try to take that curve in one cut or not.  First you have to figure out the 'depth' of the curve.  This can be done in your head very easily without a ruler but I'm going to draw it all out for you to help explain it.

Start by connecting the two ending points of the the curve as I did in the illustration below with the red dotted line.  Next, measure the distance from that line to the deepest part of the curve (usually, but not always, the center of the curve).  This gives you the 'depth' of the curve.  An actual number isn't needed as you will soon see. 

If the 'length' of the curve (the length of the red dotted line) is MORE than three times the 'depth' of the curve you can almost always get the curve cut in one or two scoops with your cutter.

In the topmost example you can see that there are more than five 'depths' making up the 'length' curve.  That means that if even if you have moderate cutting skills you can most likely get the curve out in one cut.

In the lower example we can't even fit two 'depths' into the 'length' of the curve.   I would never try to make this cut without scooping it out a little at a time.

If you follow this simple formula:  "Never attempt a curve that is less than three lengths of its depth."  You won't have any trouble deciding if you should go for the curve in a single cut or not.

Well I have to say that Myrt had no deep curves in her Ivory the Dog Window.   This week we  saw her finish her tribute window from what I've seen on the internet it's a dead ringer for the actual dog itself.  I think Martha might have been calling Ivory to get the window to come over to her work table so she could pet it!   Myrt agonized about the face of this dog as she was making it even going so far as to rip it apart to make minor adjustments to the mouth.  In the end she captured Ivory's look perfectly and that is a testament to the detailed work that Myrt does.


Here we have our first look at the pair of Aeroscopes that Carol finished in class this week.  The one on the left was made for her husband, Totally Rad Richard, while the one on the right is Carol's.  As I said before she has more propeller wheels cut out so she'll be ready to begin a few more of these when she wants.   They're certainly becoming popular pieces as you will see in the weeks to come.  The image in between is what you see when you look through the back of these planes.  However, a single picture doesn't do it justice though as the colors and shaped blend in and out of themselves as you spin the propellers.


Here's Cindy's Sunset Fantasy Waterfall Scene all completed and ready to hang.  I found the image online in a fantasy art website and thought it would look great as a suncatcher.  there are a lot of little pieces but we all know that's what Cindy loves most in her projects.


Patrice finished her first Bumble Bee Lawn Ornament and it's the first one we've see done with green eyes.   As we all know, green and yellow go together wonderfully so there was never any doubt that this was going to turn out anything less than stunning.


Rowena's Flowers and Humming Bird Window turned out as perfect as perfect can be.   She knew she was starting with a great pattern (thanks to Carol) and did a wonderful job on her own interpretation of it.   And yes, this is bigger than you might think because when other students saw it hanging up in the shop they were all surprised at how large it is (almost three feet tall).


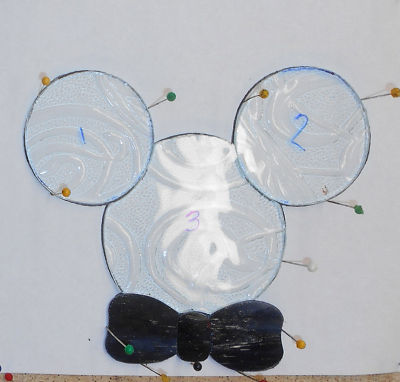
Next up we take a look at a pair of Mickey Mouse Silhouettes that Susan D completed this week.  A little further on down we'll take a look at the matching Minnie Mouse Suncatchers that Susan is making to go along with these.


Here's Tracey's Aeroscope complete with a view through the Kaleidoscope that runs through the length of the body of the plane.  These never fail to impress people even before they realize that it doubles as a kaleidoscope.  Tracey did a great job on this and her soldering is top notch.  I'm going to have to make a video so everyone can get the full effect of the kaleidoscope image.


Terry completed her Butterfly on a Flower Window this week but it was finished too late for her to wash and color it.   I don't know if we'll get to see this again next week so here is her completed window as we all saw it on the table (rather than back lit).  Even in an unwashed state you can see that it's a very beautiful window featuring beautiful work.


Mary is back!  It's been a while now and I have to say that everyone was all happy to see Mary return to class.   She had wrapped all of the pieces for the center circle section of her Dreamcatcher Window but she forgot to bring the glass that she was going to use for her feathers.   Rather than wasting time, Mary tacked together the circular section of her window and then put a finishing solder bead on it- but only the front side!!!   With the hardest part of this window easily behind her she should have no problems at all from here on out.


Betty has turned up a new Nativity Scene Suncatcher and had me print it out in two different sizes.  This is the larger size and after cutting out two of them she's decided that it's best to keep things this size since it's already tough enough to cut out some of the small pieces.


Beth has the bottom half of her Flower Window all ground and is now about to begin grinding the top half which contains all of the flower petals.  It may look like a lot of work but if she moves slowly and steadily then Beth will have no problems whatsoever. 


Carol also spent time working on a new panel lamp.   I believe (although I could be wrong) that it consists of six panels.   With these two completed she's already a third of the way to the finish line!


The glass Becky picked out for her final border is PERFECT!  I just love the combination of the two different greens.    With the front side completely soldered she's going to flip this over and finish adding lead to it when she returns to class.   Look to see this window in all its glory next week.


With the background all cut out for her Magnolia Window, Brenda has moved over to the grinder so that this all fits together perfectly.   Before you know it we'll be looking at this window in our completed projects section!


Linda L is going against the rules here because she's cut and ground and wrapped the pieces for her Sea Horse and Coral before the rest of her glass has been cut.  Why?  Because this will allow the grain of the glass she uses for the the ground that this coral is in front of to flow perfectly throughout all of those little pieces.  Sometimes you have to break the rules for greatness to occur (but only sometimes.)


Mary Grace did an incredible job soldering the front side of her window this week and I have no doubt that she'll begin the back side when she returns.  This window was causing her some problems in the beginning of it's development but not any more.  In fact, she's showing it who the boss is now!


Susan R is just about ready to get the border tacked onto her Chef window now.  There are a few pieces that she's going to have to re-cut for a better fit and there was a small break that she'll  repair by adding a new piece but after that it will be time to pick out a color for the border.


Melissa has her Sacred Hearts tacked together and she's got her sky cut and fitted as well. With just the 8 sections of ribbon(?) left to go I think that she's making excellent time on this project.


Roy made another change to his Wine Bottle Window this week by adding some wine to it.   Last week the bottle was empty but this week you can see that it's more than halfway filled.   It looks dark sitting there on the work table but when you see this lit up you'll agree that it's a perfect purple glass for wine.


Tracey not only complete her Aeroscope this week-- she also tacked together her address window and got the inner border cut out for it as well.   She has the color for her final border all picked out and there's a good chance that we'll see what that color is when we look at this again next week.


Cindy began work on this small address panel and already has the numbers cut and tacked together.   That leaves her with just four pieces of background left to go before she wraps this one up when she returns. 


Lara is about to embark on another stunning stained glass journey.  Since you can't see the colorful New Orleans style house that she traced while in class this week I've put a colored picture of it in the upper left corner.  I'll bet it ends up being spectacular.


You got to see the two Mickey Mouse Silhouettes that Susan D made at the top of this post and now we see the two companion Minnie Mouse Silhouettes.   These will most likely be completed upon her return.  Oh, don't let the bow tie fool you-- the top left Minnie is resting on the Mickey Pattern so it looks a bot odd.


Lastly, Martha returned this week and got the background for her Lighthouse and Sailboat Window all drawn up.  Alas, it's a little too big so she plans on scaling it down somewhat.   Once she has a size we'll work from there.


And that wraps things up for this week!

Paul
Bayou Salé GlassWorks

Monday, June 18, 2018

Off The Chain!

There are people who grind as they cut rather than cutting all of their pieces and THEN grinding.   I will stress again that for numerous reasons it is best to cut all of your glass before grinding even a single piece.  One of the biggest advantages to working this way is that it allows you to get a perfect fit with the pieces that you have cut rather than to the pattern which your cutting is likely not going to match.

When you grind a piece after cutting it the only thing you can base the shape on is the pattern.   If the piece next to it isn't cut perfectly the two pieces of glass won't line up and you won't be able to make an adjustment on the previous piece since it's already been ground.

It's also FAR easier to grind when you have the next available piece to use as a 'cheat' so you can grind it perfectly with just one trip to the grinder.  Some students have mentioned that I tend to ignore them as they work and if they are grinding as they cut then yes, my help comes only in the form of wrapping or soldering.  It's bad technique to grind as you cut and I won't help a student work incorrectly.   And that, is they say, is that.

Now Lara did NOT grind her Flower Of Life Window as she cut and notice how perfectly her pieces fit together, all the curves are form fitted and the straight lines are perfection.   Not only that, Lara got ALL of the soldering of this large window done in just one class.  And let me state for the record that her soldering is amazing.  I'd trust her with soldering  any of my windows!  Last week one of our students asked me why I keep calling this a Flower Of Life Window so I figured I'd pass the information on along here as well.   When Lara came up with the design it was a single long flower panel.  She asked if there was a way to widen it considerably and because of the shape I immediately though of Frank Lloyd Wright's Tree Of Life design.   By tripling the Flower image (as F.L. Wright did) we widened the window without adding any distortion into the design.  And that is why I call it the Flower Of Life.


Here's a picture of a stained glass interpretation of Frank Lloyd Wright's Tree Of Life for comparison: 


Betty's Newest pair of Stylized Crosses are out the door!  These may have no real color to them but they are stunning nonetheless, wouldn't you say? I've always wanted to make a black and white stained glass window just to buck tradition and I may do it yet.


MiMi's getting further and further along into the grinding process of her newest Rose Window and she's at about the halfway point now.  She's fastidious and precise (she's a Killer Queen?) about her work and her end results have always shown off her attention to detail.  She's using the pieces surrounding the one she is working on as a guide and everything fits perfectly.  Beautiful work indeed..


Here's Brenda's Magnolia Window.  With just the background remaining to be cut, I have a sneaking suspicion that this will be completed in about two more weeks.


Carol has her pair of Aeroscope Planes all ready to be assembled.   There are only four dots of solder left to go (to attach the landing gear wheels) and then she'll insert the mirrors.  I'll be sure to give you and inside view to both of these planes upon Carol's return.  Also, as you can see from the three color wheels atop her picture, she's just all set to make two more of these Aeroscopes.


Cindy has her Fantasy Sunset Scene all cut and basically ground.  Once this is wrapped she'll be ready to solder this which I don't think will take more than a half hour to 45 minutes at best.  This is really going to look great with some light behind it.


Roy is about halfway through the grinding process of his Wine Window (which is all cut out-- just not visible in the pictire) and he's made a few changes to it this week.  There's now a punt at the bottom of his bottle and he's also added a lip and a cork to the top of the bottle.   Since the rest of this window is realistic we felt that the flat green bottle had to be altered to make it blend into this window better. (The original design called for the use of an actual wine bottle to be used.)  I think this re-designed bottle is a much better fit and I love the fact that Roy has hundreds of pins in his grapes which stop them from shifting as he's grinding.  (The pins are visible as little yellow dots.)


Next up we take a look at Tracey's Aeroscope which has only one color wheel left to solder before it's completed.  That means that this will surely be finished very early in he next class.  Tracey already has her landing wheels attached and the the plane has been patina'ed  and waxed so she's about ready to go! 


Myrt's Dog Window is now officially all cut and ready to be soldered.  I probably wouldn't have picked the glass she used for the border but it is absolutely PERFECT!  When things like this happen it reminds me that I should hold glass next to the window before assuming that its the wrong choice because, well, just look at this.  Soldering begins next week and I know Myrt is up to that. Because she cut all of her pieces before grinding her window she's got a perfect fit.


Here's an unusual look at a project that you see a lot here in our blog posts.   This is Patrice's Bumble Bee Lawn Ornament  lying upside down on the table.  Why the odd (and unflattering) angle?  Because it shows you how the finished project is curved rather than flat.   From this angle you can easily see how the tail curves  and you can also see that the wings are curved as well.   It's always hard to get a picture that shows just how fancy this is but hopefully this view helps.   Even Patrice was shocked at how this was put together.


Look at the cutting that Linda L has achieved on the tiny little pieces of coral in her large Undersea Window.   She took her time while cutting each piece making sure to cut off the lines as she went and this is what she ended up with.   The beauty (the EXTREME beauty) of this is that what you are looking at hasn't even been ground yet!   Yes, it fits together that perfectly before it even visits the grinder.   This is amazingly GREAT work!


Terry is so close to completing her Butterfly On A Flower Window that it isn't even funny.   With the final border attached and the channel in place Terry spent most of her night soldering the front side of this window.  With only the back side left to go I'm thinking that it's safe to assume that this will be featured in with our completed projects when we return next week.  Just look at how perfectly her pieces all line up.


Susan R is just about ready to begin wrapping her Chef Window.  She's still got to grind the 4 buttons into the Chef's jacket but that won't take long at all once those buttons have been cut.  There's a good chance that we'll see this tacked together when Susan returns.


Shelley's Koy The Cat Window is all cut out and ready to be soldered.   This week saw her attaching the name plate along with the border and the finishing brass channel.  By cutting the left and right pieces of the nameplate last she was able to center Koy's name purr-fectly.


Mary Grace has all of the glass attached to her Iris Window and is ready to begin soldering!   Sadly, MG had to leave class early this week as she wasn't feeling well.  I hear that she's doing much better now and I know she's anxiously  looking forward to begin soldering this window to get it completed and out the door.


With all of the background glass cut out for her Seahorse Window, Becky was forced to make the decision on what colors she wanted to use in her borders.   In the end she went with a clear textured inner border (it's in the picture-- just not easily visible yet) along with a colored outer border that will most likely match the darker color in the Seashorses themselves.


Yep, it didn't take long for Rowena to get this Flower and Humming Bird Window finished.   Okay, so it isn't finished yet but with just the back side left to solder I can safely say that this will be completed soon (possibly when she returns.)   This week she got her outer border attached and what a beautiful choice it is!


Lastly we take a look at the next Mickey Mouse Silhouette Suncatcher that Susan D is making.  It's hard to see the texture on the glass that she's using in the picture but it is absolutely perfect in this application. 


And that about wraps things up this week.  It looks like we're on track to have a large number of completed projects when we return so be sure to drop on by again next week, same bat time, same bat channel!

Paul
Bayou Salé GlassWorks

Monday, June 11, 2018

Give The Dog A Bone


I've been making stained glass since 1978 and started doing it for a living way back in 1983.   That was a long time ago and the best marker I've found for the job in all of that time has been a blue Sharpie Ultra Fine Point marker.  In a pinch a Sharpie Extra Fine Point will do but the tip on the Ultra Fine markers make it the best marker for the job.  Also, black ink will do the job but not nearly as well as blue.  And just forget about any other colors because they aren't actually ink, they are in fact,  just colored liquid that washes off easily in water.
There is something you should know about markers though.  First, the tips are delicate and less pressure works far better than pressing it with force while marking your glass.   Second, there is no need to go over a line a second, third, or fourth time if you've already made a mark on the first pass.   Going over a line multiple times actually makes it wash off quicker when the piece is on your grinder.  Third, and finally, if the tip isn't allowing ink to flow then gently draw a line on the side of you pattern paper while rotating the marker so that all sides of the tip have touched the paper.  You'll see ink start to flow almost immediately.   Remember, the harder you press on the tip, the more compressed it becomes making it harder to allow ink to flow.   Using your markers on glass is very much like breaking glass -- a gentle effort is all you need correctly. 

Now then, onto the glass of the matter.  Cindy made two Breast Cancer Ribbon Hearts which are both stunning.  The design is a little flimsy on the bottom right of the ribbon and that is handled by the placement of a decorative (and fully functional) wire piece that helps anchor the ribbon end to the heart.   All in all it's an excellent design with one small flaw that is easily remedied by some extra decoration.   Beautiful.


Next we have the two Dress Suncatchers that MiMi made.  As you can see there's a bit of wire work to these but it's that wire work that makes these so exceptional.   They may only be made from just one piece of glass but these dresses sure have a way of speaking for themselves!  And just wait until you see a 'similar' pattern that MiMi brought in for me to see--  it's going to be outstanding!


Finishing off our completed projects is Betty's Monochromatic Stylized Heart.  She loves making these and even has one other in the works as well made up of entirely clear glasses.


And that brings us to our works in progress section of the blog where we start with Beth who has all but the tiniest slivers of glass cut for her Flower Window.  I've advised her to just skip those pieces because it will be far easier to assemble these flowers and then fill in the thin open areas rather than grinding little 1/8th pieces along with everything else.   So Beth began grinding her window and she learned the trick of grinding by using a piece next to the one you're grinding as a template.   One trip to the grinder usually makes a perfect fit using this method and once she understood the process it was as though a light went on above her head.  If I said she had a BIG smile on her face it would be an understatement!  Now she's running with it and as you can see she's got her bottom left corner fitting wonderfully.


As you can tell by her EXCELLENT use of pins, Terry has her Butterfly on a Flower Window almost completely ground now.   There are only a few pieces left to go along the top right of the window and then Terry will begin wrapping all of those pieces in preperation for the big solder.


Roy has begin work on his Wine Bottle and grapes window and I think it's shaping up nicely and quickly.  He was toying around with idea of adding a punt at the bottom of the wine bottle so I quickly drew one into place and I have to say that the more I look at this picture the more I think I'd like to adjust the top of the bottle as well.  That's something we'll discuss when Roy returns next week and if we change things up we'll discuss it in our next post.


Aeroscopes are so very IN now!  And what exactly is an aeroscope?  It's a stained glass airplane that doubles as a kaleidoscope.   Below we see the body of the plane that Tracey made with us this week.  It's all assembled and waiting for its support struts to be added which will surely happen when she returns to class.


Here we see Brenda is making progress on her Magnolia Window.   I love the flower petal in the 7 o'clock position.  It shows that Brenda is making full use of the flow of the grain lines that exist in the glass that she is using.


Here are two more Aeroscopes that Barbara H is assembling which are also ready for their support struts (we'll see what those are a little further along in this post).  Behind the planes you can see the triangular mirror sections which will slide into the body of the plane when to create the Kaleidoscope image when it's complete.


Susan R has only about 10 more pieces to grind on her Chef Window and then she'll be able to begin the wrapping process.  It's all coming together and I suspect that won't be long before we see this among our completed windows.


These are our last Aeroscopes for this post and these belong to Carol.  She was able to start attaching her support struts and now the wings of both her planes are rock solid since the wires are attached.  There are only a few wires left to add to other sections of the plane and I have no doubt that these will both be washed and colored when she returns.   Once the bodies are completed she'll move along to making the glass wheels that form the propellers.


Cindy is making a Waterfall Scene Suncatcher with a lot of tiny detailed pieces (just the way she likes them).  It's really quite a beautiful (large) suncatcher when its completed and at the rate she's moving we'll see this finished soon. 


Lara now has all of the glass attached to her Flower Of Life Window.  We I had a slight accident while carrying her border glass to the strip cutter which resulted in a lot of broken glass on the floor and Lara having to rethink her color selection for the final border.   In the end I think she did very well and she'll easily begin soldering this when she comes back in.


Ivory is the name of this dog and he is just two borders away from being ready to be soldered.   The dog itself is white but the background glass surrounding him is clear and what you are seeing is the white pattern paper through the clear glass. He actually stands out much better when this is off of the work table.


Becky S has most of her background cut for her Seahorse Window and she's hopefully going to get the missing pieces from the remainder of the aqua glass she was using.  It's going to be close but I think we can get this all together next week without dipping into a second sheet of glass.   I know I love a challenge and just by looking at the detail in this window I'd say that it's safe to say that Becky loves a challenge as well!


You can always tell when a student loves a window by how quickly they make it.   Rowena fell in love with this when she first saw it and next week she'll get her final border attached and be ready to flip it over to solder the back side.   All of this work was done in just two short weeks but what you don't see is the size of this window-- It's a good three feet tall.  And beautiful as well!


As I predicted, Mary Grace has her first border attached and more importantly she has all of her missing pieces filled in.   The final border for this will be cut when she comes back in and I have no doubt that it will be tacked together and ready to be soldered.


And to end this post we take a look at the pattern that Linda L has begun working on.   This is another HUGE window measuring almost 4 feet tall.   The design is beautiful and I have no doubt that Linda will handle it like a pro.  The only hard part will be the coral in the bottom left but once all of those tiny pieces are completed the rest of this should be a piece of cake.


So there you have it.   Another look at what's been going on during our classes.   They're always fun and I hope all of that fun shines through here in our weekly posts.

Paul
Bayou Salé GlassWorks