Monday, August 17, 2020

Who's Sorry Now?


Don't work uncomfortably.  That is probably the most important tip I can give you.  Never work past the halfway point of your window-- spin it around so the area you are working at is closer to you.   When grinding it's important that you are as 'on top' of the piece that you are fitting as you can be.  Working at an angle promotes errors. 

When you find your arms or hands are crossed, un-cross them. I see this happen all the time when students trace patterns or put hooks on suncatchers. 

If your window is is too high when you tip it on edge to cover your channel with solder then put it on something lower (perhaps a stool).

Place your soldering iron stand on the right side of your project if you are right handed and on the left side if you are left handed.

When cutting up your pattern pieces separate your pattern into smaller sections  by cutting through and following a line from one end to the other.  I've seen too many students trying to cut small pieces loose from a pattern that's two foot by 2 foot.  Break it down!

When tinning wire with lead use smaller lengths rather than longer ones which wobble all over the place giving you an unsteady surface.

And clear off your work space.  Too many students feel that everything they have should be on the table leaving them with a small 12"x12" area to work within.   Put unused items on the floor or in the next room.  If you aren't going to use it right away and space is limited, leave it in your car.

The more comfortable you are the better your work will be.


Okay then, here we are looking at Cindy's beautiful Cross On A Hill Window.  The pale blue sky offsets the clear iridised cross perfectly and both contrast with the deep purple border and cloth.  This started off as a suncatcher and now it's a full fledged window that Cindy has beautifully brought to life. 


Jan's Mr. Pickles Window may be minimal art but it's still very expressive and recognizable.  You've got to love that lead beak that was fashioned out of a snip-it of brass channel and check out how that baroque background glass was cut from one piece so that the pattern is unbroken throughout the window.  This is the correct was to use baroque glass.


Betty just loves her Pair of Pumpkins Window and I do too.  Again she's used a brown green glass that I never much cared for as her background and now I've come to realize that I've treated this glass harshly!  It's perfect.


Tracey's latest Cardinal Window was completed  and her work, as always, makes this window shine.  The blue background glass alone makes this window 'speak' and after you throw in the brilliant red Cardinal with complimentary yellow flowers well, it all comes together and makes this window sing.


Here's a look at Helen's first window with us.  Her LSU came out perfectly and she soldered like a professional after just one quick lesson!  I'm thinking that we're going to be seeing big things from Helen in the near future.


Lara had a problem this week when we discovered that we didn't have any more of the background glass for her Flower Window which made it impossible for her to continue.  When life hands you lemons you make lemon-aid, right?  Well, in this this case she shifted down a gear or two and made a pair of Lemons as a Suncatcher complete with a curly hanger/stem.  Wonderful!


Linda L finished off these beautiful Feather Suncatchers which only needed to be soldered when she came into class.  Once these were quickly  completed she moved on to a bigger project that you'll see a little later on in this post.


Mary Grace picked up a few Beveled Christmas Ornaments while they were on sale and slapped one together quickly to see what they would involve.   There really aren't much work and they really look great when they're finished. 


Melissa got all of the clear glass cut out for her Diamond Bordered Fleur De Lis Window and set upon grinding all of the pieces.  Since this window requires precision she hasn't broken apart the clear glass behind the FDL's yet-- she's grinding large clear diamonds into place and then when everything else is tacked together she'll cut them into their respective pieces.  This will ensure that everything lines up perfectly. 


Here's Linda L's next window with her completed feathers laying on top of it (I just noticed those sitting there!)  This calm and peaceful scenery window is already well under way even though Linda has only started it just this week.  The background mountains may possibly change colors when you see this again since they so closely match the color of the tree that they connect with.   We'll see what happens when Linda returns.


Cindy has begun a new window this week and it's a geometric deign with a lot of angles and colors.   She got her paper pattern traced and cut out while in class and has even begun cutting some of the glass.   I suspect you'll get a much better feel for this window when you you see it again next week.


Shawn returned to class and didn't miss a beat when it came to cutting as she finished scoring and breaking loose the last of her glass pieces.   Even in its un-ground state there's no mistaking that this is Mario.  I can't wait to see this completed.


Annette has begun working on a HUGE oddly shaped Transom Window that features two Fleur De Lis'-- one small (this one) and one larger more detailed version.  I'll show you the pattern when Annette comes back in-- it was too large for me to take a picture of with all the tables being covered with every else's projects.  Annette will first make the two fleur De Lis' since they are easily manageable on their own and then she'll add the background glass.  This is the best way to make large windows.


Speaking of Fleur De Lis', Ann M absolutely loved Melissa's Diamond Bordered Fleur De Lis Window and has begun making one for herself.  It all starts with with four FDLs and with all of them cut out and one already ground she's well on her way. 


Angie's large Pumpkin Window is looking exquisite!  Her glass choices are perfection as each pumpkin is made of a different glass which stops it from becoming boring with a large amount of repeated color.  She's got this all ground and is already wrapping her pieces.


Sheri's Broken Rose Window is very close to becoming a finished window.  You can clearly see the design now that she's ground everything (and wrapped it) so perfectly.   This is an idea I wish I had thought of.


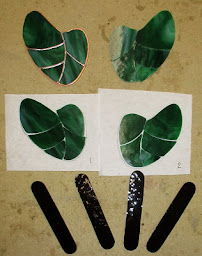
Susan R is making another standing Bird Ornament and in one class she has it ready to be assembled.  The leaf/stand is already soldered and that leaves just the bird to go.  I'm going to considering this completed at this point since there's so little left to do.


Next up we have the Flower Window that Lara was working on when we discovered that we didn't have any more of the Tight Wave Glass that she used for her background.  We do have it ordered so hopefully she'll get to resume this when she comes back in.


Beth B has her first window completely cut, ground, wrapped, and tacked together.  All she needs is to do is solder it and then she'll be well on her way to starting her second project!  I know what it will be already but I'm not going to spoil the surprise.


Linda F's Mardi Gras Mask Panel is another project that is just about completed.  A little solder will go on this and then she'll 'post' it in the yard.  Well, at least come Mari Gras time she will!


White on white is my bane so here's a look at Susan D's latest bird project.  She came in with a drawing she had made of a picture on her phone but she wasn't happy with it because something was 'off' about it.  She asked for my help and I had to confess that I was lost (and that she had done a better job than I could in free handing it).  So she texted me the picture, I resized it in Paint Shop Pro, and then printed it out and traced it.   And that, ladies and gentlemen, is how I do most, if not all of my drawings.


Belinda's latest Church Window was all wrapped and tacked together during class.   The only things left to do on this is to get the lettering fired onto the scrolls below the church, add some borders and then put a finished solder bead on everything.  However, until all that is completed, "the end is not yet."   (Mathew 24:6)


Yep, Martha moves quickly on Franklin Lamp Post Windows now.   This is her third variation of the pattern and it's also one of her quickest ones yet.  I'm ready for my borders, Mr. DeMille.


With the last of her pieces ground, Mary walked out of class ready to wrap her Round Magnolia.   It's hard to see the flow and turning leaves right now (remember that white on white is my bane) but once this is wrapped you'll easily see the delicate details that make this window so stunning.


When her Christmas Ornament was soldered Mary Grace returned to working on her Praying Hands Window.  With the front side soldered and some of the border soldered on the back side as well it won't be long before she can hang this up and move along to a new project.


Roxane's work is amazing.   She's completely soldered her Angel Window and the only thing left to do is put a channel on it and then wash and color it.  We're also going to knock out the bright yellow halo and replace it with a lighter amber glass because every time I look at this I see a sun behind this angel's head.   I just wish I'd noticed it before the piece had been tacked into place.


With all of her pieces ground Shelley is ready to wrap this and then tack it together.  She really wants to have some bright colors surrounding it so I've told her bring in her brightest pieces of scrap glass next week so we can cut them into strips and then assemble them randomly around her Address Window. 


Lastly we look at Jan's Poodle Window.   Slowly but surely she's grinding away at this and as I always say, slow but steady wins the race.


That's it for this week.  Come back soon to see even more finished projects and 8 new ones get started!

Paul
Bayou Salé GlassWorks

Monday, August 10, 2020

Why Don't We Call It A Day

There's more than one way to skin a cat and there's more than one way to number your pattern pieces.   The most important tip I can give you is to NOT jump around the pattern while numbering.   New students tend to number all the leafs, then all of the flower petals, then all of the background, etc. etc. which is a VERY bad idea.   You should never put a number on one piece and then jump across the pattern to pencil in the next number.  If you find piece #45 on your pattern then #46 should be within one or two pieces of it.   Jumping to and fro with your numbers only makes things harder to locate.   In the picture below pick any random number and you'll find that the next number will be somewhere near it.   Now count out all the pieces starting with #1 and you'll see that although we move somewhat erratically around the pattern we never really move more than two or three  pieces away from the piece we're last numbered.  This is how to number a pattern correctly.  If you discover you've skipped a piece or two (like I purposefully did below)  label it with the same number to the left of it and add a 'B' to it.   This is by far the easiest method to number your patterns so you can easily find where your piece of glass goes.


Linda L's Celtic Window is finished and it is a very professional job indeed.  I defy you to find a stained glass Celtics window that looks better that this.  It can't be done, period.

Jeannette's the winner this week when it comes down to getting the most amount of work done in a single class. She started working on this three pane window when she walked in the door and by the time she left all three panes were completed, mounted into a beautifully distressed frame, and then taken home to hang. Gorgeous!

 Linda F's Black Pumpkin Yard Post Panel is all mouth and eyes but you immediately know what it is. I regret that the lead lines in all of that black glass didn't show up in the picture because it helps define the round shape of the pumpkin which is hard (impossible) to see here.


Betty's on a roll as you can easily see with her latest trio of Yard Post Ornaments.  I'm unsure if she tried for the effect on the wing of the bottom Pelican but doesn't it look like the wing is made of two different pieces of glass?  That's some really excellent placement there!  


Susan R completed her Monogram Sign for her Yard Post and the two blue glasses that she used match perfectly while still managing to give some variance between the border and the background.  It's a nice subtle distinction.
 Linda L put the finishing touches on her 3 Suncatchers as well as her Celtics Window. Two Beveled Hearts and a new Feather design were also taken home with her ready to be gifted.


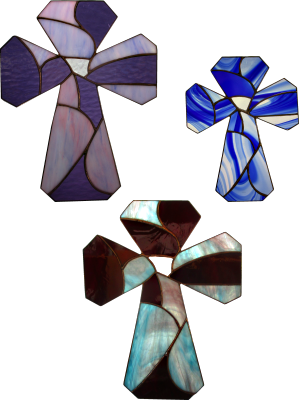
Ann  got three more crosses completed and then we retooled the patterns for these just a bit to eliminate some straight lines which had crept into the original pattern.   The differences are small but they'll make a big difference structurally and add some extra stability to the design.


Sheri saw this Broken Window Rose on the internet and is running with it. It's hard to believe but the majority of the window is all cut out already and Sheri is ready to begin grinding at this point. Once the broken borders are attached she'll fill in the two empty areas with a piece of glass to finish it all off with a look I've never seen before.

Belinda knocked my socks off when she walked into class with her Church all ground and her slats all cut!  She's begun wrapping all of those slats so this is getting close to being completed already.  I told you the second window always goes faster!
  
Cindy's Cross Window looks fantastic.  When you see this lit up from behind you will surely be impressed with the glass she's used for the sky and the glass that she used for the ground.  This is ready to be foiled so it won't be too long before this is hanging up.

Betty started making a Pumpkin Panel for her yard post but liked the pattern so much that she added two borders to it and turned it into a full fledged window.  It still needs to be soldered but that won't take her long at all. 

Cheryl had a VERY productive night with us as she wrapped her final border, tacked it into place, added a zinc channel and then began soldering her Address Window.  We won't see this finished for a few weeks though as Cheryl will be some classes, but when she returns I expect this to be finished fairly quickly.

Angie is making a similar window to what Betty made but with more pumpkins and in a much larger format.  With all of the glass cut she's ready to begin grinding and since Angie works at home as well as in class she could finish this up pretty quickly.
Jan  almost completely finished cutting out the glass for her Poodle Window but then moved along to a small Bird Panel so she could work on it at home (since it's smaller and easier to transport).  Look to see the Bird completed upon her return and even more of her Poodle ground.

Barbara H not only got the glass for her purple shadowing cut out but she also got the clear textured background cut as well.   Next Barbara moved over to the grinder and began fitting her pieces perfectly into place.  It won't be long now.


Mary Grace has her Praying Hands Window all tacked together and ready for solder!  That was some fast work on her part and people are already praying that they are the one to get the pattern next!

In keeping with a religious motif we next look at Roxane's Angel Window.  She got not one but TWO borders cut and attached and then moved along to soldering this beautiful Window.  With the front almost completely soldered (exquisitely I might add) she'll be finishing this very quickly.

Martha's moving full steam ahead on her third Franklin Street Lamp Window.  Now get this-- she's planning a fourth as well!   After that I think it's time to take a break and do  something else though she's becoming rich making these and selling them!


Beth B has finished up with all of the grinding on her Cardinal Window and moved along to the wrapping phase of her project. Her foiling is wonderful and she's taken it home with her to wrap so there's a good possibility that she could begin working on border(s) when she comes back in.

Shelley's Address Window got halfway ground while she was in class and she's already decided that her border will be a mix of colors featuring irregular cuts at varying angles.  We've seen this  effect before in a handful of Tree Of Life Windows and I think it will really make this window stand out without distracting from the numbers at all.

And to wrap things up we take a look at four Lily Pads and four Cattails that Susan D cut, ground and began wrapping.   She started these when she walked in the door and all of the heavy lifting has already been done in just one single class.

And there you have it.   This new version of Blogger seems be be even worse than it was last week.   Any formatting errors  you see in this post were things that I simply couldn't fix.  Highlighting text and trying to format it usually doesn't work and even worse, text and pictures above and below the highlighted text can become permanently linked to the text resulting in bizarre effects.  I hope they fix this soon.  (I just found a way to revert to the old version but since this post was created in the 'improved' version it still doesn't want to do exactly what I want it to.)

Paul
Bayou Salé GlassWorks