Tuesday, March 28, 2017

Saying So Much With So Little


What is one of the most important areas of your window?  It's the lines that square off your window before the border is attached (outlined in red below).   If these lines have pieces of glass that are poking out beyond the pattern then your border will be crooked and create  a very obvious flaw.   It's actually amazing how much this line matters so be sure to pay strict attention to it, especially if your window has to fit into an opening or be a certain size.   Patterns aren't drawn to give you a rough idea of where the glass should go-- they are drawn to be followed precisely.   This also includes making sure that your corners line up which we will discuss next week.


So Mary has completed her first window with us and it's a winner!   She did excellent work throughout the process of making this and even in her first window I saw real growth in her abilities.   She's got her next window all picked out and if it turns out even half as good as this one did then she'll be doing great!


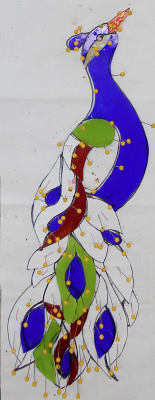
Cindy finished her large Peacock Suncatcher just as I suspected she would.  She made quick work of it especially considering that she didn't do anything on this at home.  I have two of these cut out myself and seeing this completed has got me itching to finish mine (right after I get a few orders out of the way).


Mary Grace finished her Medium Sized Beveled Panel and should pat herself on the back for plowing through this window so quickly and efficiently.  I think she's really getting the hang of this!


Rowena completed two projects this week, the first being this  LSU Window.   This is a window that she's done many times before and has down to a science at this point in time.  Although it's hard to see in the picture, I love the rough, irregular glass she used for her background.


Betty completed her Christmas Bells Window and even cut and attached her own brass channel!  Although she feels she has limited strength in her hands she has learned that it doesn't actually take a lot of strength to cut channel-- just firm pressure with a gentle rocking motion.  Attaching the channel went very easily and as you can see the finished window is gorgeous.   The berries took about 10 minutes to incorporate and really add to the overall look of one of my favorite Christmas Windows.


Rowena also came with with a Flower Hand Mirror already tacked together just needing a piece of mirror for its center.  Once that was cut she quickly finished this piece. We haven't seen one of these in a while now so it's nice to see it again.


And wrapping up out completed projects we have two more Crosses that were made by Terry.   She knocks these out faster than you can say, "Abracadabra!"


Susan D resumed her grinding and has perfect fits on all of the pieces she's ground so far.  And I don't expect that to change as she works her way downward on this window.  I can already see that this Fireman's face is looking perfect.


Carol got her final border and a zinc channel attached to her Long Tall Waterlilies Window.  I must say that the secondary green that she picked for her final border works wonderfully with the rest of her colors.   Since she has the front side soldered and she's taken this home with her I'm going to go out on a limb and predict that we see this completed when she comes back into class next week.


Linda F has been missing for the past few weeks but as you can see she has not stopped working on her stained glass.   All of her Dragonflies and Waterlily's Window has been cut out and she is now grinding all of those pieces.   She got a lot accomplished in just one class and I have no doubt that this window is going to be one of the brightest feathers in her cap. 


Susan R is putting the finishing touches on her Easter Rabbit Window now.   There are only eight pieces of border glass to wrap before she can start soldering this project.   Rabbits are the in thing now and I'm happy to see everyone finishing them in tome for the holiday.


Shelley got this John Deere Tractor window started while she was at home and then stopped working on it.  This week she brought it into class so she could get it up off of her work table and hanging in a window.   She got all of it ground and almost all of it wrapped while she was in class so I'd say it's safe to say that this window will be out of her way soon.   I love the pattern that Chad drew up for her.


Jeannette  cut out all of the background glass for her double Humming Bird Window and then got it ground, wrapped and tacked together.  Once that was done she was able to get a border cut for it.  She's skimmed her pieces and took them along home with her to wrap so she can get this window fully tacked together when she comes back in.   That will give Jeannette almost a full class to start soldering this.


This week we saw Jeanne begin working on grinding the first of her pair of Butterfly Lawn Ornaments.  She's just got 6 pieces to go and this one will be ready to be wrapped and soldered.


 Lara now has all of the glass cut for her Louisiana Parishes Window.  She got the clear sections of her background attached pretty quickly and then got her inner border cut and attached.   The green she picked out was striking enough to not blend in with all of the colors in the center of the window, but not too brilliant as to take your eyes off of the focal point.   She's taken her final border wit her so she can get them wrapped at home so this is another window that will be soldered next week.   There no chance a window of this size can be soldered in just one class but possibly in the following week, well, who knows!


Linda L is another student who went full steam ahead on a project this week and knocked it out of the ballpark.  Linda decided to work on this breast cancer window and came into class with just the pattern sitting in front of her.   By the time class was over with Linda had the top all cut ground and tacked!   Next she got her border cut as well, which she's going to try to wrap while at home this week.  She really is making this  a quick little diversion.


Jan got her Baseball Field Window's border tacked on to the window and then we put a zinc channel around that to add stability to this large piece.  The size of the channel is always dependent on the size of the window.   Larger windows need more support than brass channel can provide  around their outer edge.  Once you start hitting the four square feet mark it's time to stat thinking about using zinc channel and that's just what Jan did.  She's got the front side soldered and may very well wrap this up next week.


I do believe that Ann has just about all of the pieces cut out that she needs to begin grinding her large Fleur De Lis Window.  Once the four corners and the center FDL are ground she'll wrap them, tack them and then use them as pattern pieces to cut her background from.   Grid work backgrounds always go together easier this way.


 Barbara cut out even more of her Autumn Scene Train Window and is thinking that she may move over to the grinder next week to help break up the monotony off all the cutting and color selecting that she's been doing.  Sometimes you need a little break and in this case she'll get a much better feel for how this will look once some of the pieces start fitting together.


Mothra started working on another Fleur De Lis Window but unlike her last one, this doesn't have any bevels in it.   She's replaced the pre-cut bevels with pieces that involve tight curves with many cuts.   Your average FDL is made up of seven pieces but this one has 17!  And I do believe that she'll be making three of these!


These are two Suncatcher Angels that Mary Grace has been working on.   With just their Halo's left to go I'm thinking that these will be finished and we'll see Mary Grace start a new project when she returns to class.


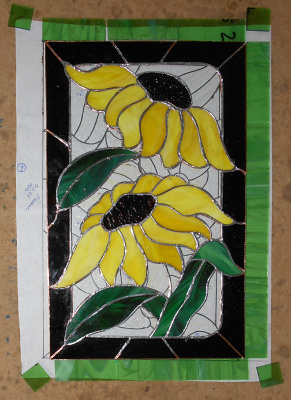
Becky S has begun making a new double Sunflower Window.   This isn't the same pattern as the one that our Tuesday morning ladies make, however.   This is based on a Spectrum Glass Pattern of a single Sunflower that Becky doubled and then assembled as a single window a few years back.  Wait until you see the colors in this one-- Becky always does a bang up job on her color selections.


Terry also worked on two more of her large Cross Suncatcher and is utilizing the grain of the glass in the green one to give it some added depth.   Sometimes a simple angular approach can really spice things up as Terry is seeing here.   We'll discuss this in more depth once we see this completed.


And Brenda is also making a large Cross Suncatcher and she's just about ready to get it wrapped and soldered.    


This week we have no missing pictures but not because I forgot to take them.  Myrt finished her Pair of Cardinal Windows but she planned on washing them and coloring them at home.  It's actually going to live with another student of ours so hopefully someone will be able to get me a finished picture of this window.

And lastly, Bonnie got all of subject matter ground on her Mystery Window this week and then began wrapping it.   When I turned back around she not only had it wrapped but she had it tacked together as well.   Then as she departed I saw she had the background glass cut as well!  That's what I call progress with a capital P.  It's too bad I can't show you what she's accomplished though because this window is a secret.


Paul
Bayou Salé GlassWorks

Monday, March 20, 2017

Put That In The Blog!

We're starting things out here with a safety lesson rather than a tip.  Lately we've seen a lot of students sort through the glass in the racks and leave pieces poking out.   This is a dangerous thing to do.  After you've decided that you aren't going to use a particular sheet of glass please slide it back into the rack so that no sharp edges are exposed.   This also applies to any sheets of glass on the work tables.  Please be sure that your glass is not hanging off of the table.  When I see this happen I always place the glass further onto the table so no sharp edges are 'exposed' but lately I haven't been able to keep up.  I'm not saying this to stop someone from having a piece of glass get broken, I'm saying it because someone can get seriously injured because of it.  Thanks!


So then, our first finished project this week involved more than just glass cutting and soldering.   Beckey S's Cheetah Window has wires soldered to it to form whiskers and spots 'painted' on it!    To achieve this effect Becky traced the outlines of each of her ground pieces of glass that would have spots on them onto paper.   She then drew in spots by hand with a sharpie marker.   We scanned the images into the computer and then printed them onto a special Decal Paper that works only with a laser printer (an ink jet printer won't work).    This Decal Paper was then cut up to match Becky's glass pieces again (which was why we outlined them in the first place.)  Next Becky briefly soaked the paper pieces in water and then slid the decal off of the paper and onto her glass pieces.  After drying (for a day) the glass was fired in our kiln overnight and the end result became pieces of glass with permanent spots.  We even went so far as to blur the spots before we printed them to give them a less sharp edge.   All in all it worked WONDERFULLY as you can see by her finished piece below.  Beautiful!


Martha finished her Beveled Fleur De Lis and her soldering on this piece was Tour De Force!   I touched up two run-throughs on the front side and that was all that needed to be done.   Kudos to Martha on a job VERY well done!


This week we also got to see Terry complete her humming bird window and the colors are spectacular (as is the rest of the window).  Terry always catches people's eyes with her work and this window is no exception.


Betty put the finishing touches on her Mardi Gras Mask Window this week and it's another winner.  Betty flies through windows pretty quickly and she tends to donate most of them.   That's a heart of gold right there.


Shelley finished her three Legged Cat Window and I'm also posting a picture of the original drawing that her son made which this was patterned after.   As you can see, she's followed the drawing perfectly.  Shelley had to paint the face onto the cat which helped tie everything together nicely.  Why the dreary day?  Well that's because this cat's name is Stormy!


Bonnie completed her Butterfly Lawn Ornament by attaching the stake that will anchor it to the ground.   Once that was done she washed it, gave it a coat of wax for protection,and took it home to put in the yard.  Don't bother looking for the stake in the picture though-- I photoshopped it out as I do with the hangers that we attach to completed windows as well.


And our last completed project this week was this Rabbit Lawn Ornament which was made by Rowena.  this is a sister piece to her other Rabbit Lawn ornament and has something slightly different about it that is hard to spot unless you see the two of them together-- this is a mirror image of her first one!  When I went to draw the eye on it I knew there was something 'off' about this one! lol


Susan D has all of the glass cut out for her fireman Window and she has begun grinding it already.  Her work is meticulous which means that the face on this fireman will surely look great.  Faces are difficult to do because just the slightest twist in a single piece of glass can render the face disfigured.   I have no doubt that this window will be a showstopper though.


Carol got all but the borders cut, ground, wrapped and tacked for her Waterlily and Reeds Window this week.   She'd decided to go with a double border on this piece and got the first thin, clear accent border attached.  She then got a second green border cut and sized and she's taken those pieces along home with her to wrap.  When she returns she'll be able to attach the final border, add some channel and then start soldering. 


Ann made some major progress on her Fancy Fleur De Lis Window this week.   She won't be cutting out her background glass until the corners and the Fleur De Lis are tacked together.  This will help make her grid work line up.  It's nice and colorful and the window is BIG!


Cindy started working on a Peacock Suncatcher/Window(?) and has a great portion of the bird cut out already.  She's begun grinding her pieces which means that this will soon be completed-- especially of she keeps up at this pace!


Next we look at Terry's newest Cross.   As you can see it's already been foiled so this will surely be a completed project when we return again next week.  She's going through these crosses so fast I can barely keep track of them!


Jeannette has all of the subject matter for her Humming Birds and Fuschia Window all tacked together and the original game plan was to cut the background out from one piece of glass; however, the background glass that Jeannette wants to use was cut in half the wrong direction so it's too small to cut everything from. (If you look closely you can see the cut running down the center of the glass.)  Rather than making three separate passes of cutting, grinding wrapping and tacking to get things to fit nicely it will be far  easier to just cut pattern pieces for the background and cut each piece individually.  She may have lost the battle but she WILL win the war because you can already see that this window is going to be beautiful.


Myrt has officially finished cutting all of the glass for her Two Cardinals Window and even managed to get all of the pieces tacked together.  The double border system that she used really sets this piece off nicely.   I guess this means that Myrt will begin soldering this when she comes back to see us next week.


Next up there's Mary Grace who started working on a smallish beveled panel.  She's really catching on to this Stained Glass stuff because before class was over with she had it all cut and ground.  Her center is even tacked together already leaving only the border left to wrap and then attach.   This will end up fitting into a frame that she has and the sizing is perfect.  Not only did Mary Grace do an excellent job on cutting and grinding this piece but she also got two Angel Suncatchers cut out as well!  That's what I call progress.


Mary is moving along nicely on her first window with us.  She got her final border attached as soon as she walked in the door and then got some brass channel attached to the window as well.  After that was over with she began the 'scary' task of soldering but you know what?  Mary wasn't afraid at all and she did a wonderful job on the front side of this project.   Next week she'll complete the back side (which, as you can see, is already started) and then take this home with her! 


Jan started her class by wrapping and then tacking the four pieces of background glass to her Baseball Diamond.  Once that was done we remeasured the size for her border to make sure the finished window will be the proper size (measure twice, cut once.)  We put her sheet of border glass on the strip cutter and within a minute we had all of the strips needed to make her border.   We then cut the strips into equal smaller lengths and then Jan skimmed those border pieces on the grinder.  Jan will surely begin soldering this window next week because she's taken her border pieces home with her to wrap.


Tracey, like Mary, tacked the border to her Jester Window and then watched as I demonstrated how to cut and attach a brass channel to it as well.  After a quick soldering lesson Tracey was raring to go.  Later when I came back to see how she was doing I discovered that Tracey took to soldering like a fish to water.   With just the back side left to go I won't be surprised to see this be finished when she comes back next week.


Linda L began cutting out all of the letters for her three Welcome Windows and made great progress on them.   Doing three of anything will wear you down a bit due to the repetitiveness of it all so next week Linda may very well be taking a break and work on a new small window just to help break up the monotony of these three projects.


Betty not only finished her Mardi Gras Mask, she also tacked together her Christmas Bells Window as well.    Once the center was tacked together we were able to strip cut her border and then cut them down to their individual pieces.  Betty chose a green glass for her border and even added some glass globs to form Holly Berries in the bows.  Nice.


And Rowena has officially started to solder her latest LSU Window after getting the center letters and the border all tacked together.   She's already got her brass channel attached and the front side soldered so she's going to take this one home for good when she next returns. 


Susan R got all of the glass cut and ground for her Bunny Lawn Ornament which is indeed a major accomplishment for one class session.   Everything fits together wonderfully and Susan will wrap this at home between classes during the week.


Bonnie not only completed her Butterfly Lawn Ornament-- she also worked on this mystery piece as well.   All I can safely tell is is that she has the center section all cut out and mostly ground.   The rest of this story will be revealed at a later date.


Jeanne has decided to make a few Butterfly Lawn Ornaments and started out by picking out her color schemes.  Over the years we've seen this popular pattern done in many different colors with many different color placement variations.  In the end Jeanne settled on my favorite rendition of it and you can see in the picture some of the different glasses that she'll begin cutting out next week.


And to wrap things up I have to fess up and admit that I didn't get a picture of Tasha's Sailboat Window this week.   It's all tacked together and just awaiting a soldering job so it may very well be completed when she return.  Completed or not I promise to get a picture of it then.


Paul
Bayou Salé GlassWorks

Sunday, March 19, 2017

Get The Lead Out

We had a pair of Stained Glass Weekend Workshops in January and now we're finally getting around to posting what was completed in them.  First off I have to state that we thought there was only going to be one Workshop but we screwed up the dates and told two people of our four students that it was happening on the wrong weekend!   Everything worked out in the end and we had two small, but very personable, classes that went wonderfully as you can see in the pictures below.  Now let's talk about what took place on those weekends.


We had two returning students (Angie and Roxane) and two new students (Sandra and Rhonda) who had never made a stained glass window before.   Sandra and Rhonda started their weekend off with a cutting lesson that lasted about an hour.  At the end of that hour both of these delightful women were able to cut out the moon shaped curves you see below with no problem at all.  The biggest rule in cutting glass is learning that before you cut an inside curve you need to cut 'point to point' first.  Sandra and Rhonda passed with flying colors (as did Angie and Roxane, but then again they're old pros by now!)


Sandra decided that she wanted to make a Parrot Window and the colors used in this patten really make this a stand out window.  As you can see below, Sandra has most of the glass cut out for her window with just the background glass and the eye of the parrot remaining.


Once all of her glass was cut out we added a carpenter's square to the left side and bottom of her window and Sandra began grinding her glass to smooth things out and to ensure a perfect fit.   You can see that everything fit together wonderfully and the next step is for Sandra to begin foiling her window and then tack it together and solder it.


And here's her completed window.   Sandra did a wonderful job soldering and had very little trouble despite some minor apprehensions about the process.   In the end she left with a perfect window that no one would think a beginner made, don't you think?


Rhonda worked on a Geometric Window that we fondly refer to as 'The Genie'.  This window is made up of a lot of straight cuts which need to line up perfectly or the effect of the design is ruined.   You might think that the pieces below have already been ground but then you'd be wrong because they aren't!   As you can see, Rhonda did a wonderful job cutting her glass.


Once all of her glass was ground, foiled, and tacked together Rhonda put the final solder bead on both the front and back of her window.  Look closely and you can see the spool of lead that she's literally melting onto her window with a soldering iron.


Here is Rhonda's finished window.   All her lines are straight and her curves flow evenly and symmetrically which is key to a great looking geometric design. From start to finish Rhonda showed that she had an attention to detail which reflects in her completed window.


Roxane decided that she wanted to make a Jesus Window so she sent me a picture of this pattern and asked if she would be able to do it in two days.   Since this is her 5th or 6th (I've lost count) Workshop with us I knew that she was certainly up to the task so we drew up the pattern, skipped the glass cutting lesson and went straight into the cutting process as you can see below.


After she got her pieces ground and wrapped Roxane tacked all of those pieces together so she could get her final border cut and attached.  That last border goes quickly and easily thanks to the strip cutter.


Roxane turned out yet another quality window in a record amount of time!   Her Jesus Window looks like it would fit wonderfully in any church (and even looks better than many church windows that I've seen)!  Gorgeous!


Last, but not least, we have Angie who, like Roxane, has attended many of our weekend workshops already.  She decided to make the Double Sunflower Window with a double border and here it is with everything cut but the borders. And no, this has not been ground yet, that's just Angie's Stained glass skills showing in this early picture of her window.  


With the first irregular border cut, ground, and tacked to the center section Angie got her final green border cut out on the strip cutter and then sized.  Here you can see that she's skimming some of her border pieces and getting ready to foil them.


Angie's finished window is indeed a work of art and the color she picked for her final border blended perfectly with the colors of the rest of her window.  Angie has only ever taken Weekend Workshops with us and yet she's able to complete windows on her own while she's at home away from us.  That's what I call an attentive student (and a good friend)!


Although I regret that all of our Weekend Workshop Students couldn't meet and get to know one another, I did enjoy the more personable one-on-one time we had by splitting the class up over two different weekends.  I suppose it's a case of looking at the glass as though it's half full or half empty.  No matter, both weekends were fun and VERY enjoyable and everyone's glass was half full or more!

Paul
Bayou Salé GlassWorks