Tuesday, June 29, 2021

Juicy Fruit!

I'd like to remind all of our students that the shop will be closed for the next 2 weeks so please don't show up for classes!  I'm running late with this post but since no one from Tuesday morning showed up I think it's safe to assume that everyone knew not to come in today. 

Okay then let's start things off with Kerry's Butterfly in the Sun Window which is so bright and colorful that I actually had to tone it down for the picture below.  Changing the sun from red to yellow was what this window needed as it changed to look of the window altogether from being dark to becoming bright.  I won't even mention the perfect yellow/orange combination that Kerry used for the final border because it truly speaks for itself.


Kate completed her Dragonfly Window and as much as I want to tell you that we'll see more great things from her I just can't do that.   Due to personal reasons she has to drop out of class and she's just not sure how long it will be until she's able to come back.   That's a shame because she shows great talent.   We hope to see her again soon and wish her our best. 


I believe that this is the first Wedding Box that Cindy has ever made and although I might possibly be wrong about that I can say without a doubt that it's certainly the first box that she's made that she designed herself.  There's a lot of amber iridised glass in this and when the light hits it this box REALLY sparkles.  You can easily tell that although this may be Cindy's first Wedding Box this is not her first stained glass rodeo.  Her work is just too good to possibly believe that! 


We have 3 boxes to look at this week-- the first (above) was done by Cindy and the next two by Martha. The actual invitation that Martha used in this had a scalloped edge so to square it off a solid piece of off-white iridised glass was used to back the invitation so there wouldn't be little crescent openings all around the invitation.   All in all this is a very beautiful box don't you think?


Martha didn't have an invitation for her second Wedding Box so she just presented the newlyweds with a box featuring our ever popular Sunflower heart design.   She just set the heart off at a tasteful angle and then squared it off while leaving the point of the heart overhanging to form a 'lift' of sorts.  Stunning and thoughtful, I know that this is going to make the bride and groom very happy.


Mary Grace got her Cardinals in a Hoop completed and it features a wonderfully elegant hanger soldered onto the top of the hoop which not only supports these beautiful birds in a tasteful manor but which also suspends a beautiful jewel to accent the piece as well.


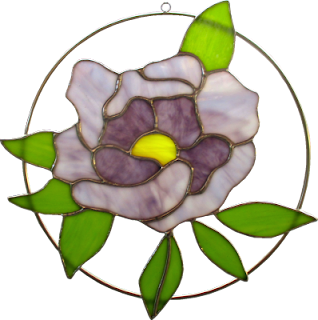
And then there's Linda F who completed a Hoop of her own while in class.   I'm unsure as to what this flower is (I'm botanistically challenged) but the lavender glasses that Linda used mixed with the almost lime green leaves really make this piece sing no matter what kind of flower it is!


Susan's second Bee/Garden Gnome is just as fun as her first one was.  And this one took far less time to make because she was comfortable with all of the cuts and the grinding.   Does that make it better than her first Bee Gnome?   Not at all-- they're both perfection!


Now that all of her glass has been cut Annette has begun grinding all of the pieces for her Crow and Moon window.   The moon and some of the clouds actually extend outside of the border and some of the pieces such as the crow's feet cut into the border which makes grinding this into a window that is perfectly square a little bit of a challenge. Annette is doing great though and all that extra work will give this project a unique look which will make it stand out even more.  I'm loving this!


Shelley is well underway on her sunburst window which is a reproduction (although in a different aspect ratio) of an older window that she's trying to match.  So far everything is fitting together nicely and I don't believe that Shelley will be spending much more time working on this because her skill level is way above what it takes for this window to be completed.


Judy M has just started work on this Buxom Pair of Wine Beauties and is moving along on it at a nice rate of speed.  Although Judy is still somewhat new at this I believe that her making this window will not only go smoothly for her but that it will also boost her self confidence when it comes to window making.    She's also going to end up with a great head turning window as well.


After completing his Butterfly Window Kerry also began work on our famously popular Stylized Fleur De Lis pattern.   The color choices are what make this and Kerry has decided NOT to go with a traditional series of browns and ambers.  I think that's a nice change of direction for this window because the version of this that really sticks out in my mind the most is the one made using green glass.


Next up we have Sheri who is so close to finishing her Chakra Yoga Window that it almost hurts.  With the front and the back soldered all she has left to do is knock out 2 pieces that accidentally got soldered in backwards, solder the gems into place, get channel attached the outside edge and then clean and color this window.  That may seem like a lot but there's a possibility that it could happen inside of just one class. We'll see what happens when Sheri comes back in 2 weeks.


Melissa is a grinding fool and the bottom Butterfly portion of her window is coming together wonderfully.  The hardest part of this is getting the butterfly ground because after dealing with all of those tiny pieces the larger  (and fewer) pieces of the Iris at the top of the window will be very simple.  


I'm pleased to say that all of the intensely small pieces don't stop you from seeing the word 'Spring' in the center of this incredible window that Susan D is making.   A lot of that has to do with her excellent color choices.  Enlarge this and marvel at the number of deep 1/8th inch cuts that run all throughout this design.   Susan is moving along on this at an impressively breakneck speed so color SPRING blue and me impressed.


Mary Grace's latest hoop design is of an American Flag in the shape of a heart and in just one class she managed to get it all cut out and halfway ground as well.  I think we'll be seeing this done again soon now that it's been posted on the blog for all of our students to see.  I'll say this:  Mary Grace knows how to start a trend!


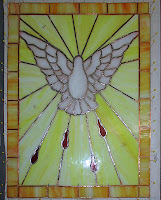
Bee's Dove Window is officially cut out and even mostly tacked together.   She only needs to tack the border and then she can begin soldering both the front and back sides of it.  Alas, I have her soldering iron so I'll need to see if we can get it back to her so she can possibly work on this at home during the next two weeks while our shop is closed.  If she can get just one side of this completed before she comes back in I have no doubt that this will be finished and prominently displayed at the top of out next post.


It's official- all of the glass has also been cut and ground for Tracey's Humming Bird and Morning Glories Window.   She's got the center all tacked together and she decided to go with a mixed border of bevels and textured clear glasses for the border.  I'm sure that she'll be soldering this upon her return because she only has 16 straight pieces left to wrap and I know it won't take but a  few minutes to finish wrapping those remaining pieces.


Mary's dueling Hummingbirds Suncatcher has completely taken shape now that Mary is two classes into her newest project.  It's funny how she said that she wanted to do something simple this time around and how she ended up with a very small project with over a hundred pieces in it.  Simple is not the word I'd use to describe this pair of birds-- the word 'stunning' is a much better fit..


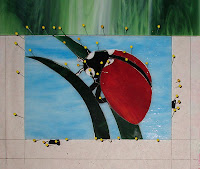
Linda F got all of her first Ladybug Panel ground and now you can see just how cute a window it truly is.  She's decided to use green for the border (that's almost expected from Linda!) and I think the color contrast from the green leaves to the border is perfect.  I'm a big fan of subtle color shifts.  We've still yet to actually cut the border but once this is tacked together that will take less than 10 minutes to cut and grind. 


I may be wrong but I do believe that Linda L has her Flower Plate Window soldered both front and back sides. That means that she'll be able to drop her plates into position, solder them into place and then get some channel around her border to finish it all off. It may look a little empty right now but once the plates are in place this window will look like a whole other window indeed.  The end is near!


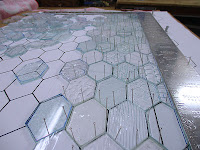
As always, MiMi is hard at work and still not losing interest in making her Hexagon Style Cabinet Inserts.   Once she finished this one she'll have all of one section in the room completed.  This week we double checked the measurements for her next set of windows and as soon as she finished this piece she'll be able to move along to the next size.

 
And there you have it.  This is a bit late but not nearly as late as our next post will be since we are closing shop for 2 weeks.   Hopefully the place will be much cleaner when our students arrive back to class! 

Paul

Monday, June 21, 2021

It Cuts Like A Knife

Running Pliers.  The knob near the hinging point is called a set-screw and it was put there for a reason.   Can you break your glass without adjusting the screw correctly?  Definitely.   Can you get difficult, complex or deep curves to break (correctly) without adjusting the set-screw?  Sometimes, but most times not.  When students tell me that they've broken a piece three times and then ask me to cut it for them my solution usually begins and ends by adjusting that set screw correctly.  Students also believe that the adjustment process requires strong witchcraft.  It doesn't.  It's essentially just a flick of your wrist and it takes most people less than a second to do.  That's no joke.  I can literally adjust my pliers in less than a second.

Most times when I use a students pliers the set-screw is turned up so high that the top and bottom halves of the breaking edge of the pliers actually touch (as in the picture below).  This is bad.   Even if you don't know how to set them you shouldn't stop the set-screw from functioning altogether.

You should ALWAYS have your set-screw adjusted to prevent the pliers tips from touching.   Even it it is set incorrectly you at least have something to stop the full brunt of pressure that you transfer to your glass when you squeeze you pliers.

This screw is very much like the seat belts in your car.  Can you drive without your seat belt on?  Sure.  Are you safe without your seat belt on?  Most times yes, but when you need that seat belt aren't you glad you had it on?  Also, it takes longer to put on your seat belt than it does to set your pliers.  Now I've been writing up instructions on how to adjust the set-screw correctly and although it's simple enough, writing down the step by step instructions gets somewhat convoluted because of all the  detailed wording needed to explain a simple movement.  Next week I should have it whittled down to a less verbose set of instructions.  It's honestly just three minuscule twists of your thumb and pointer finger.  Word of warning- If you are a student of ours you will be practicing set-screw setting this week with me. Be prepared!

So then, Lara's Flower Pot Window is finished and it's definitely going to be turning heads.   The level of detail that she achieved on this window goes above and beyond what she's accomplished in the past and her soldering was a work of art itself.  A stunning gift indeed.


Shelley's Flamingo Window looks incredible and the glass that she used behind the bird is perfection.  Sadly, this glass is no longer available because it is no longer being made anymore.   Only the best glass gets discontinued, but at least Shelley used it for all of its potential in this gorgeous window.


Jan finished her small Pelican window which is no larger than a standard sheet of paper.   Because of the small size she was able to forgo a border since it was light enough to hang from circular hooks that we attached on the corners of the brass channel that surrounds it.   Jan also used a small piece of wire to seperate the beak rather than cutting it in half since the beak was so narrow.   Had she cut it in half most of the glass would just cover in foil which wouldn't look nearly as good as this solution does.


Judy completed her large Angel Suncatcher,which turned out looking just as good as I told her it would.  I can't say that that's a big surprise-- we never have bad looking projects!  I have a sneaking suspicion that we'll be seeing this made again before Christmas by many other students. 


Susan R completed her first Garden Gnome Bee Man and has it attached to a stake so she can put it into the ground or into a flower pot.  This one turned out so nice that she's started work on a second one as well.
 
 
Mary Grace finished off one of the Hoop Projects that she was working on and as you can see it's the Double Sunflower Hoop design.  This is the pattern that started the Hoop craze that Mary Grace herself started and it's easy to see why it's taken off as it has.


That brings us to Betty who put the finishing touches on five more Cross Suncatchers this week after she soldered each of them.  Last week they were all ground and mostly wrapped and here you see them completed just one week later.   She moves quickly on these. 


Cindy's final Bicycle Wheel Spinner is finished and ready to be staked into her yard.  This one, as you can see, was done in Mardi Gras Colors and the wheel itself even sparkles.  All of that shiny chrome makes this wheel look as though it came off of a brand new bike.


Mary began work on what she's calling her Dueling Hummingbirds.   This will be an intricate Suncatcher but the end result will be very much worth it.  Wait until you see this lit up-- her glass choices are spectacular when you see them with light behind them.


Cheryl started work on this Circular Cross while at home and finished grinding it while in class.   She's well into the wrapping part of this project so she should be soldering this when we next see it.


Rowena walked into class with a pattern in her hand and just three hours later she left with this cute little Santa Panel all cut out and ground.    I think she could make one of these start to finish on Christmas Eve if she had to!  Rowena doesn't rush, she just moves quickly and efficiently.


Bee's got her Dove all tacked together and then worked on cutting out her background pieces.   Each of those pieces have a grain pattern that radiates outwards starting from the center behind the dove and traveling out towards the edges.   She's also going to add blood drops to this but those will be cut into place AFTER the background has been ground.  Oh, and the Dove's beak will be added by attaching a piece of wire once this is all soldered.


Melissa's now got all of the glass cut out for her Butterfly and Iris Window and even moved on over to the grinder before her night was over with.  She was a little concerned about the color of the black trim on the edge of the butterfly wings but I think it's perfect.  


Sheri has her first border tacked into place and did she ever luck out (as well as I).   I had actually read the ruler wrong while drawing the pattern but because I 'screwed up' we were able to use an inner beveled border!  Talk about a fortuitous mistake, huh?  Sheri also got her second border cut out and ground so it's ready to be wrapped.   She'll easily begin soldering this upon her return next week.


Speaking of inner borders, Linda L managed to get the first of two borders attached to her Plate Flower Window.  Once that was done she worked on the second, wider border which she only needs to grind, wrap and attach before she can begin soldering this window that a lot of other students are talking about in class.


Kate finished wrapping her window and even added eyes and a more distinct head to her dragonfly.  Her attention to detail is so exact that she's going to re-cut the missing blue piece of water because the original piece didn't lined up with it's adjoining pieces correctly.  Sometimes, no matter how careful you are, things just fall off kilter a bit.  I'm glad that she's changing it because it would always bother her every time she looked at this window if she didn't. 


This is the second Hoop Pattern that Mary Grace was working on this week and as you might suspect we will surely see this among our completed projects next week.  There's just the back side left to go on this and then MG will begin something new.


Kerry  only needs to touch up the soldering on his Butterfly Window and that means that we'll see this hanging up next week for sure!


Cindy also managed to work on her Wedding Invitation Box and all she needs to do now is wash and color these two pieces and then she'll solder the hinge to the box bottom to completed this.


Martha, like Cindy above, is at the exact same place with her own Wedding Box.  All she needs is to wash and color both the top and bottom pieces and then she'll just solder the two together for a completed box upon her return. 


MiMi's well under way one her latest Cabinet Insert.  She's got plenty of hexagons in all the assorted glass she's been using in the previous windows and that means that she's back on track.


Next we look at Susan R's second Garden Gnome Bee Man (I'm not quite sure what to call him, actually).   She's already well underway with this one so I don't think she'll be working on it much longer before he's another project in her stained glass bonnet.
 
 
And lastly Susan D actually forgot to bring her glass with her so she decided to head back home and work there.   Four hours later she sent this picture of her Spring Panel that she continued grinding on at home.  She might not have been with us in person, but she was figuratively working right along side of us throughout our class.


And that's all I have to say about our classes this week.  See you next Monday.

Paul

Bayou Salé GlassWorks


Monday, June 14, 2021

Pull Your Lashes Out and Blow Thru Your Nose

I know I promised a tip for setting your running pliers this week but we're holding that off until next week because of Cheryl's Mr Bingle window and the example I can make with it.    Cheryl has worked long and hard on this massive (over 3 foot wide) window and finally her 20 week journey has come to an end.  Mr Bingle looks amazing and even I was surprised at how sturdy he was after he had been completely soldered.  It's amazing what quarter inch foil and a roll of Strong Line can do to help shore up a window.  But it's Mr Bingle's fused face that makes this window shine simply because the face remains intact without numerous breaks throughout it.  That said, as much 'fun' as this has been for her, Cheryl is looking for smaller projects to make after completing this one. 

 
Now to onto our 'tip'.  When Cheryl asked if the Mr Bingle picture she had could be turned into a stained glass pattern I was a little skeptical because of his face.  To get the mouth, nose and eyes into it we'd need a lot of lead lines that would make Mr Bingle look like he had a scarred face which would be very distracting.  But then Russ came up with the idea to fuse the features to the face and was that ever a great idea.   It's the perfect blending of Stained Glass and Hot Glass.  Here's a look at how the face would look if we had actually cut the features into place.  Mr. Bingle isn't nearly as pretty and friendly looking there below now, is he?

 
What I'm trying to say in this 'tip' is that you should learn how to think outside of the box. There are restrictions and limitations when working with glass but here at Bayou Salé GlassWorks we do our best to come up with new ideas to work around those 'hard set' limits.  We don't believe in the no win scenario.  

And now we go back to out completed projects of the week.  Tell me, have you seen the marvelous Red Fish?  Mary put the finishing touches on hers this week and what a stunning window it turned out to be!  I especially like the fact that the fishing line coming off of the lure cuts through both borders to signify that the line travels much further along to the pole that Sammy is holding.   Mary's glass choices are perfect and her work on all of those thin pieces is exemplary.


Susan D's Summer Panel is officially behind her and ready to be displayed.   What I love most about this window is that Susan didn't take any shortcuts.  For example, there are the points of her sun which were painstakingly cut and ground into the blue sky, and then there's Susan's wire work for the Multicolored Pail and Flip Flops which just take this Summer Scene to a whole new level. Bravo.


Rowena is a powerhouse stained class craft person.  She can knock out a window of this complexity in just two short weeks.  That border is perfection just as is the rest of the work that makes this window come to life.


Cindy made quick work of her Franklin Street Light Window and those blues are perfect together.  Someone else asked about this pattern so I think we'll be seeing this done again in a possibly different color scheme very soon.  The problem with Cindy's version of it is that it looks SO very good that everyone wants to make it with the exact same glass which isn't always possible.  Hey, when Cindy nails it, she really nails it!


The last of our completed projects is this stunning Oversized Flower Hoop Project  that Linda F finished.  The reason this gets the 'hoop treatment' is because of those leaves on the bottom right of the flower.  They add balance to the piece but they are so precariously attached that they would just fall off if they weren't also soldered onto the hoop.  There are rules to hoop projects and we'll discuss them as a tip soon.   Rest assured that Linda made this one perfectly.


With Summer under her belt Susan D's latest Seasonal Panel is well under construction already.  This is the one that looks like an Adult Coloring Book ('Adult' due to the complexity, not nudity!!!).  You can already see all of the detail that is featured in this window which only spans 15 inches wide.  This window is going to be turning heads for sure and it might make Susan's head spin while she's making it!


Cindy has started a Wedding Box and it's her own design!  This is a rush order so she's planning on having this soldered when she comes back into class.   That means that she'll just have to add the borders to the box top and then assemble the 5 pieces of glass that make up the box bottom when she comes back in. 


Linda F has begun work on her first of two Ladybug Windows by cutting out the blue sky which will become this window's background.   The spots of the Ladybug will actually be painted onto whichever red glass that she uses and that will happen AFTER this is 100% finished.  We're thinking outside the box with this design.


Kate's Dragonfly is officially ground and yes, I like the orange body she's using for the body best.  The green just got lost whereas the red body just looked dark.   Kate wants to foil her pieces while in class so she can be sure she's doing it correctly which means that there's a good chance that this will be tacked when we see it again.


Melissa's Butterfly and Iris Window is looking incredible.   She wasn't sure what color to use for the bottom of the wings and rather than adding a new color she decided to go with the same glass that she used in the upper sections of the wind.  What makes this work so well is the fact that the lower wing section never touches the same glass that she used in the upper sections.   Truth be told, it adds a layering effect especially since you could go so far as to drop the bottom portion of the wings and still have a complete butterfly design.


Martha has not one but two more Wedding Boxes in the works.  The second one won't include an actual invitation and will more or less be a Sunflower Heart Box.  The first one will include the actual invitation and you can see how the pattern matches the floral design of it.  We'll see glass cut for this when Martha returns.


Judy M's large Angel Suncatcher was completely wrapped this week and then Judy set upon soldering it.   She's got the front side covered in lead and with only the back side left to go I'm guessing that Tuesday will be a busy night since we have so much being completed, including this Angel.


Kerry's Butterfly Window has literally come together this week as he managed to wrap everything, tack it and get his beveled border attached.  He also exchanged the orange glass he had originally cut his sun out of for yellow glass and it really brightened this up considerably.   The end is near.


With her Bee Garden Gnome soldered on his front side and the flower at the end of his cap in place, Susan R only needs to work on the back side of this to finish it all off.   I have no doubt that she'll have this completed upon her return.


Barbara worked on two projects this week, her Mini Yellow Iris Window and her simple Starburst Suncatcher.   I say 'simple' but all of those straight lines need to be perfect or the Starburst will look crooked as well as hang crookedly.  Now that it's all cut and ground I have to say that it looks as though this will be perfect. 


Linda L's Plate Flowers are also looking great.   She has all but a handful of pieces wrapped which means that she'll tack this together and hopefully get two borders attached to this upon her return.  She has her colors for those borders picked out already so there will be no time wasted when she comes back in to work on them.


Lara loves double borders and so do I.  This week we see that she's picked a lime green border for her thinner accent color and then gone back to Seedy glass for the larger outer border.   Lara was on a deadline for getting this window finished and it looks like she'll certainly have done in plenty of time.


Tracey ended up calling it a night just before she was able to finish wrapping all of the pieces on her Humming Bird Window.  Now that the pieces are surrounded with copper foil you can really see all the detail in this window.    I know one of these are in my future.


With all of the glass cut out and tacked together for her Flamingo Window Shelly was able to begin the soldering process.  She has the front side essentially finished and she's taken this home so she can hopefully get the rest of the soldering completed before she comes into class.  I suspect that we'll see Shelley working on a new project when she returns.


Sheri got a lot accomplished as she now has everything wrapped and tacked for her Chakra Yoga Window.   With the holes ground into place you can see how the Jewels will look since I placed then into their proper places for the picture.  Well, all but the top one which I just noticed has slipped out of position.  Foiled again!


Mary Grace has her two latest Hoop Projects just about ready to be soldered.  I'm certain that at least one of these will be finished when she returns.  Perhaps even both of them will be completed.  Time will tell.


Bee finished grinding the rest of her dove and then got busy foiling all of those nice, white feathers.   If you click on the image you can easily see how the backing of the foil actually influences the color of the white glass (in the larger image).  I like the effect of the copper on the white but there are times when I want a difference between similar whites within the same window and I will use silver backed foil.   This sounds like it could become a tip in the very near future.


To wrap this all up we look at the five different Crosses that Betty has all cut out.  She even has four of them completely ground already so I'd say she's an expert on making these now!


And there you have it.  We're done early again this week and I really like this new habit that I've developed.
 
Paul

Bayou Salé GlassWorks