Thursday, March 31, 2022

Introducing Liquid Solder

 Introducing Novacan Liquid Solder!


Do messy, lumpy solder lines have you pulling your hair?  Finding the correct mixture of heat, lead, flux and speed can be daunting so Novacan is proud to announce their newest product: Liquid Solder!  Just snip of the tip to the desired size of the bead you need and simply squeeze it out of the tube on top of your foil.  It's that easy!   Liquid Solder dries in less that a minute and applies in much less time than it would to actually melt a solder bead on your window.  Cut your time to solder your windows in less than half!

No more lead fumes!

Liquid Solder comes in the four most popular colors:  Silver, Copper, Brass, and Black.   Most people have trouble telling the difference between brass and copper patina but with Liquid Solder you a get true Brass and true Copper coloring.  The black is darker than any patina could ever compete with.  No more messy flux or patina.

No more Hot Soldering Irons!

Although Liquid Solder dries in under a minute we recommend that you not wax your window for 1/2 hour after applying the last liquid line.

Liquid solder is also VERY affordable generally costing about the same as a 1 pound roll of 60/40 lead.   Call you stained glass supplier today for pricing and availability.


Monday, March 28, 2022

I'd Like To Solve The Puzzle Please

Due to a few back issues that I'm having we're just going to dive right into our students work this week.   We'll start with Robert's Door Insert, his first project ever,  which he completed almost effortlessly.  He has one more of these to make but a lot of it is already cut out so it will surely go quickly.   Here's the finished window.

 
And here's that same window temporarily put into place.  Even with the right hand window missing you can plainly see that this looks WONDERFUL.  Together the pair will certainly add a lot of elegance to the doors and therefore Robert's home!


Let's newest window proves that she wastes no time when it comes to getting these Flower Panels hanging in her house.  She's actually made a series of these double bordered flowers and I'm starting to believe she's already found a signature design of her very own.


Judy finished her second Opened Arms Angel and it's plainly evident that she's done a great job with her.  Or should I say 'it' because the common belief now days is that angels have no gender.  That said, when angels appear to people in the Bible they're always seen as men. And when they were given names the names are always masculine. But this is about stained glass and stained glass is about art and beauty so we're going to say this Judy's Angel has gorgeous hair and that she's lovely.  


Betty has a friend that had an LSU Plaque that needed some repair work done on it.  Betty loved the pattern but the pattern as it was had numerous design flaws (perhaps leading to its needing repair work done on it).  So I altered the design here and there and we now have a pattern that is both easier to make and is also far more structurally sound.  Here's Betty's version and rest assured you'll be seeing more of these in the weeks to come.  
 

Susan R finished her final four Easter Eggs just in time for the holiday.  These have a stake that come out from the bottom which allows you to secure them into a flower pot.  Normally you don't see the stake but I've got these lit from behind to help show off the colors that Susan picked but unfortunately that light also reveals the stakes in these pictures.  In normally circumstances you won't see any hint of the stakes on the front of these cute eggs.


Number 11 is out of the shop and ready to be installed!  We're down to the final three (or should I say that MiMi is down to the final three!) and that third one is already under way.   I wonder how many Hexalongs MiMi will have left over when she finished this HUGE set of windows?  I'll have to think up something that she can do with any remaining pieces.


Betty certainly keeps busy and this Owl and Sunflower Heart were completed along side her LSU panel this week.  She may not be making two of everything anymore but she's usually got three projects under construction so maybe we'll change her nick name from Twofer Better to Threefer Betty!


Now we're at the point where we look at projects that are still under construction.  As I said I might in our last post, I've re-worked June's Rooster so that there aren't any sharp points cutting into other pieces of glass which would need to be deeply ground out using a small grinding wheel (which takes forever to use). The end result of the re-draw looks every bit as cute as the original design and June's Rooster is going to look wonderful while only requiring half the work.


Kerry wanted to make a Shrimp-de-lis window but we couldn't find that pattern among the hundreds of patterns that we have (that's no exaggeration).  We have a bit of an order to all those patterns and even though we've both seen the Shrimp-de-lis recently it was not turning up so in the end I just squared up and printed out the picture of the window that Patty made years ago.  With a  print out in hand Kerry was able to start.  At the end of the class he had everything cut out so this looks like it will be another quick window for him.


What we have here are two Spinners that Lisa has cut out.   One is a Flower while the other is a Geometric Design.   What looks like eight pieces of cut glass are actually 48 pieces of glass because she has each design stacked six high.  I have no doubt that these will be put together in no time at all because if there's one thing that Lisa loves to do it's working on her stained glass.


You might think that this is another spinner, and I'm only just realizing that it could be, but this is Cheryl's 3D Birdhouse.  She has the first of two side panels tacked together and the second one is all cut out and waiting to be ground.   She'll be working on the front and rear panels before you know it!


Steve has two more large Multicolored Panels to make for his Lantern.  You can find these lanterns at a lot of home decor stores. Just pop out the boring, uninspired glass that comes with them and replace it with a pattern of your choice.   Steve's going for a Piet Mondrian themed design and it's coming together quickly.  (Who says you can't learn things here in our Blog??)


Meanwhile Cindy's Coffee Themed Address Transom  has officially been joined together into one HUGE window.  All it needs now are two borders and she'll start working on those upon her return.  This is going to be a fun one to clean when it's finished!


Our next transom Window is a little more manageable in size although large also.   Annette got all of the center initial oval of her window cut and ground save for the background glass.   She's going to cut that once the oval has been tacked together along with the M.  Doing it that way ensures a quick easy fit like we saw Martha achieve just last week.


Sheri's got a large splash of color in her Heart Cross and now that the center has been ground she'll foil this and add a small border along the edges.  Although the outside edge appear to consist of 90 degree angles, there are actually eight 90 degree angles and four hypotenuses (the opposite of 90 degrees).  The difference is oddly vexing but because of that difference it will most likely be easier to tap a solder bead around the edge rather than trying to use channel.  We might get into what that's all about next week but before we do I'm going to think it through and see which way will work best.


This may look familiar but it's not quite a duplicate of the Angel that you saw Judy complete earlier in this post.  This one is  actually a distant cousin because when you put them side by side you'll see that although they are similar there are differences between them.   'She' is still beautiful though and Judy made excellent progress on this in just one class.


Yes, Susan D officially has all of the toughest parts of her window completed.  The only thing left to cut is the background glass and perhaps she'll do that AFTER this is wrapped and tacked.  Some people hate to jump around on their projects but I tend to do things in an order where I can cut down on the grinding since I find it to be the least enjoyable part of making stained glass.  Either way, I know that this will turn out to be incredible.


Shelley's Mermaid window is also coming together and only needs a few filler pieces along with a border to finish it off.  This one will be swimming out of here very soon.


Here's another LSU Plaque that is currently under construction by Linda F.  I told you that we'd be seeing more of these-- I can't tell you how many of these patterns I've passed out already and now that we're seeing them on the blog I'm certain more students will want to make them.


Ann's got another Large  modern Cross under construction and I'll bet anything that this is not only completed when she comes back in but that she'll also have something else underway as well.   She cut all of her glass, ground it AND foiled everything in just two and a half hours.  Look out, this cross is barreling towards the finish line!


Shawn's got a window that is very timely in its diversity.  Look at all of those arms holding flowers or (in one case) simply posing with a sign of peace.  This might sound odd but Shawn carefully considered the colors for the nails on each hand and in the end she chose... wisely!    If, by chance, I don't have a new, better looking flower drawn up for the upper right corner Shawn can begin grinding these arms, but I think I'll have things looking better and that she'll be able to start cutting the new flower when she returns.


With the front of her Yellow Rose  completely soldered and only the rose bud left to be soldered on the back of her window, Martha is just about set to take this along home with her.  I have no doubt that will happen next week as we really only need to put a channel around this and then wash it and color it to finish it off.


And here is the first of Linda L's Beach Windows ready to get a crab.  That will be dropped into place next week and then this will essentially be finished!  This looks nice now but just wait until you see it with the crab dropped into place because it's going to become a focal point.


And there you have it!

Paul

Bayou Salé GlassWorks

Monday, March 21, 2022

Men in Rubber Suits

Why isn't my foil isn't sticking to my glass?  I hear it every week and the answer is always one of the four listed below.

1) The most common problem is that the glass isn't clean.  You may have washed it last week  but every day those pieces sit on your pattern untouched they attract more dust and grime.  You might not see it but it's there.  Glass can create a static charge which helps it attract dust.  If your foil isn't sticking, first try re-washing your pieces using just plain water.  Soaps and other cleaners may leave a film on the glass that can prevent your foil from adhering.


2) The glass isn't completely dry.  If you've just washed a piece and immediately try foiling it you'll find that the foil won't stick.    If you look at the freshly ground edge of your  glass you can actually watch water slowly evaporate off of it even after you've towel dried it.  It can take  30 seconds or longer for your glass to completely dry off even after you've used a towel to remove the water.  As a rule of thumb I wait one minute after I've dried a piece before I apply any foil.


3) If you see a white powder (usually, but not always, on inside curves of your pieces) then they weren't thoroughly washed when they came off the grinder.  This is a common occurance and bevels are often shipped with white power on them which must be washed clean before you begin foiling.


4) The foil is no longer sticky.   Age and temperature affects foil so if you have an older roll that doesn't stick it may very well be past its 'expiration date'.  Store your foil in a zip lock bag to keep it sticky longer.  Most foil will be fine even 6 months after opening it but specialty foils are used far less frequently and need some added protection from the air.  Also, never leave your foil in extreme cold or heat.  In other words, don't leave your foil in the car for extended periods of time.

Lastly silver backed foil, for whatever reason, is always problematic when it comes to sticking.  It usually takes some finessing to get it to adhere to the glass.


So first up this week we have Ann's Lady Of Guadalupe window which is absolutely stunning.  This is a fairly large window (almost 3 feet tall) which explains how all of that detail fits into this piece.  I think that the most impressive thing about this window is something that you can't actually see-- it's how quickly Ann was able to bring it all together.  Ann began cutting glass for this on the second of February and completed it on  March 17th. Also, all of the work she accomplished in that short time was top tier!


Barbara's Louisiana Iris got its border attached and then she was able to solder it to its completion before calling it a day.   She used baroque glass for the background and cut it out contiguously which explains why the lines match perfectly throughout the background pieces.  We will turn this technique into a tip of the week soon enough.


Kerry's Alien is taking a break before he gets back into his UFO and sails off to parts unknown.  I have to admit that this is one sweet oversized suncacther.  As for the hanging UFO, well that's the icing on the cake.


Susan R has the first pair of her Easter Egg Yard Ornaments completed with four more to follow in the weeks to come. With everything cut and ground I have no doubt that these will be finished in time for Easter.


Our last completed project for the week are two more HLB Windows that Linda F wrapped up work on.   That means that she'll be starting something new when she returns and I know she's happy to be finished making these because making more than two of anything is a chore. But don't they look great?


Cheryl has begun working on a birdhouse.  Not a birdhouse window-- a real 3D Birdhouse!  Below you can see that she's cut and begun grinding one of the four side panels.  She'll need two of this particular pattern and two of another for the other two panels.  Since this is a 3D project she needs to assemble these panels in a jig which we constructed out of wooden yard sticks.  This ensures that everything lines up and allows the first piece to but up against the 4th piece without any angle errors.   If we were off just an eighth of an inch on these the end difference would result in a half inch gap.


With all of her green glass ground into place Jan then wrapped and tacked the newly cut glass that sits behind the green 'needles'.   Once that was done she wrapped everything, tacked it all together and even got her border cut and ground as well.   The end is very near.


Judy finished wrapping her Angel and then began the soldering process that will lead to the end of this project.  With the front side all tacked together it's safe to say that she'll be starting her new variation of this design after we take this Angels final completed picture.


Shawn got an ebony arm and the daisy that the ebony hand is holding all cut out before calling it a night.  That leaves only two arms left to go.  The background itself will come together easily but we still need to come up with a flower for the upper right corner.  I guess I'd best see what can be done because it certainly looks like Shawn will be needing it sooner rather than later!


Sheri began cutting her classic Stained Glass Cross and got all of her glass cut out before calling it a day.   Something that many people don't realize is that the straight pieces that surround the cross are actually a border.  That means we won't cut it from pattern pieces and we won't attach it until the rest of this has been ground and tacked together. 


Look at this Heron!  I always say that you get out of a window what you put into it and this just proves my point.  Melissa's got so much wonderful detail in this that the heron almost becomes secondary to all of those beautiful flowers.  But only almost.


June decided to make this large, colorful Rooster Suncatcher.  It may look simple enough but it's going to take quite a few tricky inset grinds to get this to match the pattern.  In fact, now that I'm looking at this I may redraw it to see if June might want to smooth out those deep sections to help make this a little easier to make.


With the coffee grinder section (the right side) of her Address Transom Window all cut, ground, wrapped and tacked together Cindy will next join the two completed sections (right and left) by filling in the center pieces.  She'll begin that when she returns next week.  Once that's done she'll only need to add two borders and this window will be ready for some soldering action!


Robert has a Transom Window of his own in the works and although we didn't know it when he walked out the door, this window already has all of its glass cut and tacked together.  We were planning to add a thin glass border which a small channel would attach to but at the very last moment we discovered that we could skip the thin border by replacing it with some 1/2 zinc channel.  All of the zinc will be hidden behind the wood moulding that will secure the window into place and the size remains perfect.  How serendipitous!


Now this is progress.   Here we see two of Linda L's three Beach Scene Windows and one of them (the top one) is going to be tacked together before the sky is cut so the grain in the sky will flow continuously across the window.  Perhaps we'll see that sky attached when Linda returns unless she decides to keep working on the second window to get it just as far along as her first one.


With her roses all wrapped an tacked together Annette will now be able to fill in the six missing petals that broke when she initially cut them.   That will only take 15 minutes or so which means that the M and the center circle will be the next section that she begins working on. 


Martha got the background glass for her Yellow Rose Window cut and ground in the first half hour of class.  How did she do that so quickly?  She simply cut one piece of glass that fit inside her bevels, laid the flower on top of it, traced around everything, and then cut each piece free being careful to follow the lines precisely.   Grinding was then very simple-- just skim off any line that you see on the glass.   She ground each piece never checking to see if anything would fit until all of the pieces were ground and then placed back into the beveled border.  Then came the moment of truth as she dropped the flower into place.  Normally there are a few sections that need a bit more skimming but in this particular instance the flower fell into place perfectly!  By the end of the night Martha had everything wrapped and tacked and even had her final border cut and ground.


Susan D already has the majority of her Fall Window ground which means that she can begin wrapping this if she wants.  If anything grows while she's foiling we can simply adjust the background pieces to make a perfect fit.   That's the best way, but not the only way, to deal with windows made up of a lot of tiny pieces. 


Number 11 is all wrapped and tacked together.   MiMi will solder this upon her return and I have no doubt that this will be finished that same very night.   I'm already calling it:  Only three more to go!


Let's Daisy Panel is ready for solder as she got her background wrapped and tacked together followed by the first white border and then the final border which matches her background glass.   She'll add some channel and then she'll finish this up upon her return.


Lastly we take a look at Mary Grace's first Peacock which only remains to be soldered.  Although she wanted a curved top, the sheer weight of a piece this size would make it impossible to hang with a curved top.  Installing it into a wooden frame would be the only way to be sure that this wouldn't come crashing down.  So what difference does squaring off the top make?  It allows you to run a heavy channel along the entire perimeter of the window which gives the same added support that a frame would.  A curved top prevents you from adding channel to the top of the window and therefore prevent you from hanging it securely.  


So there you have it!
 
Paul

Monday, March 14, 2022

They Make A Cream For That

A common misconception occurs when I tell students to begin cutting a multi-pieced object as one large piece rather than immediately breaking it down into its smaller pieces.   Take the leaf in the pattern below for example.  

The leaf consists of 6 cuts, but you can simplify it and make grinding it MUCH easier by cutting the leaf as one large object and then splitting it into its individual sections after it's been ground.

The common misconception occurs at this point when most of our students next cut the leaf down into its 6 individual parts.   Don't do that.  The trick is not to split the leaf  until your entire window (leaf included) has been ground as shown below.  Just pretend the pattern calls for just one big leaf.

Only after everything had been ground and fitted together do we work on separating the leaf into its 6 sections.   Start with the long center cut because the smaller curved cuts are impossible to make until the leaf has been split down the center.

Once that's done you can make the four remaining cuts.

Since the leaf already fit into position these 6 pieces will fit right back into place even if you don't grind them.  That said, we do need to skim all the edges that we just cut for two reasons.  1) To provide room between the pieces for the foil and 2) To ensure that our foil will adhere firmly to the glass.  Just apply a constant pressure as you sliding each piece along your grinder.  One pass will easily do the trick because you don't have to worry about trying to get them to fit into position-- they fit before we even took them back over to the grinder.

By cutting the leaf  using this series of cuts you'll save an incredible amount of time and the fit will be perfect.  Rather than grinding and adjusting six small pieces you've only had to grind the outside edges of one large leaf for its initial fit.  The rest of the leaf literally falls into place.  The only draw back to this method is that you have a limited choice when it comes to choosing the grain of your glass.  On small pieces you'll never notice but on large pieces you may want to trace out and cut the pieces separately.

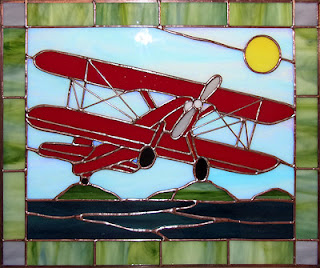
With that out of the way we'll look at the work that was completed by our students this week starting with June's first full sized stained glass window and boy it was a complex one.  Her Biplane Window utilized a lot of different tricks to get it to look this great.  She cut her sky pieces contiguously so they would line up seamlessly, she added the two propellers after everything else was ground into place, and she used wire work to achieve the lines between the struts on the wings.  That's a lot to take in but just look at the sum of the end results!


Steve's fused glass Doors are absolutely amazing to see in person.  There's a simplicity about these which makes them as charming as can be,  Alas, the pictures here don't even begin to do them justice because these truly need to be seen to be believed!  Steve's got enough glass cut to make at least two more of these so who knows, we might see another pair of his grandmother's Front Door in the near future.   


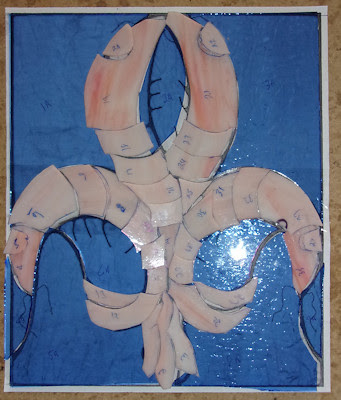
Cheryl began this Fleur De Lis Window a few weeks back when she couldn't begin working on her Invitation boxes.  Now that those have been completed she's come back to her Fleur De Lis and this week she put the finishing touches on it.  The stark black glass that makes up the FDL contrasts perfectly against the vibrant gold background and then the sparkling clear textured border frames it to perfection.  I do believe that it's bloody well brilliant!


With three of her HLB Panels completed Linda F has just 2 more to go before she can begin work on a larger (and therefore easier) project.  The other two are not far behind these so I'm sure we'll see them completed upon her return.  If you look closely you'll be able to see where we simplified the pattern (in different ways) to make one of the cuts far, far easier.  It doesn't detract from the overall look of the window but it sure helped Linda keep her sanity!    If you can't spot the difference well that just proves that extra (needed) lead lines won't hurt the look of a project.


Sheri's Owl is the second variation of this pattern that we've seen so far and she's actually changed up the colors quite a bit.  All of them have looked great but her use of green accent feathers really sets this one apart from the others that we've seen (so far).   Green you might say?  Yes, green because this is stained glass.  It's art, not real life, and in art we want things to look as best they can.  That's why the phrase 'Artistic License' exists.


Kerry spent the night busily working on his Alien with a Saucer suncatcher and he got it all cut out in one class.   In fact, I think there's only the head of the alien and the saucer left to be ground before he can start foiling this most unique project.


Steve also began working on four different randomly placed rectangle panels for a lamp that he's making.   He's already got 2 of them cut out with one of them being completely ground and wrapped in foil.  Steve is full of original, unique designs and this surely shows it.


Lara has a penchant for making women's faces and this one is going to be just as stunning as any of the others that she's created.  The trick to a stained glass face is making sure that all of the profile curves are correct. A misplaced grind here or there can easily destroy the face but as you can see, this woman's nose and lips are flawless.


With her irises all ground and fitting together wonderfully, Melissa moved onto the second group of flowers in her Heron Window-- the  kalanchoe blossfeldiana's (or what everyone else calls the Dogwood).  I really feel that the hardest parts of this window are behind Melissa now so the rest will go quickly-- after she grinds and tacks together her Dogwood of course.


Shawn has begun cutting out the glass for what is going to be a very eccentric but very relatable window.  This Hands and Arms project is actually larger than life because the hands ARE, in fact, slightly larger than what we would classify as 'real life' arms.  She's got one arm cut out and I believe that it looks great.   She's going to use a lot of color in this piece so expect to see many ethnic and cultural arms being formed in the weeks to come.


Cindy is already working on cutting out the background glass for her coffee themed address window.  This stretches a more than 5 feet wide so she's building this in three sections which she will join together after each section is completed.  She has the background cut for the left coffee pot section and next week she'll cut the glass behind the coffee grinder.    When making large windows it's always best to work in sections until it's no longer feasible to do.


Ann's Lady Of Guadalupe Window has all of its glass cut and ground now.  This week she tacked it all together and then got her border cut as well.  With only a few pieces of the border left to wrap in foil I think it's a fair assumption to say that she'll be soldering this when she comes back in.  It won't be long now!


Barbara's Louisiana Iris Panel is ready for a border!  This week she wrapped her flower, tacked it, set it on top of her clear glass, traced around it and then separated the pieces using her glass cutter.   Everything fit back together wonderfully using this method and it allowed her to get further much faster on this project that she could have if she'd cut the background pieces individually.


Robert decided to use a bevel for the center of his Transom Window but the lack of color in the center bothered him.   The fix was simple:  Robert framed the bevel using a yellow cathedral glass cut to the same width as the red inner border.  Now he has  a very visible focal point which has turned this into a stunning design!


Judy's latest Angel is so very close to being ready to be wrapped with foil.   There's only a few pieces of hair and some wing pieces left to grind so I know that I can say without a doubt that at least some of this Angel will have foil on it when we see it again.


Well, I certainly expected this project to go far more slowly than it's going!  Even with all of those miniscule pieces Susan D is making progress faster than a prairie fire with a strong tail wind.  I just want to know who's in the pumpkin patch with the scarecrow?  There's got to be more than a bird (which rests atop the leftmost pumpkins) in there...


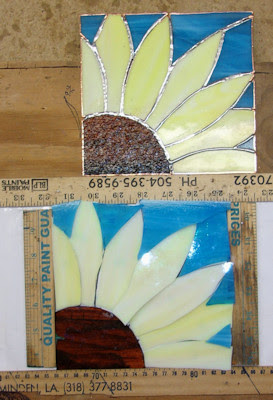
Let is another woman whose project is on fire.  She's finished grinding her Daisy Window and has begun wrapping glass already.   Look out because she'll be working on the borders for this panel before you know it! 


And then there's Betty who can keep up with anyone when it comes to stained glass projects.  Here we see her three latest large suncatchers which are each completely ground and waiting to be foiled.  If you knew Betty like I know Betty then you'd probably be thinking what I already know-- that these will most likely be completed upon her return.   Come back next week and see for yourself.


Linda L has the first of her three Beach Scene Windows nearly completely ground.   There's only the sky left to go and that's just 10 measly pieces.  Of course she still has to cut the crab into place but that won't take long either.   I can't wait to see those palm trees in the light because they've been cut out of three different green glasses which have been interspersed within each frond!


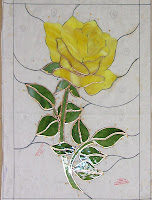
It appear to me that Martha will be able to cut out her background glass for her yellow rose when she comes back in.  There's a little foiling left to go on the rose petals but that won't take but a few minutes.  She'll be tracing this out onto one large piece of background glass and we may be able to show you that process as our tip when we come back next week.


Annette was busy foiling her flowers and once that is done she'll tack these together, slide them off the pattern and then work on the center initial oval.  This is coming together nicely and the foil allows you to clearly see the individual petals in each of the flowers.


Mary Grace has her deep blue inner border attached and that means that she'll work on the final border upon her return.   The rest of this will be easy now and that includes the relaxing soldering process that she'll begin two weeks from now.
 
 
MiMi's latest insert is now completely ground and she's moved on over to the foiling stage of this window's genesis.  We may have seen this all before but aren't  those 'hexagons'  impressive when you see them laid out in uniform rows and columns?   These inserts would easily drive other stained glass artists mad, but not MiMi.  She's kept on trucking and smiling throughout this tedious and repetitive building process. She's already seen the fruits of her labor on the other windows of this project and that helps enable her to stay the course and finish this beast!


Eggs abound!  Susan R actually has four eggs here but one of them is completely covered with pattern pieces.   Susan says she loves working on the one in the center with the little,little circles that have to be ground into the glass.  They're super fun (and the cause of many headaches!)  I think that particular egg will be finished soon though, as will the rest of these.


It's hard to see right now but this is Shelley's Circular Mermaid Window and she's very close to having it completely ground.   Once all the pieces have foil on them the mermaid itself will become very prominent-- it just lacks a little detail right now, but that will change quickly enough.


And that's all there was this week.  But it was a lot, wasn't it?  I mean, let's face it, it was all very impressive, right??? ;-)

Paul

Bayou Salé GlassWorks