Monday, July 22, 2013

Be a Deer and Hand Me the Flux

I was going to start this out with another stained glass hint but I realize that I didn't take the required pictures to show what I planned to talk about.  So we're just going to jump straight into our students work this week.  We'll have another stained glass tip in our next update.

Well, it looks to me like Linda's Vegetable Window is ripe and ready for hanging.  This makes her old window look almost abysmal (it was hanging in her kitchen so I can't insult it too much!)  But seriously, Linda did a great job on this window and I could tell by the way she was always smiling that she had a great time making it.  And let's not forget that she's currently redecorating her kitchen to match this window... I think that speaks volumes as to how much Linda loves her latest creation.


Meanwhile this week, Mary Grace put the finishing touches (meaning the bottom tray section) on her first Stained Glass Box.  Apparently she's tried her hand at making one before but the hinge assembly didn't work out very well.  But now that she see's just how easy it is to do so she won't be having any problems with them from here on out.  Of course, it's always easy once you know the secret.  Mary Grace's Flower Box turned out so nice I'm posting 2 pictures of it--one slightly opened and one with the lid closed.


Last week Bonnie got slightly side tracked from working on her lamp so she did some last minute adjustments to it and then started this Cross Suncatcher.  This week she finished her cross, which is a  more traditional squared off design with a beveled center and 4 small accent globs that make a BIG difference in the overall appeal of the project.  The off-white cross makes the blue beads stand out beautifully, don't you think?


Of course Bonnie wasn't going to walk away after her cross was soldered.  She planned on getting all of her lamp assembled and tacked together-- which she did.  We don't have the brass cap attached yet but the rest of the lamp completely assembled and VERY sturdy even with just a flat bead of solder holding it together.  Bonnie will certainly begin soldering this next but first we'll attach the brass cap (for stability) that will allow it to hang from its lamp base.


Terry's lamp got assembled this week as well.   I started Terry off showing her how to place the pieces on the waxed mold and about an hour later I looked over and found that Terry had it all together.  She tacked it and then ran a flat bead of solder on everything leaving us with the task of separating the full lamp from the mold.  We heated it with a hair dryer and inside of 10 minutes it popped off nicely.  Terry, like Bonnie, will begin soldering her lamp when she returns.


It would appear that Lamps are the 'thing' to make now.  Susan's been hard at work on her panel lamp for a while and this week she began cutting out the third and fourth sections.  With the first two panels ready to be soldered Susan is at the halfway point of this project.   It won't be long before she solders her four sides and then tacks them together to form a completed lamp.


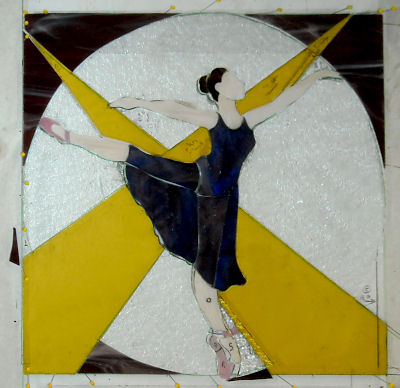
Brenda has the front and most of the back of her Purple Ballerina window all soldered which means that this will certainly be a complete window when she returns.  She's already got her next few projects planned out and they're going to be beveled cross windows with far fancier borders than we're used to seeing.  And we'll see those get started in our next update!


Becky came in and went right to work cutting out the green glass for her flowers leaves.  Once they were cut she then ground everything so it fit together perfectly.  She moved quickly and efficiently  and by the time class ended her glass was ready to be wrapped.  She's taken it home and if she manages to come back with her pieces foiled I'm going to say that she'll easily have the background cut and ground.  Everything fits together wonderfully and this is shaping up to be an outstanding piece.


Cindy made a few alterations on her Deer's antlers and then wrapped any tacked it all together save for the background which she is cutting out now.  She has a good portion of it cut but since it's a clear, textured glass it's hard to see in the picture.  I  suspect that Cindy will be adding a border to this next week and then it will basically be complete.  Meanwhile she's also working on a Crab/Corn tray for herself since she loved how the last one turned out.  As you can see she already has the front and back finished so the hard part if this project is already behind her.


Ann worked on her Angel Hand Mirror which she has wrapped and ready for tacking (but I somehow didn't get a picture of it).  She also worked on her newest Fleur De Lis Window which I did managed to photograph.  She only has to cut 4 corners to cut before she tacks this together but  the glass she decided to use for the corners is at home so she just left the corners empty for now.  That didn't slow anything down for her during class so I'm sure that this will be another completed project next week.


Helen came in with most of her Iris Window completed.  She had run out of glass and still needs to cut  three more of the 'ribbon-ish' sections of the inner border but one they're cut and fitted into place she'll be home free with her first window.  Once this is tacked together all she'll need to complete this are two borders and some solder!


Mary seems to be in love with clear, textured glass.  And that's fine because I love clear, textured glass as well,  but it really makes it hard for me to show you what she's accomplished because it doesn't show up in the photos!   That said, her window is 100% cut , ground and even wrapped.  She plans on tacking it it home and perhaps she'll even solder it there as well.  We'll know for sure when she returns next week.


Myrt took a small break from her Balloon Window to make this Dove/Cross Suncatcher and start another Fleur De Lis Window as well.  Both of her new projects are all cut and ground which means that she's only got to wrap them before moving on to the next steps.  I'm pretty much expecting the cross to be finished  and the fleur de Lis to be ready for it's background which will involve a fancy border much like the one Brenda plans on using for her Cross window.


Wow, Tami really impressed me this week with the cutting on her first window.  When she completed her butterfly she told me that she would like to make the top of Mary Graces box as a stand alone window.  Honestly, I thought it was too simple for a stand alone project so I asked if I could 'flesh the idea out some' so to speak,  Tami agreed and this is what I came up with.  And since she already  has all but 5 pieces cut I'm glad I went with the more complex design.   So that was the long way of saying that Tami did GREAT working on her first 'real' project.  I could see her confidence grow with each cut she made and there's no doubt that she'll be grinding this next week.


Betty continued working on her 2 windows.  It's hard to see but she's got all of her background cut and ground in her Flower/Hummingbird window.   That means that the only thing left to do is cut out the border and she's ready to tackle that while she's at home during the week.  Meanwhile she's going to cover the brass channel she put on her Fleur De Lis Window with lead and then touch up some rough spots to finally (did I just say 'finally'?  She's only been working on it for a week!) call this window complete.


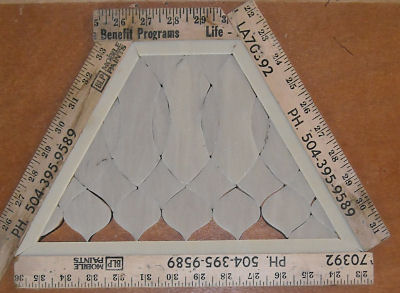
And ending on a sad note we take a look at the 3D star that Tim began at home.  He brought in the triangle bevel pieces all ready to be assembled and he also brought in a new LSU window that just needed some channel on it (that I never got a picture of).   What's so sad about that?  Well, it was Tim's last class with us.  I'll state for the record that he's officially graduated with honors and I'm pleased that Tim will be continuing to make stained glass at home.  Looking at the work he accomplished on his latest LSU window proved to me that he knows what he's doing.  He, Jane and Donna are going to missed on our Wednesday night classes. 


That about wraps it up this week--  See you all in again seven days!


Paul 

Monday, July 15, 2013

Just a Little Is Enough

Flux.  You can't solder a window without it but just like anything else in life we need to use it in moderation.  Flux is a mild acid that removes impurities from the surface of the copper foil that all of our glass pieces are wrapped with.  But too much means that the excess flux will literally boil when the hot solder hits it.  This can result in uneven lead lines on the front side of your project, which may not be too terrible but on the back of your window too much flux will cause nothing but headaches as you try to solder.  If you're experiencing sputtering and you're dealing with tiny explosions of lead as you are soldering your window you'll want to remove some of the flux by going over the surface with a paper towel.  As a rule of thumb I always wipe off my flux brush on the rim of the flux bottle before touching the glass.  It helps insure that I don't have puddles of flux and allows me to get an even bead most every time.  And that's our tip for the week.

Lat's start looking at our students work.  Betty basically made this window while she was at home last week.  There was only the need for a few slight soldering touchups and then the addition of a zinc channel to hold the window together firmly.  These clear patchwork quilt windows have always been a popular design and lately we've been seeing a lot more of them.  It's funny how certain patterns seem to have a life of their own once people see them completed.


Tammy is our newest student and this is her Butterfly.  I love her choice of glass because, truth be told, this blue/green has always been one of my favorite pieces of glass.  As you can see she went with a green butterfly body and a yellow head which compliments the blue/green wings perfectly.  Tammy plans on making a flower window when she comes back next week and I have no doubt that she'll  make a stunning window.


Speaking of working at home-- Ann came in with this Angel mirror design all cut, and ground.  She just wanted me to look it over before she began wrapping it and I gave it two thumbs up!  The rounded space between the wings will be filled in with mirror once this is tacked together which makes this a complex but wonderful hand mirror.  And I'm thrilled with Ann's work!


While Ann was in class she decided to work on a second stained glass Fleur De Lis window.  She's unsure of the exact size that this will end up but the rest of this window is made without a pattern anyway.  When she comes back she'll drop this on top of her background glass, trace around it and put it all together  As it stands now the Fleur De Lis only needs to be wrapped and tacked together.


Becky's first 'real' night of class with us was an eye opener for me.  She picked out the glass for her window, traced out the pattern and cut out all of the yellow flower pieces.  Then she ground her pieces on her own getting them to fit together perfectly with barely any help at all.  I suspect that Becky is going to make very short work out of this pattern which is going to turn into a beautiful window.


Betty brought in this beveled Fleur De Lis that she had tacked together and picked a nice, rich brown glass for its background.  She wasn't sure if she should tack her beveled border together first or cut the background and in the end we went with cutting the background.  On of our basic rules is to tack your window together before we attach the border(s).  No that Betty's background is cut and ground it just needs to be wrapped and soldered.


With the 6 pieces of background glass completed in her FDL Window Betty also got to work on her Humming Bird and Iris window as well.  I love the slanted, leaning design of this window and think her choice of colors is perfect.  While her Fleur De Lis window is very traditional, this one is very modern making for two nicely contrasting designs.


Bonnie took a bit of a break from her lamp this week and cut out this Cross Suncatcher.  At first she thought that the blue accent pieces were just glued onto the top of the cross but glueing glass onto glass is a definite no-no in stained glass so they have been cut into the the cross.  It only took about 10 minutes to grind out the 4 small circles and the end result is a suncatcher that looks just as good from the back as well as the front.  And Bonnie has at least 2 others lined up to be made as well.


And Brenda's Ballerina Woman is really taking shape now.  She spent her class grinding away at the grinder and as you can see she has this window pretty much under her belt now.  With only the bottom leg left to grind and 4 surrounding pieces left to go I'd say that this is another Woman in Glass Window that Brenda can certainly be proud of making.


Cindy began working on her deer window this week and she's moving along at a precise and steady pace.  As always, everything is fitting together beautifully.  Cindy's stained glass talents have really grown leaps and bounds over the past few months and her work is a testimonial to that fact as you can see here.


Linda's Vegetable Window is officially cut and tacked together--border and all.  The Brass channel has been attached to the edges and Linda has already begun soldering it.  I'm willing to state for the record that this will be completed when she returns next week because I can't imagine her not soldering it while she has it home.  She's very pleased (excited!) with how it looks already so I can't wait until she sees it all washed up and polished with some light behind it.   It's a keeper, that's for sure!


Mary came in with her Sunflower all tacked together and ready for some background glass action.  She laid this on top of the clear textured glass that she picked, traced around the flower and then got all her pieces cut and ground.  She's wrapping them now which means that she'll just need to add a border when she returns.


Shelley's Dog window is very close to being soldered now.  In fact, it's so close that I really need to look at the face and determine the best way to get the last few pieces together.  All it needs at this point is some eyes and the inner ear sections and then she'll tack it and add a border.  This window certainly has a 'cemetery' feel about it-- her use of color is perfect!


Next we look at the second side of Susan's four sided panel lamp which is just about ground.  She took the first section home to wrap and I'll say that she'll be grinding her 3rd section when she returns next week.  Susan also has her next window pretty much lined up so she's ready to be done with this lamp project already!  :-)


Mary Grace managed to complete the top lid of her box the week.  She came in and cut the background and the borders, ground everything and soldered it all together.  Then she even washed and colored it to boot!  With the top completed that only leaves the 5 pieces of glass that form the box itself which means that she'll certainly walk out the door with a completed box when she comes back in next week.


And all that's left to report on this week is Terry who can now see the light at the end of the tunnel with her lamp.  All of her background , flowers and leaves have been cut, ground and wrapped.  She has everything all stacked into piles three pieces tall and the only thing left to do is wrap her border (all 108 pieces).   When she comes back in she'll start assembling this onto the mold and you'll see this literally take shape.


We only had 2 completed projects this week but something tells me that next week is going to be a busy week here in the shop.  There are a LOT of projects nearing completion so I'm expecting to see a large amount of finished window in our next update!

Paul
Bayou Salé GlassWorks

Sunday, July 7, 2013

More Water Less Time

We're going to start things off talking about grinders this week.  A lot of students have grinders at home and will work on projects on their own between classes.  One thing I can't stress enough about grinding is to keep your grinder wheel lubricated with water.  I've used spongeless grinders and they always give you the option of using a sponge with it if you'd like.  And that's something I always recommend.  If you can't see water spinning up onto the grinding wheel you'll not only wear your wheel down quicker but you'll be grinding slower as well.  And don't forget to clean out that sponge every so often as well or it will fill with ground glass and not transfer water very well at all.  I rinse out my grinder sponges every 2 days or so and the difference when you first do it is amazing.

With that out of the way let's see what out students have been doing during this 4th of July Holiday week.  Although it took her a little longer than she expected, Cindy's Red Fish turned out nothing short of marvelous!  And the only reason it took extra time was because she ended up changing the glass she used for her water.  Other than that little unforeseen event this was pretty much smooth sailing for Cindy.  You've got to love the colors she picked for this-- it really makes the fish SPLASH!


This week also saw Cindy wrap up work on her Crab/Corn key holder.  What you're looking at below are the front and back of this double sided 'bowl'.   They keys drop in between the corn and the crab where they'll always be found provided they went in the holder rather than on some random flat surface where my keys usually go.  ;-)  This got a lot of compliments in class and is yet another wonderful project by Cindy.

Brenda isn't just another pretty face in class because she also managed to knocked out yet another Blue Cross window this week (I'm starting to think that she can do these with her eyes closed at this point.)  When you find something that looks this good and you're also good at doing it I say make a lot of them so you always have a gift on hand.  And this Cross Window certainly makes a perfect gift-- just ask Brenda!


Tim put the finishing touches on his Christmas Ornament and it's just as nice as any of the other larger pieces that he's done in the past.  Attention to detail is imperative when you make a small 5 inch piece like this and Tim pulled it off without even breaking a sweat. The biggest mistake you see made on projects like this is when the circle ends up turning into an egg, but that's not the case here at all  As you can see, this is a very well rounded piece.


Next up we have a Butterfly and that can only mean one thing: A NEW STUDENT!  Yep, Becky showed up for her first evening class with us and managed to complete her butterfly handily.  The thing that impressed me most was how she was always one step ahead of me with her questions which showed me that she was always anticipating her next move.  Just look at the nice symmetry on her butterfly-- it's the sign of someone who cares about their work.


Brenda not only completed a cross window-- she also continued working on this Ballerina Window that she started at home.  I'm pretty sure that she has this all cut out now.   Once all these pieces are ground and tacked together she'll move onto it's final border and then have to start thinking about what she's going to be making next.  Perhaps a cross in two spotlights???


Martha is going to be MIA for a few weeks but she certainly made excellent progress on her stained glass Cross Windows this week.  She has three of the 5 Crosses cut and ground and once they're tacked together the backgrounds on these windows fits will fit together nice and easy. 


Look out-- Myrt's Hot Air Balloon Window is 100% cut, ground, wrapped and even tacked together.  That means that there's only the soldering left to go before we get to see this hanging up with some light behind it.  She agonized over the border and Myrt may very well have tried just about every sheet of glass we had in the shop, but in the end this light brown was the favorite choice with everyone in the class.  And I agree that it works wonderfully.


Susan also made a lot of progress this week when it came to grinding her first lamp.  Her panel lamp will consist of 4 identical sides and this is the first side all ground and ready to be wrapped.  Everything is lining up perfectly here and I have to say again that I love how she turned a standard stained glass window into the design for her (first?) lamp.


And last, but not least, we take a look at the lamp that Terry is making with us.  She has a system that she's devised to make sure that all her pieces line up and fit perfectly which involves photocopying all of her pattern pieces on 4 separate pages.  This gave Terry a 'pattern' she can grind on top of much like every other stained glass project that she's  ever worked on.  She just grinds her pieces and places them on the photocopy so she can instantly see how things are fitting together.  Terry is taking her time yet moving quickly and she has the lion's share of her cutting finished already.


Next week we'll have a full week of classes so we'll get to see our Thursday night Houma gang.  It will certainly make for a much fuller Blog especially since we'll have yet another new student joining us! Until then remember to keep your grinders wet and your cutters sharp!

Paul

Tuesday, July 2, 2013

The Arc of a Circle

Smooth, flowing lead lines are what set apart great stained glass pieces from good stained glass.  Anyone looking at just your lead lines can easily see how fluid your curves are, how exact your cutting was and how talented you are when it comes to using a soldering iron.  Just because a piece fits into place doesn't mean that it's correct.  A square peg can fit in a round hole if it's small enough, but that doesn't make it round.  But if you grind off the four corners of that square you begin to see a circle and that's what it's all about.  Stained glass is a forgiving art form.  I use the 1/4 inch rule myself:  If the piece I've cut breaks and it's under a quarter of an inch I'll most likely use it and adjust the surrounding pieces to it but anything beyond that needs to be re-cut.

Okay, now this is some well cut glass!  Terry's latest Fleur De Lis Window was just a jumble of un-ground glass last week and this week it's finished!  In fact, it was finished when it walked back in the door.  All she had left to do was add some hooks and wash it up.  Terry got the idea for this window from a piece of jewelry which proves that you can find design ideas in just about anything.


Terry also came in with this Beveled Cross window as well.   Again, all this needed were 2 hooks to hang it by and then a bath to complete it.  This one varies a little bit from the one she made last week in that she has all of the bevels running in the same direction this time around. I personally can't pick a favorite between the two versions.


And Wow, did Ann make this Fleur De Lis window quickly or what?  This week she soldered it, washed it and then took it home.  I can't find any fault with this at all--it's perfectly balanced and beautifully cut.  I guess that making a window with all those little pieces has really paid off because Ann had no problem at all with this project.


Betty made our third and final Fleur De Lis Window this week and she also made it look easy.  This has always been a tricky pattern since just one crooked line can throw off the entire background.  But everything lines up perfectly and the end result is a window that really has an antique and rich quality to it.  And I must say that Betty's soldering has really progressed wonderfully as well!

 
Jane completed the panels she made for her 3 pane window and they all turned out stunning.  She's in the process of having the frame redone and then she'll putty these into place and always think of us whenever she looks at these windows.  Both Jane and her sister Donna have hectic summer's ahead of them so we're sadly going to lose them as students.  But they've learned a lot over the past few months with us and have promised to keep on making glass.  We're certainly going to miss them.  :-(


This stained glass, stand-alone Angel is another project under Mary's belt and it's a nice one at that.  I've been making variations of this for at least 25 years and it's always been my favorite Angel design.  The design and even the size of it is just 'right'. Mary's colors are perfect, everything lines up and this is a project that she can certainly be proud of.


You're not seeing double and no, you aren't seeing another Terry window.  This one was made by Brenda and you can certainly see the family resemblance. I really love this Cross Window but  I will admit that I'm biased due to the color scheme. Royal blue set into a clear, textured glass is my idea of perfection and Brenda has executed this flawlessly.


Brenda really loves her Cross windows because she's already got another one in the works (possibly her fourth-- I've lost track).  The cross itself is tacked together and her background is cut and ground which means that all this needs is a border.  Expect this one to be finished real soon now!


Betty found this pattern online and decided that she needed to have it completed and hanging in her house.  It's a stylized Humming Bird and Iris window that has a unique, almost Art Nouveau  flow to it.  The colors Betty has picked are a nice mix which suit this design perfectly.  I'm sure we'll see some of those colors when we see this window again in two weeks.


Cindy would have had more of her Red Fish Window completed but her husband didn't quite agree with the glass that she had picked out for the water which forced her to stop working on it at home.  Or at least until she came back into class to pick out something else.  She has all of her water splashes cut out and again I must say that she has really raised the bar when it comes to attention to detail.


 And since Cindy wasn't able to work on her Red Fish Window  she decided to make this double sided Key Tray/Holder.  It's got a Crab on the front and two ears of corn on the back side which make this about as Cajun as you can get.  Everything has been cut and just the sides need to be tacked onto the base so we'll see what this looks like completed in our next post for sure!


Our newest student, Helen, isn't wasting any time working on her first window.  She's got a good portion of her Iris Window cut, ground and even wrapped already.  To say that she's moving right along would be an understatement!  I think Helen is going to be very pleased with this when it's completed because I'm pleased with it already.


And Linda's Vegetable Window is so closed to being finished that it isn't even funny.  I'm seeing just 11 pieces of background left to cut before she can add a border and then start soldering it!  I know that she loves everything about it because as you are reading this Linda is redoing her kitchen with colors to match this window!  Linda currently has a nice deep green picked for her border and I think it's just what this needs to really set it off.


Martha has certainly come a long way, that's for sure.  What you are looking at here are 4(!) crosses all cut out with a fifth one ready to go.  Once these are tacked together she'll begin cutting her backgrounds out and then we'll see a steady stream of Cross windows.  Martha's picked up speed and makes the grade every time!


Shelley's Dog Window is almost completely ground now with only a few pieces of ground left to go.  In fact, this is so far along that she's taken it home so she can start wrapping her pieces and possibly get to soldering it right away.  I can't wait to see this one finished-- it's already got other students talking!


What's this?  Well, Terry has decided that she wanted to work on a project that would slow her down a bit so she's begun working on a lamp of her own.  This is the start of a 16" Clematis lamp and what you are looking at is most of the pieces traced onto the glass she picked.  For some reason I don't believe that this will slow Terry down at all even though it's a new experience for her.  :-)


This week Tim decided that he was going to make a 5 inch Christmas Ornament. I'm stressing the 5 inch part because these pieces are downright tiny.  There are 27 pieces in that 5 inch circle! But they're all cut and ground so when he brings this back in we'll certainly see it soldered and ready to hang (when the tree goes up).


And in rounding things out this week we're going to look at Mary's latest window.  It's a sunflower and birds design that Mary has decided to alter by removing the 2 birds from the finished piece.  So I guess that makes this a Sunflower Window.  I'm loving the colors and look how nicely things are fitting together already.


With the 4th of July coming up we'll have a smaller set of classes to review in our next post.  But I'm still expecting to see a lot of striking pieces and will certainly pass them on to you when we return.

Paul
Bayou Salé GlassWorks