Monday, March 16, 2020

Anchors Aweigh!

Keeping the grain of your background pieces lined up is one of the more difficult things to accomplish in stained glass but I'm about to show you how to achieve this feat quickly and efficiently.  In the example below the grain of the background glass runs up and down.  These pieces were all cut separately from individual pattern pieces but the grain still lines up from piece to piece perfectly and the grain also runs flawlessly from the 12 o'clock position to the 6 o'clock position within each piece.   This is what you should strive for.


So how do we do that?  First and foremost, ALWAYS MARK YOUR GRAIN LINES BEFORE YOU CUT APART YOUR PAPER PATTERN!!!  If you mark your grain lines after your pattern has been separated you will surely end up with variations that are easily spotted.  Secondly, use a straight edge to mark your lines.   Below is an example of how I see most people draw grain lines on their patterns.   These grain lines (in red) give a general indication of how the grain should travel, but as you can see they aren't angled uniformly at all.  Accuracy counts. 


Here's how I do it.  First, I put two lines, not just one, on each pattern piece--  One line on each end of the pattern no matter how small the piece may be.  Secondly, I use either a square or a plastic angle to draw the line while aligning the opposite edge of the tool to the outer edge of the pattern.   This ensures perfectly straight (12 to 6 o'clock, or 9 to 3 o'clock) lines.  Third, and finally, when I trace my paper pattern to mark my glass I make sure that both of my grain lines follow the grain of the glass as close as possible.  Making them both align to the grain of the glass ensures that the piece is as close as possible to being perfect.


So there you have it.  It may seem like a lot of work but it's really just an extra second or two for each piece that more than pays off in the end.  Be proud of your work.  If you are doing something do it the correct way because your stained glass reputation is based on everything that you produce, big or small.


Well now, Melissa's Peacock Window caused quite a stir on the Facebook Stained Glass Patterns page.   A well liked window usually gets about 200 to 300 likes but this incredibly detailed and precision laden effort has gathered almost 1,300 likes!   I'd say that Melissa's work has paid off in spades.  She took her time, never rushing so she could move quickly along to her next project and ended up with, well, a feather in her stained glass cap!   Melissa should be very proud of this window.


Then there's Mary Grace who finished her Circular Anchor Window and her end result is also marvelous.  No one would ever know that we altered the pattern to hide the fact that one of her border pieces broke and we had no more of that glass to replace it.  In fact, I think it looks better than it would have had the piece not broken.  Part of making stained glass involves thinking outside the box and that's exactly what we did here.


MiMi's Sunflower heart is just too precious for words. The blue glass that she used for the sky sets off the yellow perfectly.   MiMi also took great care to make sure that all of the outer perimeter  follows the pattern as well as lining up perfectly with each adjoining piece.   That's extremely important in a project where the outside edge forms an image (in this case a heart).  So tell me then, what is not to love about this?


Angie's Umbrella Lady  Window turned out beautiful also and kind of pays me a compliment as well.  We've seen a few of these completed since I made the first one about a year ago but Angie loved my color scheme so much that she went with pretty much the same glass all throughout it.  I must also say that her work on this is just as wonderful as the window itself.  Oh, and she used great colors!


Betty wrapped up the work on her two smaller Flower Panels with both being head turners to say the least, even if Betty doesn't care so much for the muted border that she used in the panel on the right.  Both of these windows feature beaded wire stamen and I couldn't help but notice that Betty has really been adding a lot of wire to her finished work lately.   It's a talent that she refuses to let go to waste and that's great because little things mean a lot.


Jeannette finished up two  Flowerpot Decorations this week:  a Cardinal and a beveled Bee ornament complete with, yep, wire work!  As I said above, it's the little things that can make or break a project.  Imagine Jeannette's Bee without those fancy antennas.   It just wouldn't be the same, would it?


Betty also made another in her series of Stylized Fleur De Lis.   If you have an event that Betty is donating to, this could very well be your auction item!  She makes these quickly and efficiently, and they always bring in a nice amount of money to any event.


Martha has begun working on a window that captures Main Street in Franklin by featuring one of its iconic Lamp Posts.  The pattern started off as a full image of the Post but in the end we both agreed that a closeup of the top section was what looked best.  She's got it all cut out already and her background glass is perfection (and sadly no longer being made now).


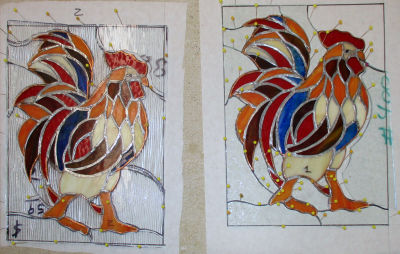
Cindy's pair of roosters both got their background glass cut and ground which means that she'll most likely wrap these while she's at home and then come in all ready to get borders attached.   Chickens are very vogue right now so I have no doubt that these will sell quickly for her.


Jan worked on cutting out more of her Poodle Window and she's almost got it all cut out now.  There's just the heart section and a little bit more of the face to go and then she'll begin grinding it and tacking it together.   This is one of those 'exception to the rules' windows where we will cut the background out AFTER the subject is ground, wrapped, and tacked together.   Why?  Because the subject matter (the poodle) can easily be lifted  once it's tacked together.    If you can't easily lift the subject matter, you won't be able to get your background glass underneath it without things shifting all around.  If you can't easily get your background glass under the subject of the window you'd best cut the background before you begin grinding so that everything fits perfectly.


Jeannette came in, started, and almost completed her latest Wedding Invitation Plaque.  With just a little bit of soldering to go this will easily be finished upon her return.   How many of these is she making for this wedding?   Actually it's two because it's a double ceremony with two different couples!


Kerry began cutting out the glass for the Tiger Eyes portion of his double window.   Before class was completed he finished cutting his glass pieces and began grinding.  That's a lot of progress for just one night!


Barbara H worked on two more Flower Pot Decorations and she's ready to begin the soldering process.  One piece is missing on the Butterfly but she'll fix that at home because that's where both the glass and the paper pattern piece is.  With so little left to go on these I'm considering these two projects as completed.


Linda F tried hard to get an outer green border to work for her Underwater Fish Scene but in the end the blue that you see below was by far the best visual fit for the window.   All of her glass has been cut and ground so once she wraps those outer blue border pieces she'll be able to tack it together and then begin soldering.


Decisions, decisions.  This week Lisa got hit with the big, burning question:  Do you want a single or a double border on your Owl Window?  Her first response was to go with just one border to be done with it but here at BSGW almost all of our students lean towards double borders so a minute later everyone was trying different combinations of glass which made Lisa change her mind.   She got her first, inner accent border cut ground and foiled which means that when she comes back she'll quickly get the final border attached and then she'll be ready to start soldering.


Lastly we look at Roxane's Penguin Window which is also very nearly completed.  With just a few lines left to solder (you're looking at the back side of the window in the picture below) she's going to be finishing this up VERY early in to her next class.  So what's up next for Roxane?  An angel window the likes of which you've never seen before (here at the BSGW Blog that is).


Well, things are slowing down in class largely due to concerns about the Covid-19 virus.  So far it looks as though we'll be having classes the week coming up but we have had more than a few cancellations already.   I'm thinking that we'll be closing shop for a little while after this week passes if not before.   It all depends on attendance and how our students feel about coming in.  Stay healthy everyone.

Paul
Bayou Salé GlassWorks

Monday, March 9, 2020

A Picky Palate

Most times in stained glass you want to follow a procedure to make your window flow naturally.  The grain for your backgrounds should always run from left to right (horizontally) if you are using blue glass because most everything that you see in the sky flows in that direction.   If you are using clear glass or any other color for your background  you can run the grain in any direction you want-- just be consistent.

Now we all know that every rule has an exception so here we go.  If your border is cut up into random pieces, many of which are unnecessary,  that don't simply make the cutting easier, then you can break the rule of having your grain flow in one direction.  Below I've colored in Shawn's Address Window and I've run the background grain from left to right (horizontally) in one direction.   It looks wonderful to me and there is nothing wrong with making this window in this manor.

Next I've randomly run the grain so that nothing matches up.  Someone used this grain scheme a long, long time ago (but in a galaxy not far away) and it worked so well that many, many other stained glass artists followed suit over the years to the point where it's almost expected, but only when a background is cut up into more pieces than it needs to be.  Me, I like the look below best.   The fact that it doesn't all flow together draws your eye to the window which is actually somewhat boring since it's only numbers.  The look below is the one I'd go for and it's the the look that Shawn went with as well.   You'll see her window later on where the effect is much more apparent.


First off this week we have Jeff who has completed his  Flowers and Scenery Window.  Now that it's hanging up in the light you can easily see how all of his hard work has paid off.  Jeff is going to take a few months off since he'll be working out of state but we hope to see him return a little while down the line.


Martha's Flowing Textures Window is finished  but since she colored it with black patina (which I recommend for all clear glass windows) she had to let it sit for 45 minutes before washing the patina off.  Since she colored this late into class she left for home and I washed it right about the time she would have been walking into her home.   In other words, she hasn't seen this 100% completed yet but as we can ALL see, it's wonderful.


Jeannette put the finishing touches on her Coffee Pot Window and Angie is already eyeing up the pattern!  This window is made out of a bare minimum amount of colors but still stands out vibrantly due to it's high contrast and excellent craftswomanship.


Barbara H put the finishing touches on 3 different Dragonfly Flowerpot Decorations  and even attached the stakes herself which is something that a lot of our students find daunting.  Way to go Barbara!


Tracey's Single Sunflower Window is all cut out and she's begun grinding it already.   The long clear top piece had broke in half while cutting it but rather than replacing a huge piece of glass we simply put a lead line through it to make two shorter pieces out of one long one.   Then we saw that the stem of the sunflower looked like it ran straight up and out the top of the window so to fix that optical illusion we cut a green stem and now all is fine.   I actually prefer the green stem over the original lead line stem that the pattern called for.


Annette's Cross Window has really taken form now that the background glass has been cut.   She's already grinding her pieces and you can now see the dove perfectly even though it's somewhat hidden behind the cross.  People in other classes are already talking about making this for themselves!


MiMi began working on two Heart Sunflower Suncatchers and has both of them cut out along with one of them being ground already.   Her fit is perfect and her colors are exquisite.  I loved this design so much that I cut three of them out over the weekend for myself!  I'm hoping that this becomes a popular design and MiMi's flawless work will surely help make that happen.


Wow, Lara got all of her Flower Window ground in just one class!   This proves just how much time you can actually save if you slow down, take your time, and stay on the the line while you are cutting your glass.   When Lara was packing up she stumbled upon the missing pattern pieces for her stems so those five opened areas will have pieces cut and ground for them upon Lara's return. 


Rowena began work on an American Flag and Eagle Window by cutting glass this week.   As you can see she got it all cut out and even has some of it ground already.  It won't be long before this eagle flies out the door.


Cindy has all her ducks in a row (so to speak) by having her pair of chickens all foiled and tacked together.   Next week we'll get to see her work on cutting out the background glass for these two birds which, compared to cutting the chickens, will be a piece of cake.


Kerry has begun working on an LSU/Tiger Eyes Window and got as far as getting his paper pattern pieces traced onto the glass he'll be using for the dark sections of the tiger portion of his window.  That means that Kerry will be cutting glass when he returns.


Shelley has returned!  We knew she couldn't stay away from us for too long and when she walked in the door this week after being absent for 4 months she just fell right back into place.   And what's she working on?  Those of us who know Shelley's previous work aren't surprised to see that she's working on a Mermaid. 


Linda F tacked her Underwater Scene together, filled in a few missing pieces and then redesigned the lower left corner so that it had more coral in it.   Not a bad days work at all!  Next week she'll add a border and then start soldering this beast.


Lisa spent the day foiling all of her glass and she's just about ready to tack this, fill in a few missing pieces, and then add a border or two before finishing this up by adding solder to it.  It's all coming together now for her!


Roxane was back in class this week and tacked together her Penguin Window after which she added two borders, a grey one and a black one.   Now she's just about ready to begin soldering this cute family themed window.


Susan R  has just a few scant pieces left to cut out for the background glass in her Seafood Window and then she'll finish it off with a border before she begins to solder it.   All of her hard work was well worth it as this window already shows off her stained glass skills.


Jeanne M has finished grinding her Easter Window and even began wrapping all of her pieces with copper foil.  She hopes to get this done in time for Easter and I'm sure that this will be hanging in her home before Easter gets here.


The stained glass woman that Angie is working on is feeling under the weather but luckily she has an umbrella with her that her handbag accessorizes with perfectly.  Angie got her first border attached which means that she's got just one more to go and then she'll finish this rainy day scene.


Fran's begun cutting glass for her Red Fish Window but will be redesigning the background of it.   When she comes back in we may see what her new pattern looks like but even if it isn't drawn up she'll be able to continue grinding this colorful fish.  Fran still needs an eye in her fish but we're going to cut that into place once the eye has been cut and ground so that it fits perfectly. As always, the smaller the piece the more important the precision.


Carol is working on an LSU/Tiger Eyes Window of her own and she's really far along in the creation process.  We make this window in two separate sections so we can be sure that the Tiger Eye portion and the LSU section are EXACTLY the same width otherwise you end up with a lopsided, trapezoidal shaped window when the borders get attached.


Susan D's Ali The Dog window is officially ready for its background glass.   Now that she has her dog foiled and tacked together the rest of this window will be child's play for Susan.


Mary Grace worked on getting a zinc channel curved to wrap around her Circular Anchor Window and then went to work on filling in some missing pieces that she still had to deal with.   After that was finished she managed to get the front side of her window soldered which means that with a little luck she'll be wrapping up this project upon her return.


Jeanne L is grinding the fruit for her Fruit Basket Window and it won't be long before she tacks this together and then cuts out her background glass.   I've never understood why I've found this design to be such a fun window to make but Jeanne (and everyone else who's made this) has agreed with me.


Melissa stunned everyone when she came in with ALL of her glass cut!  She was worried about splitting both the green and blue pieces so that each separate piece became two but she said that when the first one cut so easily she just couldn't stop cutting and grinding every one of them.   Melissa wants to finish this next week and if she can get this soldered at home I see no reason why that won't happen.


Betty worked on two different projects this week.  Her small Lily Panel only needed a border which everyone in class helped picked the color for.  Once that was chosen and cut she put that project on the side so she could finish it at home.  She then resumed work on her Stylized Fleur De Lis Window which is also almost completed.  Look for these two windows to be in a spotlight position near the top of our next post.


Which brings us back to Shawn's address window which sort of started this post. Shawn has a big decision to make.   She 's thinking about adding another border to her Address Window but there's a size restriction so she's unsure if she should add more to this or not. Either way, she'll be soldering this before you know it.

 And there you have it, everything that happened in our first class for the month of March.

Paul
Bayou Salé GlassWorks

Monday, March 2, 2020

Put Your Big Girl Panties On


Be comfortable, not contorted!  This is something I tell students two or three times a week when I see them reaching to the other side of their projects trying to see if something lines up or not.  Our first golden rule is to first cut point to point when cutting an inside curve, but our second most  important rule is that you should never work beyond the halfway point of your window.   Once you go beyond that point you should spin your project around so the area you are working on is closer to you thus enabling you to see exactly what you are doing!  You'll be surprised at how much time you save with this one simple tip.


So our first completed window of the week is Annette's Max The Dog.  Although Christmas is behind us Annette thinks she might very well hang this up for a while anyway.   Just in case you don't recognize him, Max is the dog that starred in How The Grinch Stole Christmas.  This window, along with her Grinch window, will surely make quite a statement during the 2020 Christmas season.


Next up we have Belinda's Church Window which was finished this week.   As you can see all of that hard work sure paid off.   The funny thing is that all of those thin white boards that make up the church weren't hard to do at all! The 'Love', 'Faith' and 'Hope' words were fired onto the glass that make the scrolls in our kiln and the finished result is nothing short of inspirational.


Kerry's Deer Window looks exactly as a deer should look which is a great compliment because I've seen some on the internet that need a label to let you know what you're looking at!  This is yet another stunning piece of work by Kerry.


And Jeannette made another Wedding Invitation Plaque this week with colors completely different from the ones she used for her last wedding gift.   Although it's difficult to see in the picture, the glass she used for her border matches the flower on the invitation perfectly.  That color tie in is what really sells this design.


After completing her Max the Dog Window, Annette traced out and began cutting glass for her new window.   She wanted a Cross but we added to it so that it wouldn't just be 4 pieces of brown glass in a frame.   This cross is made up of three colors and features a Dove behind it almost in silhouette.  I may be wrong but I think we're going to be seeing a few more of these made over the next few months.


Meanwhile, Shawn is working on an Address Window with a background that will very closely match the background of the Cross Window that her mother is working on.  We're going to dive into the design esthetics of a 'fractured' background next week as our tip of the week. As for Shawn, well, she cut out all of her glass and even got half of it ground in just one night.  Way to go!


MiMi is working on three Suncatcher Birds and in just one class these have been cut, ground, and ready to be foiled.  The three of these are so perfectly matched that you'd almost swear that they were a kit.  Alas, only people who don't properly know how to do stained glass assume that other peoples' work came together starting life as a prefabbed kit.


I have to say that Jeannette's Coffee Pot Window looks fantastic!   When I drew this up I accidentally reversed the width and height measurements but Jeannette said she liked it so much that she was going to make it anyway.   So who knows, we may see another one of these running wider than taller later on down the line.


Lara's always on a roll so it should come as no surprise that she has her Flower Window completely cut out and ready for grinding.   Well, she hasn't cut six pieces of her stems yet but somehow the pattern pieces have turned up missing so we're going to deal with those a little later on.


Ali the dog is completely ground and since Susan D had to drop on by the shop for more foil I'm thinking that when we see this again a lot of the pieces are going to be wrapped.   With the bulk of the work on this project behind her now, Susan will most likely finish this before you know it.


It's official.  Lisa is just 3 weeks into her first window and it's already been ground and set to be foiled.  She wrapped a few pieces before she left class and it's safe to say that she's got the foiling process pretty well worked out.  Most importantly she knows that if there's a foiling problem you just can't ignore it and I have seen her go the extra mile to re-wrap pieces to ensure nice and even foiling.   


Melissa now has all of her inset pieces ground and even has the round circular insets wrapped which means that when she comes back into class she'll work on cutting them into place and then separate the remaining pieces that still need to be cut.   This isn't even finished and it looks spectacular already!


With the fruit bowl all cut and ground Jeanne L has moved along to cutting out the fruit for her window.   I've always found that to be the fun part of making this window because there aren't many set colors which allows you to run free with color placement.   Her fruit is almost completely cut out so I have no doubt that when Jeanne returns she's be working at the grinder again.


With just a small handful of background pieces left to cut for her Seafood Window, Susan R is coming close to adding a border and then soldering her piece de resistance!  This is close to finished now and all of her hard work is already shining through.


As you can see, Barbara H has been busy working on Dragonfly and Butterfly Flowerpot Decorations.   She's already got four Dragonflies cut and ground along with a Butterfly that is very close to fitting together.   She'll be tacking these onto small steel rods which will then be inserted into flower pots all throughout her patio.  And do you know what?  They also make GREAT gifts!


Jeanne M resumed the grinding process of her Easter Window and I have no doubt at all that she'll get this completed in time for the holiday.  The only pieces she has left to grind are the cross and some of the background.   Once that's done she can come in, relax, and take her time wrapping all of these glass pieces.


Lastly we look at Martha's Clear Flowing Textures Window.   She's begun soldering the front side already and has taken it home with the hopes of getting more of it soldered before coming back into class.   Even if she doesn't get the soldering done at home there's a very good chance that this will be completed upon her return.


And there you have it.  Come back next week when we look at newly completed projects as well as newly started ones as well!

Paul