Monday, July 20, 2020

Looking For Lysol In Lafayette

Here's a quick tip that beginners don't seem to pick up on until they've done a few pieces.  New students have a lot on their plate as they deal with remembering all of the rules for each of the steps that they try to accomplish.   Sometimes they get too excited when something fits after they've ground a piece and immediately move along to the next piece.  Remember this though--  Just because something fits it doesn't necessarily make it correct.  Once a piece fits into position make sure that it resembles the opening that you have it fitting into.  I'd rather see a piece be the correct shape yet be a little short rather than a fit that doesn't match the shape at all.  Remember that a square peg can go into a round hole if the square is small enough, but that doesn't make the peg round.  Pay attention to your shapes and your windows will look better than ever.  In the example below, the red piece fits into the opening but it certainly isn't round and needs to be re-cut.


So first up we have Jan's latest Crucifixion Panel.  It has a wonderful simplistic look but it's anything but simple to make.   These are some tiny pieces that require some finagling to get to fit but the end effect is obviously very powerful.


Belinda printed out a Heart Sunflower from the internet and then added a few leaves to add some more color to it.   Here you get to see it for the first time already in its completed form.  Not bad at all!


Ann's newest Cross Suncatcher utilizes color perfectly.   The clear baroque glass pieces have just a hint of green in them which match wonderfully with the solid green that she used as an accent color.  Or is it perhaps the other way around?  Either way, this works!


Jeannette completed two beautiful Suncatchers this week.  The Bumble Bee is her best one yet and I love that she used a piece of very soft amber glass for the wings.  Sometimes bending the rules makes something all the more perfect.  And, of course, her Humming Bird suncatcher is also perfection.


Here's a look at Linda L's first American Flag Panel.   I'm pretty sure she'll be making at least one more of these once her daughter sees it!  And Betty is already cutting glass for one of her own.


Mary Grace finished her Flower Candle Votive project and it also really turned out nice.  Alas, all of the photos I took of it from straight on were VERY blurry so this angled one is the best I can show you.  :-(


Betty made this wondrous Wise Owl utilizing a lot of scrap glass in the process.  I have to say that her soldering on this piece was phenomenal if not even better that that!  Another great job all around.


Susan R took the standard Mixed Drink Suncatcher and turned it into a Lawn Ornament by attaching a stake to the back.  She's got a second one in the works because why settle for one mixed drink when you can get two!  Look how you can see the pink part of the drink swirling in the glass.


Betty also made her own rendition of the Sunflower Panel that Linda made last week (and possibly even the week before).  Now that Betty has her own Wrought Iron Post that these fit into I  suspect that we'll see more panels of this size made by Betty in the weeks to come.


Our final finished piece was made by our newest student, Beth and yes it's a Butterfly.   She had no problem at all cutting her glass and grinding it to make this beautiful blue sun catcher.  She's still not entirely sure what she's making next but we'll see what she decides when we return in our next post. 


Barbara H got her clear baroque background glass cut, ground, wrapped and tacked into place this week which means that she only needs to solder this window and then add some channel to finish it all off.   Perhaps that will happen next week...


Cheryl decided that she was going to work on an address Window for her first project and this is it.  She got both the numbers and the background glass cut out which means that she's ready to move on over to a grinder upon her return.


Helen worked on an LSU Window and after she got her three letters cut out she worked on cutting out her clear background glass as well.   It may be hard to see but everything is officially cut save for the border (which is cut after this is tacked together) which means that she'll also be at the grinder when she comes back in.


Jeannette's latest window is a Heron Scene and she only has to get some green leaves cut out before she begins grinding.  Look how wonderful that sky flows from left to right.  That's nice glass placement right there because you can actually see clouds in the blue sky.


Now here's something that you don't see everyday.  Lisa is working on a Monogram Alphabet Panel.  The curves and lines in this symbol form all 26 letters of the alphabet.  Lisa has used clear textured glass and has this ground and ready to be wrapped.


Here's another 12 x 9 panel that Linda F is making.   It's obviously a Halloween panel with a little bit of a scary twist in its smile.  Wait until you see what glass she's going to use for the pumpkin-- it's not going to be what you expect at all!


Cindy's on the home stretch with her re-made Bird Window.   It's all tacked together and now she's working on soldering it.  This will be done before you know it.


And MiMi's Combat Vet Window is in the process of getting its right wing fitting together as she works each feather at the grinder.  The right piece of blue background glass perplexed us for a minute or two because the right side of it was off by quite a bit.   Rather than grind it down we waited to see what may shift here and there and a little while later we saw that it was the bottom edge that was off and with just a small quick grind everything dropped into place perfectly.  


Here's Susan D's Address Window all ground and fitting together perfectly.   If you look closely you can see that she's begun wrapping her pieces in copper foil which means that this will surely get a border attached when we next see it.  See that number?  Remember it when you're playing the lottery...


Linda L's Celtics Logo Window is really moving along wonderfully.  Look at those perfect curves and those wonderfully complex letters!   You can tell she's been at this stained glass thing for a while now!


Tracey's Cardinal Window is all ground and looking rather epic if I do say so myself .  She's removed the branch from the upper left and went with a lead line coming out of the beak.  It's a cleaner look so I believe it was a good decision.  Tracey's taken this home to wrap and she'll tack it together next week and add a border.


In less than 2 classes Roxane was able to wrap all of the pieces that she ground for her Angel Window.   When she comes back in she'll tack this together and then get some background glass cut out.   I can't wait to see what she picks out because I'm unsure if she's going to do an empty background or maybe something that resembles the sky and clouds.


Shelly finished grinding and wrapping her Mixed Drink Suncatcher and would most likely have finished it during class but she had to leave early and we didn't get to see it completed.  But next week will be a different story entirely!


Last but not least we look at the three projects that Angie worked on.   Her two Butterflies really only need to be attached to a stake so she can put them in a flowerpot and her Angel Wings/Heart Window only needs to be soldered for it to be completed.  She's talking about making a Great Pumpkin Window next so I think she feels that these will be finished upon her return- and I believe they will be!


And there you have it, another busy week in the shop all accounted for.

Paul
Bayou Salé GlassWorks

Monday, July 13, 2020

A State Of Constant Flux

Momentum.  In glass it's about a force that wants to continue along the same path.   Momentum gathers strength the longer it travels along a fixed path and it's something that should always be considered when you decide to break your score lines since it's generally momentum that breaks a curve.  We touched on this a little last week and today we are going to expand on it some more.

When you make a score line you can always break it from either the start of the cut or the end of the cut.  A lot of times it won't matter but sometimes (frequently, in fact) it does matter.  You always want to start on the end of the cut that is closer to the curve.  Also, when you use your running pliers to start the break  BE SURE TO ADJUST THE SCREW SO THERE IS VERY LITTLE PRESSURE ON THE GLASS!   That screw on your Running Pliers is there for a reason and it's why students who insist that they don't need to adjust their pliers to get them to work need me to cut certain pieces for them.

For beginners, the following cut should be made in three steps.  First the red line (point to point), then the green line, followed by the purple line. Each time the break NEEDS to be started near the curve (at the bottom of the glass) rather than at the long straight run (at the left of the glass).  If you break it from the left side of the glass momentum will take over and make the break run off of your score line.  Also, be sure to cut this inside curve before making the straight cuts so that your piece has more 'bracing' behind it.  Failure to do so will increase the odds of your glass breaking incorrectly dramatically.


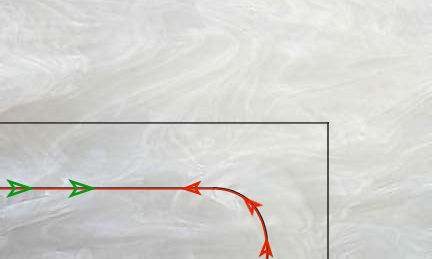
Now, if you're an experienced cutter who can easily make that cut using the instructions above then you might want to do it in one cut. This is a complex curve but a fairly easy one.   To get this inside curve with just one score line you would just follow the entire curve with your cutter to score the glass.  Don't rush, follow the line perfectly.  Once it's scored you will break it out using your Running Pliers.  Adjust them so that they apply just a tiny amount of pressure on the glass and start with your pliers at the bottom near the red arrow.  Apply a little pressure until you hear a 'click'.   The curve will have broken to a point just beyond the curve.  Now move your Running Pliers to the left side of the glass where the green arrow is and again put just a little pressure on your pliers.  That's it.  The piece will drop off and your curve will be perfect (so long as you followed the line when you scored it).  Grinding this piece will be very easy now because there are no 'shards' to clean up at the grinder.


Just remember that if you make any of the straight cuts before you cut the curve you will most likely break your piece when you finally cut that inner curve.  We ALWAY cut inside curves first so they have  the strength of all that extra glass behind them. 

Okay, so last week we saw Susan D's Pelican all ground and laying out on the pattern and now this week we see that while she was at home she soldered it together and then bent copper tubing into a circular, spiraling design.  Once that was done she soldered it all together and then added the stained glass Pelican and fish to the copper tubing.  The finished project is huge and looks incredible.  This is a success story all around!  Job well done.


I'm happy top say that Ann's Yellow Rosebud Window was completed in just two short weeks.   Even though she's been out of our weekly classes for two years she's lost none of her skills.  As I promised last week you can easily see just how nicely that border works with the rest of the window.  This also shows what a difference having some light behind a window can make when it comes to photographing colors.  I know someone who is really going to love this window when they receive it!   


Belinda's circular Birds On A Branch Hanging is perfection through and through.  She even attached the beaded eyes onto each bird both front side and back!  You've got to love the fact that she aims to do it all by herself.  And when she does it's magic.


Jeannette's Coffee Window is probably already hanging up on her kitchen wall and for good reason.   She knocked this Window out in just two weeks and the end result is stunning.  This monochromatic design borrows some of it's aesthetics from the Address Windows that we've been seeing here in the shop lately with one big difference-- she's replaced the curves with straight lines which fit this design wonderfully.


We have two new students this week so our last two completed projects are butterflies.   We had Cheryl join us on Tuesday for her first class and this is her red Butterfly.   We expect great things from her and she'll start with an Address Window of her own when she returns next week.


And this is Helen's purple Butterfly.   Helen took classes with us a long time ago but had to leave after her first five classes.  When she came in this week we started from square one and had her make a second Butterfly which she accomplished with ease.  She's already picked out her first project which will be an LSU window that you'll see when we return.


Linda F's latest exchangeable panel is another Sunflower and she can knock these out faster than a prairie fire can spread with a tail wind.  A little further on down the line we'll see that she's already head first into a new design!


Jan's back but she's paused work on her Poodle Window to do this Crucifixion Scene that she's done at least once before.  In just one class she cut, ground, and even began wrapping her pieces so this will be done before you know it.


Linda F has her next exchangeable panel cut out and is ready to begin grinding.   Flags are tough to do in stained glass due to all the points on the stars so it's always interesting to see patterns that stoke patriotism without setting fire to your cutting and grinding skills.    This is a beautiful compromise to a tricky problem indeed.


Mary Grace was back and she resumed work on her Candle Holder.  Since this is a three dimensional piece she had to grind and tack together each of the four sides in a jig so that everything would line up perfectly and the bottom would be flat and not angled. There are only four lines left to solder on this and them Mary Grace will cut out and attach 6 small flower blossoms to finish it off.


After finishing her Rosebud Window Ann spent the remainder of her night working on a Cross that she had cut out 2 years ago and forgot about.   As you can see she managed to get it ground before she called it a night.  


Roxane was busy wrapping all of the tiny, thin pieces that make up her beautiful Angle and I have to say it's great to have Roxane back with us.   Her work (especially her foiling) is of the utmost quality.  When this window is completed I think others will ask about the pattern and then possibly decide against it when they see just how many tiny pieces it takes to make this Angel.


MiMi's Paratrooper Window is almost halfway ground (well, the logo part of it).  The feathers that make up the wings are so perfectly ground that you'd swear they came from a kit!  But you know what?  They were all hand cut and hand ground by MiMi herself.  Her work proves that if you take your time and strive for perfection you can achieve it.


Betty's Owl has been completely cut and is very nearly ground as well.  In the end she didn't go for a random color placement for the feathers but rather a systematically choice where each color was specifically selected and yet appears to be randomly chosen.  It's a topic I've covered before and maybe will again because you see it all the time in designs everywhere.


Next up we look at the Mixed Drink Suncatcher that Shelley has started.  In just one class she was able to trace the pattern, cut out all of the glass, and then grind it all for  a perfect fit.  I have a feeling this could be finished when she returns.


And here's another window that has taken complete form in just one quick 3 hour class.  Susan D traced out the pattern for her Address Window and then managed to cut out both the numbers and the background glass.  She's set to begin grinding this and after it's tacked together she'll decide on how many borders this will get and what color(s) the border(s) will be.


Jeanne L got her Fruit Bowl tacked together and then filled in two missing pieces of glass. After that she picked out some beautiful clear water glass for her background, placed her Fruit Basket on top of it and then traced around the bowl.   After cutting out the pieces she has a background that fits so beautifully you can't even see it in the picture, but it's there.  The thing is, it's not even ground yet and it looks spectacular!


Angie had a busy day with us as she split her time between 2 Butterflies and an Angel Wing Heart Window.  I'm thinking that we'll see at least two of these completed upon her return if not all three of them.  I'm interested to see what color she picks for the border on the Angel Wings. 


Last but not least we have 2 more Mixed Drink Suncatchers that Susan R worked on.  Not only are they both completely ground but one of them is completely wrapped as well!   I'm thinking that next week will be another banner week for completed mixed drinks!


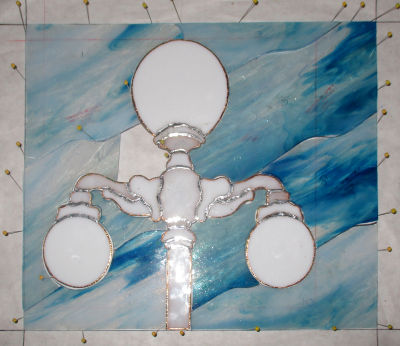
And that's about all we have to show you this week because I am slipping! First off,  Melissa managed to grind 4 small Fleur De Lis but I forgot to take a picture of them so you will surely see a LOT of progress made on them when she comes back in.  Secondly, Cindy got everything but her background glass cut ground, wrapped and tacked together in her Bird Window.  And lastly, Martha's Streetlight Window is ready to be tacked and then get some borders added to it.  Be sure to drop on by again in a weeks time to see if I can remember to take pictures of everything that I'm supposed to and to see what we've been up to in each of our classes.


Paul

Monday, July 6, 2020

A Stack Of Chaos

How to positioning your pattern pieces onto your sheet of glass is a VERY important decision to make especially if inside curves are involved with the piece you are positioning.  Look at the piece below.  It's a fairly simple piece but the inside curve should always give you a bit of pause or concern.

 
Most people would position it on a sheet of glass as shown below.   To be honest that's not incorrect as we like to line up straight edges with the straight sides of the sheet of glass,  However, positioning it this way leaves no support for the inside curve.  The possibility of our piece breaking incorrectly is increased because there is very little glass 'behind' the curve on either the left or below the piece.  Because of this the glass could easily break along the red line due to momentum.


Below we show far better placement because for the glass to break incorrectly (again indicated by the red dotted line) the break would have to travel through a lot more glass which means that the piece is less likely to break.


Next week we'll dive even deeper into this curved piece of glass but meanwhile keep in mind that the more glass you have 'behind' your piece, the better the chances are that it will break correctly along your score line.


Now let's look at Shelley's Titus Window which really looks stunning with it's bold colors and modern design aesthetic. The lack of a border also enhances the avant-garde flavor of this window that many students first thought was an odd choice but who then came around to believe that it was neoteric with its thoroughly sumptuous implementation.  Myself, I love it!  It's different and it captures your attention-- that makes it everything that a stained glass window should be!


Next up we have Lisa's Butterfly Emergence Window which is another head turner.  Many people couldn't envision its end result until it stared them in the face but that's the way truly artistic pieces are made.  More expressive pieces are usually overshadowed by the weight of their construction and can't truly be appreciated until they are completed as in the case of this gorgeous window.  Wow, listen to me-  I'm starting to sound like an art critic instead of a blogger!


Now our next window just radiates inspiration!  Annette did wonderful work and created a piece that will almost surely be made over and over again.   I just wish my single picture of it hadn't turned out blurry!   I've done what I could to sharpen things up but it's muted the colors of the cross which I can't get to reflect its actual colors.  Still, I believe the point comes across and it proves that this is another standout piece in Annette's stained glass portfolio.


Betty completed the Address Window that she made for a Wrought Iron Pole that she purchased just for this application.  She couldn't hang it as she initially wanted to but I believe our solution works even better than what Betty originally envisioned.  Address Windows are quickly becoming the fashion here in our classes and Betty's work will do nothing but further promote the desire for our students to make more of these.  By the way, there's your lottery number for the week!


Lara put the finishing touches on her latest Flower Window and her use of iridized purple for the ball in the upper corner photographed perfectly (which is never the case for iridized glass).  There's a third companion window ahead on the horizon for Lara so don't be surprised to see something similar in the immediate future.  The simplicity of this design makes it nothing short of charming!


 Angie started and completed two bird Suncatchers this week, the first being a Beveled Dove and the second being a Large Swan.  Something tells me that the Swan is going to be popular around here...


Jeannette, as expected, got the soldering all touched up on her Religious Themed Window and once we hung it up it really shined.  The use of two different purples for the borders is what really makes this window.  I'll be honest and tell you that using different shades of the same color in a window usually enhances the overall look as you can easily see in this piece.  Jeannette is also working on a Coffee Window that I somehow didn't manage to get a picture of.  I guess I'll show you that when we return next week.


Linda L made a flurry of Mixed Drink Suncatchers and now we have 2 other students making them as well!  They're festive, they're cute and they make me salivate! I suspect I'll be handing out more of these patterns next week  now that everyone can see what these look like completed.  Oh, and congratulations to Linda for mixing up the colors and making them all different!


Kerry finished his LSU / Tiger Window and when he had it all washed and ready to hang we discovered that one of the eyes had cracked. Since the eyes are made out of glass globs it was a definite hassle to remove.  While breaking it free we also broke one of the pieces of glass surrounding it  which actually went better than I expected since I was sure  we'd lose BOTH pieces that surround the pupil.  All in all the repair took about 25 minutes but now you'd never know there was a problem at all.


Linda F completed her Sunflower Panel and already has another one in the works that is very near completion.  Here's a look at the first one and next week I believe we may very well be looking at a similar image mixed in among our completed projects.


Tracey's new Cardinal design is in the midst of being ground so that all of her pieces fit together perfectly.   She's left out the branch in the upper left of the window  (which is visible on the pattern through the glass that she's used for her background).   We will add a simple lead line coming from the beak that extends to the left side of the window to make the cut for the beak possible.


Belinda's semi-circular Birds On A Branch Suncatcher is also coming together as you can now clearly see what it looks like in glass and what color choices she's made.   She's got some amazing detail here and she's also learned that you need to fill in the open areas between pieces with clear glass to give stability to the project.  And when I say clear glass, I don't mean textured.  The idea is to create the illusion that those open areas are empty which textured glass won't do.)


With her borders cut and attached as well as the channel being added to her panel, Ann has begun soldering her Rosebud Window.    I apologize for the brownish tint to her border-- it actually doesn't look like that at all and once we get some light behind it you'll be able to truly appreciate the actual color of her border.  Cameras mixed with fluorescent lights can sometimes mess up certain colors.


This is Susan D's Pelican which she successfully ground during class.  Trust me when I say that it's a far bigger piece than you might think when you see this picture.  It's a different kind of big bird for sure!  I'd tell you that it won't be long before this first one is completed but I got a text from Susan last night saying that she already has it assembled and decorating her back yard already.  She's not only capable of accomplishing great work in our shop but at home on her own as well.  I'll share a picture of the finished piece in our next edition of the blog.


Betty has begun making a Scrap Owl which is exactly what the name implies.  Utilizing almost nothing but scrap glass this owl will be colorful upon its completion.   Now that the face is done Betty is free to let go of convention and let chaos control the colors!  Rules no longer exist in this piece.


After she finished wrapping all of the pieces on her Fruit Bowl Jeanne L discovered that just one piece needed to be re-cut to make this fit together perfectly.   In a window this complex that's a very good end result because the foil expands everything and it doesn't expand evenly throughout the piece.   She's going to tack this together and then replace the missing piece before cutting out the background glass when she returns.


Here's Martha's newest Streetlamp window with its background glass almost completely cut.  We only had one sheet of glass and things fit VERY tightly so we were VERY careful when it came time to separate those pieces.  Once that was done we were able to rest easy and that's when I wasn't VERY careful and I broke one her pieces that I wanted to help cut.   Never run your cutter off the edge of the glass-- that's how this was broke.   Luckily, another sheet of glass was just delivered so we can replace it now. 


Roxane ground her entire Angel in just two weeks and you can color me impressed.  I didn't think to count the pieces but there certainly are a lot of them because it's all anyone says when they see it.   Now she's ready to wrap this and then tack it together before setting it into whatever background glass she decides. (I love her face-- it reminds me of Roxane.)


And Mary is also making excellent headway on her Magnolia Window. She's got a good 80% of it ground and I suspect that she'll be wrapping pieces when we see her again.  The leaves look stunning because she randomly mixed up the pieces between the light and dark sections of one sheet of green glass.   Sometimes you really want contrast and this is one of those times.


MiMi has her Combat Vet Paratrooper Window all cut out and she's already knee deep in the hoopla into the grinding process.  She's begun with the piece that rests in the corner of the square she's pinned down and is working on radiating outward from there.  Look out because this will be landing soon.


Mario just needs a face and some gloves and he will be ready to be ground.  Shawn's cutting is wonderful but I needn't state that here because you can already see how well this is fitting together.  No one is going to mistake Mario for Sonic-- that's for sure!


Barbara came in and got all of her bevels wrapped and even managed to get the center bevel tacked together.   Since this didn't come with a pattern we had to make our own and that involved pinning the bevel cluster together, tracing it out, and then folding the pattern in half to make a symmetrical drawing to build it on that works with both sides.  It may sound easy but it can be time consuming.  Of note is the fact that once you have the pattern it can be used with ONLY that particular bevel cluster.   Others clusters, even though they're the same, will differ and not fit the pattern. Now that the bevel is tacked Barbara can cut the four remaining pieces when she comes back in next week.


Here's a look at Susan R's interpretation of the Mixed Drink Suncatcher.   She's going with a pink drink and since one of the scrap pieces was close to fitting the umbrella she's going to make it fit  and have an umbrella that matches the drink itself.  How's that for accessorizing!


And here's Linda F's second Sunflower Window all cut out and waiting to be ground.  The colors may be slightly different but the design is the same.   It won't be long now.


And we end this post with a look at the pattern for Cindy's Three Birds Window.   The actual birds and the berries that hang from the branches have already been tacked together so we designed this pattern around those finished pieces.   We'll get a better idea of what this will look like when we see it again next week and some of the glass has been placed onto the pattern.


Wow, I've been thinking that we haven't seen many completed pieces in the past few weeks but this week we had an overflow of finished windows!   I think thinks are beginning to return back to normal in our classes!


Paul