Tuesday, October 13, 2015

Heart Of Glass

Before we check out what our students are making I'm going to welcome you to our third installment of reading a ruler.  We've covered the inch, the half inch, the quarter inch, and the sixteenth inch, but we skipped over the eighth inch. The eighth inch is represented by the second longest line and there are eight of them in an inch.  The arrows below show where each of these are located on a standard ruler.  Each eighth inch (1/8) is made up of two sixteenth inch lines.  The red arrows point to eighth inch marks that we actually refer to by different names but we'll get into that in our last ruler lesson (next week).  If you count every other line on a ruler you are counting in eighth inches.   The blue arrow numbered '3' is the third eighth inch mark so it's called 3/8th's of an inch.  The blue arrow numbered '5' is the fifth eighth inch mark so it's called 5/8th's of an inch.  Likewise, the blue arrow numbered '7' is the seventh eighth inch mark so it's called 7/8th's of an inch.  See the pattern?  It's easy!

Next week we'll end this by showing you how one measurement can be known by many different names yet still translate to the same size.  This is the part that tends to confuse people but once you see the pattern you'll discover that it's quite easy.

And that's it for our second to last ruler lesson.   Now let's take a look at all of the work that was done this past week.  First off we have Jeannette's completed Pigeon House Window.  After she washed and colored and waxed the work she accomplished last week she added the 5 small windows (taking care to align them perfectly) and added some wire work which creates the railing along the bottom of the red house.  Using wire to form these lines ensured that the grain of the house wouldn't be broken and the pattern would show through as it would in real life (which really didn't photograph well). Attaching the windows afterwards stopped the tower from getting lost in a sea of lead lines that would have had to be added to cut the windows into the sides of the buildings.  This method is far more graceful and makes a more natural effect..


Next up we have Linda F's Humming Bird and Morning Glories Window was completed this week and  which came together wonderfully.  Even the eye of the bird worked out perfectly proving that we can adapt to any situation while making stained glass.


Gale completed her Horseshoe Cross Suncatcher but don't let the word 'suncatcher' fool you-- this is large enough to be a window.  Her attention to detail was top notch and the heart addition works perfectly.  There are more Crosses in Gale's future including a possible return and reworking of this design.


Bonnie's large Winged Heart Suncatcher looks great and everyone loves the Fractures and Streamers glass that the heart itself is made from.  Me, I love the shape and flow of the wings.  They fit the heart perfectly and are easily identifiable.


Sue's LSU window is now complete and her football and four green corners help make this design her own.  She's been taking her time soldering and it's showing in her work as each project she turns out becomes better and better.


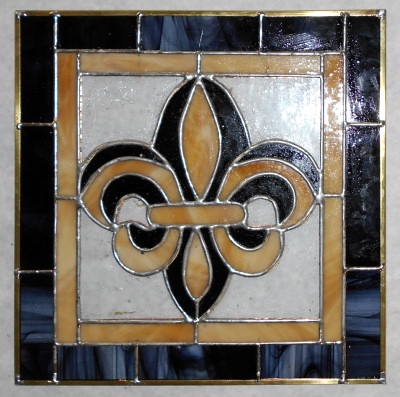
Now we're going to look at a series of Fleur De Lis Windows starting with Betty's.  She completed her shades of black and white Fleur De Lis window which had some students amazed that the FDL was actually grey since it looked like it was solid black while it was flat on the table. But it's the unbroken pattern in the baroque background that really makes this window (although the thin clear inner border was a stroke of genius as well).


Carol finished her medium sized Fleur De Lis Window by doing the majority of her work on it while she was at home. Her glass work skills are top notch and I love the way she effortlessly multitasks by working on more than one project at a time without ever sacrificing perfection.
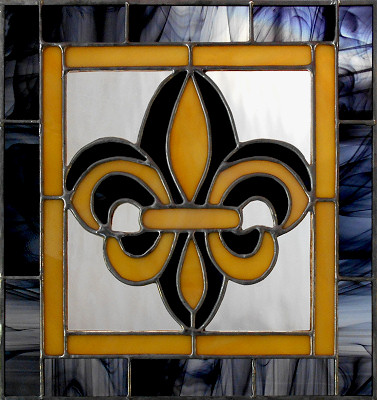


Then we have Rowena's own version of a medium sized Fleur De Lis that she cut into an octagon.  Although it's not red like a stop sign it does make you stop and take pause.  Beautiful work!


Rowena also put together this quick Christmas Ornament with a few scraps she had floating around.  She was unsure of how the hook would be attached but since it comes out from the top of a point it will be fine even though it isn't attached to a joint.


Moving on to our projects that are still under construction we'll take a look at the two large Bird Of Paradise Windows that Charlie is working on.  He had a little help again this week from his wife, Natalia, but Charlie got a lot of work done on his own.  What you see below is actually almost three feet tall and he's got not one but two of these cut out.  He'll begin grinding this next week so look out!


Martha was in luck when Terry brought in a piece of red glass that was so close to what Martha had her crabs cut from that she was able to seamlessly use it for her crab body.  Once that piece was cut she moved onto the corn section but she bagged it all before I could get a picture. So what you see is her corn in a clear bag on top of her window.  I can't wait to see what she'll be cutting out next.


Betty started a new LSU Tiger Claw Window and is now using the pistol grip (that she gave up on using about two years ago) to cut all of her straight lines.  All she needed was a lesson or two on using it correctly.  She simply needed to use it with a straight edge (not a thin ruler), and she also needed a sheet of scrap glass to practice on to perfect her cutting with it before she moved to the good glass.  It's already looking better than ever and you know she's having a good time with the pistol grip because she's even cut out her border with it rather than using the strip cutter!


We never run out of Fleur De Lis being made and this week we get to look at the work Cindy is doing on her Tiger De Lis Window.  She's just one week into it and it's already taking shape.  It's the eye of the tiger you see staring at you in the picture-- or is it the eye of the Fleur De Lis?


Here's the first of our two full tigers and this one belongs to Susan.  It's all tacked together save for the last border which only needs two small pieces cut before she can do a final tack and then get some channel attached to it to stabilize it.  I know that this is going to look great with a little light behind it.


And Brenda has made astounding progress on her LSU Tiger Stripe Fleur De Lis Window.  It's all ground and she's wrapping her pieces now.  The LSU 'bar' in the FDL shows just how wonderful and exact Brenda's work has become.


Our second full Tiger Window belongs to Jeanne she's all ready for her border(s).  She came in and filled in the missing pieces of her background, wrapped them and got them tacked into place.  I don't know if she has a border glass picked out but on a window with these colors it shouldn't be too tough of a choice.


Terry has her own Tiger De Lis going on and this has always been one of my favorites.  I wish I could have taken credit for coming up with this design but it's Terry all the way.  She's made little changes throughout each of these Tiger's iterations and she's got it perfected now.  This one will be seeing solder real soon.


Linda L is also making a lot of headway into her three Santa Claus Windows.  She's got one tacked together, one ground and ready to be foiled, and the third is all cut and being ground as you read this.  We're going to be painting eyeballs onto Santa since cutting them into the face would be next to impossible considering their size.  Linda will be framing these (somewhat) and you'll see how that works out when we update her progress next week.


Shelley also filled in missing pieces (save for the eyes of the fish) and got her border cut and attached.  She wanted it to be bright and vibrant and that's exactly what she got with the brilliant yellow that she picked out for her border.  And just for a little extra pizzazz  she went and put bevels in the corners.  This is now ready to get a zinc channel attached to it and that will happen next week for sure.


Mary Grace has all of her Holly Decoration cut and ground and has begun wrapping it as well.  The last thing she added were the six Holly Berries which are actually glass globs.  No cutting required!  We like that.  There's a great chance that Mary Grace will have this completed when she returns so look to see this showcased in our next update.


Paula's Hurricanes Logo Window is all tacked together and she's about to begin the letters that will spell out the team name across the bottom.  Once that's finished this will only need a border and some solder.  Paula's attention to detail is what makes her work stand out.  Everything always fits perfectly no matter how small the piece.


Jeannette also worked on a Sunflower and another Butterfly Lawn Ornament this week.  Both are ground and ready to be wrapped which Jeannette hopes to do while she is at home.


Myrt's Cross De Lis is ready for its background to be cut.  She has the glass all picked out so when she comes back in next week she should have all of her glass cut for this project.  She's  moving really quickly on this one and making it look easy.


Rowena is working on another Fleur De Lis Window and is starting with the actual FDL itself.  Once this is tacked together she'll surround it with glass, add a border and move along to her next project.


Sue is making this Sitting Cat suncatcher and when she left there was very little left to be done on it.  I'm pretty sure that all she needs to do is bead the outer edge and then add hooks.  Consider this done!


Bonnie cut out 3 different Lilly Nightlights and has her first, off-white Lilly ground.  She has them cut in assorted colors and will surely be assembling them soon.  You can see the pieces for the other two surrounding the pattern and I believe that she plans on cutting out at least one more of these.


Carol has begun work on a large, six paned stained glass door.  Luckily each pane is a separate window which makes working on this so much easier.  We played around with different sizes for the diamond accent pieces that will be the centers of four of the panes and decided that the smaller diamonds looked best.  (You can actually see the larger one drawn out in pencil under the clear background glass).  She's still deciding on what glass to use for the border but I think we'll see what she picked out  in our next update.


Vickie has started working on a big, but small, project this week.  She's making ten Butterflies and has the bodies all cut out already.  She's taken a lot of the wings home and hopes to get some of the work on cutting them out during the week.  I suspect that when she returns we'll see more than a few of these laid out and ready to be ground.


Lastly, we take a look at a window that one of our former students mailed us.  Denise shared  the progress of this window with us as she was making it.  Never one to back away from the challenge of small thin pieces, Denise's finished Louisiana Tiger Design is a true work of art.


I received a very pleasant phone call today from Janet asking if she could come into class this week.  I was too excited about her returning to even joke about not having any room or table space for her.  I guess you can say she caught me off guard because normally I wouldn't miss an opportunity like that with Janet.  It will be great to see her again and I know everyone is looking forward to having her back.


Paul

Tuesday, October 6, 2015

Cooking Commando

Let's start this week by returning to our ruler and looking at dividing our inch in half.  The longest line on our ruler diagram below denotes the half inch mark.  I've gone ahead and marked it with a red arrow.  There is only one half inch mark in any span of one inch.  We arrive at the half inch by simply dividing the inch up into two equal pieces.  Let's make a quick analogy here and compare one inch to a dollar.  Half of a dollar would be 50 cents otherwise known as a half dollar.  Two half inches make one inch the same way that two fifty cent pieces equals one dollar.  Easy, right?

When we divide the two half inch sections in half we find ourselves at the next longest lines on the ruler (marked with blue arrows).  We call these quarter inches.  There are four quarter inches in every inch.  This works the same way when we look at our dollar analogy because there are four quarters in a dollar. The first blue arrow points at a quarter of an inch (1/4) while the second blue arrow points at the three quarters of an inch mark (3/4).  The red arrow points at the two quarters of an inch mark which is more commonly known as a half inch.  Using our money analogy again we see that two quarters equals fifty cents or a half dollar.  Again, easy!

This isn't nearly as hard as people make it out to be. You should now understand sixteenths of an inch, quarters of an inch, and half inches.  Next week we'll cover the our last measurement, the eighth inch.


Now onto the projects that our students are working on.  Gale completed her Saints Fleur De Lis Window and the border worked out perfectly.  This triple border wasn't nearly as difficult as her last one was but the end result matches the window perfectly.


Terry completed this window based on her own pattern of a Humming Bird and Fuchsia which  in turn perfectly matches the Cardinal Window that she made just a few weeks ago.  The borders and sizes are identical which make these a lovely pair of windows.


Betty completed her Cross Window and her newest Geometric Bevel design as well.  Betty never shows up with less that four projects in tow so she's generally good for one or two completed projects a week.  In fact, she also made a simple cross suncatcher as well but my picture came out a bit blurry so I can't show you that one.


Cindy finished the last of her suncatchers this week wrapping things up with this beautiful Humming Bird in a Circle as well as a wonderful oval Water Lilly scene.  Cindy came in to class with the patterns already drawn which means that I never had to place a pencil to paper for her to complete these suncatchers.  Nice!


Carol finished another Star/Geometric Nightlight this week but added a border to this one to make it a bit more fancy than her first one was.


And Ann finished her abstract Orange and Red Cross and has become quite good at making these.  And her beading of the lead around the outside edge was perfection.  One drop per touch always makes a perfect bead which makes your finished project far more secure than a simple tinning of the edge.


Susan finished this beautiful Pair of Pumpkin Lawn Ornaments, one large and one small.  Again, she did it all herself including the wire work.  It's always nice to see something go out the door that I didn't touch up or add hooks to because it means that a student has truly learned something.  Great job!


Brenda resumed work on her Tiger Stripe De Lis window which she'd been working on at home as well.  She would have had this ready for foiling but she had to re-cut a lot of the bottom purple pieces because she had cut them out of the wrong glass.  That's a problem that can happen when you are working with two pieces of glass that are the same color with the only difference between them being the texture (which is found on the back side of the glass.)  I've been there and done that myself.  But Brenda persevered and she'll be adding a background to this before you know it.


Becky S has been hard at work making three 3D Roses.  There are actually only four different pattern pieces in the Rose Pattern but each are repeated either three or five times each.  Putting these together is always fun and I think Becky will enjoy constructing these when she returns.


Charlie came in and brought his wife along with him as well.  Natalia helped him cut glass but more importantly she helped picked out the colors for the two large Bird of Paradise windows that they are making.  They're doing great with the color selection AND the cutting as well.  Cutting both of these windows out at the same time ensures that the glass will match perfectly between the two windows. and that the work remains consistent.


Bonnie got all of her Winged Heart ground, wrapped and tacked together this week.  She's taken it home to solder and during the week while I was writing this she brought it back to the shop feeling that it's safer there than it would be at her house were her grandchildren were running around this weekend.  It's actually finished now but I won't show you that until next week (and that's a promise.)


Ann saw Becky B's Horseshoe Cross pattern while it was pinned to the wall and fell in love with the design.  She said she'd be making one after she completed her Fleur De Lis Window but she ended up making her red and orange cross (up above) first.  This week she's started the horseshoe pattern but she dropped the fifth horseshoe turning the cross into a geometrical design instead.  And as you can see, she's moving right along on it.


Rowena is working on another Fleur De Lis and since she tackled an oval shaped window just a few weeks earlier she's decided to do something different this time and place it in an octagon.  Those are tricky also, but not nearly as difficult as an oval.  It's hard to cheat on curves but you can always use a ruler for straight lines.  And as you can see Rowena had no problems at all.


Gale took one look at Ann's Horseshoe Cross design and decided she wanted needed to make one of her own but in the five section cross variety.  She even tried to match Ann's colors as closely as possible because she thinks Ann has GREAT taste.  :-)


Carol also came in with small Fleur De Lis of her own cut out and then added two borders to it.  She said 'NO' when asked if she wanted to frame it in an oval so the background and those borders that you see below went on pretty quickly.  In fact, the only thing left to do is solder this and it will be fit for hanging.


The Cross De Lis that Myrt is working on is rapidly nearing completion.  She's got the majority of this ground now and I don't think it will take her much longer before she gets to the background of this project.  The glass she's using may look a little dark while it's sitting there on the table but it lights up a beautiful shade of purple.  This will be anything but a dark once it's hanging up.


Then there's Martha who is battling a problem with crabs.  She's just one large crab body away from finishing the two crabs on the left of her Seafood Medley Window but she's run out of glass.  That's okay though because she has a long way to go before she actually requires it so next week she'll simply work on another section of the window.  Terry believes that she may have a piece of the glass that Martha needs but if she doesn't we'll just throw a sheet onto our next order.


Linda L has begun working on her next seasonal projects and those are three Santa Claus windows.  She's stacking the pieces up three high and managed to get a LOT of work done in class.  In fact, I can see her getting quicker and quicker with each passing week.  What makes me happy is that not only is she gaining speed but she's becoming more precise with her cutting as well. These pieces aren't even ground yet and they fit together nicely.  There's a good reason we ask our students to cut the line off while we're cutting their glass.  Grinding these Santa's will go quickly for Linda.


And Mary Grace began work on this  large Holly suncatcher this week.  She's got the leaves all under control and will work on the top ribbon and stem section when she comes back in.  She's been grinding as she's cutting which means that she needs to be extra careful when cutting the remaining pieces since she now has no margin for error.


Susan 's version of the Tiger Window is all fitted together and she's taken it  home to hopefully wrap.  She's also been experimenting with her kiln and making some hefty progress there as well.  Susan's been planning this window for quite some time and it looks as though she'll be finishing this up within  two or three weeks because the hard part of making this window is now far behind her.


Meanwhile, Jeanne  is making her Tiger Window exclusively from cathedral glasses and she got the majority of her background cut and ground this week.  She cut out what she could from one sheet of krinkle glass and will fill in the few remaining pieces next week once these are all tacked together.  Doing it this way helps maintain a perfectly square window.


Betty came in with her baroque background all ground and tacked together for her latest Fleur De Lis Window and then concentrated on pick out out a color for her border.  Solid black made the window too dark but it was the only color that worked for this window so she separated it with a thin clear border first.  It certainly looks like it was a wise decision to me.


Paula's Hurricanes Logo Window  is another project that is nearly finished.  With the six background pieces  cut out and only needing to be ground I think I can safely predict that Paula will begin working on the letters that spell out the word 'Hurricanes' when she comes back in.  I doubt the lettering will be a problem at all for her and, of course, there's a trick to letters that will be revealed when Paula returns.


Shelley has an awful lot going on in her life right now and when she forgot to bring in her glass she just skipped working on the border and went straight to the soldering process.  Since this window isn't completely cut out she can only solder the front side but there's a lot of front side to her Aquatic Window so Shelley was able to keep busy.  She's doing a great job and next week we hope to add border(s) and the fill in pieces.


Jeannette has the majority of work done on her  Pigeon House Window.  All that's left to do is add the  channel, do a little wire work, and then add the windows. We didn't want to cut the windows into the glass because it would have added too many distracting lead lines.  Instead, we are going to tack them to the panel afterward.  And you'll see how that looks next week.


I'm thrilled to report that Cindy has begun working on a large window this week thus marking the end of her suncatcher days (for a while anyways).   Her show was this weekend and she certainly had a lot made for it.  I hope that when she returns she gets to tell us that she sold every piece of her stained glass!  This week she began working on a Tiger Eye De Lis window that we haven't seen made in a long time.  It was nice when she showed me the picture of what she wanted to do next because I got to say, "We already have a pattern for that!"


And for some reason I  didn't have a picture of Sue's progress on her LSU Window.  It's all tacked together and her green corners are in place but I guess that during the rush of everyone trying to carry projects and tools out to their cars I somehow managed to miss taking a picture of her window.  But fear not because you'll see that completed next week.

And that about does it here.  Next week we'll see a slew of new projects and cover 8th's of an inch.

Paul
Bayou Salé GlassWorks