Monday, March 7, 2022

OMG! Look At Your Teeth!

Understanding what cuts are possible to make and what isn't is a huge part of your glass cutting skills.  Knowing instantly if a piece can be cut in just one score or if it will take multiple scores will save you precious time.  Inside curves (a curve that cuts into the piece you are saving) are the hardest cuts to make and most times you'll need to cut those curves multiple times to get them to release without breaking your glass.  Here's a quick and simple guide to understanding what cuts can be accomplished in just one pass.

First we need two measurements:  The depth of the curve and the length of the curve.   The depth is measured from the deepest part of the curve to the edge of the glass that you will be removing (shown below with the vertical purple line).  The length is measured from the curve's starting point to its ending point (shown below in blue).

If you can fit 3 or more depths along the length of the curve then you may very well be able to cut that curve in just one cut.  The green arrows below are the exact same size as the purple arrow (just running horizontally rather than vertically).  You can clearly see that you can't fit 2 depths along the length of the curve.  That means that this cut is most probably impossible to get out in just one cut.  I would make this cut in small, multiple cuts.

Each of the green arrows below are again the same depth of the purple arrow and as you can see we can get more than five of those depth measurements along the length of the curve.  Anything 3 or more is great so this would be an easy cut to make with just one score. 
Once you follow this 'one to three' formula just a few times you'll be able to easily tell if you should whittle away at the curve or just take it in one simple cut.

Now this was an exercise in patience.  Sheri ended up with  a last minute deadline to finish her Sugar Skull and to be honest I didn't think that she would make it-- but she did!  Most impressive though, is the fact that the quality of her craftsmanship NEVER wavered.  I've put this along side the Sugar Skull that I made last Halloween and I'm not embarrassed to say that I like Sheri's more than I do my own!  This is a piece to be proud of for sure.  Look at those teeth (and eyes)!


Lisa also made a completely stunning Window this week and it all started with a small cut glass bowl.   She was originally going to just frame this only on the sides and leave the top and bottom blank but in the end she added two more clear borders which frame the entire piece up beautifully.  This is a winner for sure and people sure seem to love it over on the Facebook Stained Glass Patterns page as well.


Kerry has completed a stained glass Ames Window which is actually an optical illusion.   It works best seeing it in action rather than knowing exactly what the finished piece looks like.   Watch the video and realize that the 'window' is NOT wobbling back and forth.  It's spinning completely around.  You may need to watch it a few times to see it because this is like those magic eye books from back in the 90's.  It may not come to you at first.  I've looked on line and found an easier to see version here which also reveals how the illusion works.
 
Betty finished up her latest pair of Fleur De Lis Suncatcher and they are both very striking.  They also sparkle quite nicely in the sunlight.   Whenever you use Textured Cathedral Glasses you you can be sure that your finished piece will shine brightly.


Lastly in our completed projects we have a Kaleidoscope Biplane that Martha made a few years back which needed some MAJOR repairs after it fell off of the shelf that it had been residing on.  Let's just go ahead and call it a rebuild because the plane itself was, without a doubt, totaled!)  A cat may very well have had a helping paw in that sad accident but as you can see it's back together again better than ever.


Let started a new panel this week and even got it all traced onto glass and cut out.  Once that was done she moved on over to the grinder and got the bottom half of it ground as well!  I have no doubt that she'll be wrapping these pieces when she comes back in because at this rate the rest of the grinding won't take her very long at all.


Susan R is on a roll (almost literally) as she cut out three Easter Egg Lawn Ornaments in assorted pastel colors.  The egg on the right is the toughest one to grind but she's got that one ground already.  That egg may only consist of three pieces but all of those zig-zags can be murder!


Sheri also managed to get a large Owl Suncatcher mostly cut out and she stumbled upon a wonderful discovery while making it.  The branch that the owl sits on broke while she was cutting it but rather than re-cutting the piece she simply shortened it and used it as it was.  Unless the person who ultimately receives this finished owl reads this blog they will never know that the size of the branch was changed because either way looks fine.


Meanwhile, Steve is hard at work making five fused glass doors that match the stained glass door he made back in January.  He spent his class time working with a strip cutter system getting all of his straight pieces to line up perfectly.  You can see the small colorful squares that he still needs to assemble all around the blue sharpie marker which helps give you a sense of scale for this small but detailed piece.  He's got one door put together and the rest will go together quickly now.


Robert has his first beveled border tacked together as well as the thin, red, inner border that rests next to the bevels as well.  The leaves just the eight rectangular center pieces and the thin final outer border which expand this to it's finished size.  Robert still isn't entirely sure of what he wants to put in the center pieces but he's got ideas that he'll be considering in the weeks to come.  There's no need to rush because he has one more of these he can start on before deciding what to fill the center sections.


Afrer finishing up her Fleur De Lis Suncatchers Betty worked on a new LSU Panel which is almost completely ground already.  With only two pieces left to cut and grind I'm thinking that this may very well be completed upon her return.  Betty is making short work of this, that's for sure!


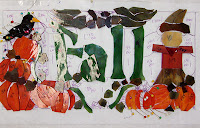
Take a look at Susan D's Fall Panel!  She's also made some major headway in just one short week and now she's grinding all of the glass that makes up the different subjects in her window (a scarecrow, numerous pumpkins, and leaves).   Once they are ground and tacked together she'll cut the background glass and make it fit to the pieces that she's already cut.  A background should always flow around the subject matter, not vice versa.  That will make an excellent tip for next weeks post.


Speaking of the background flowing around the subject matter, Jan's Santa is now getting all of those tiny leaves cut into the background glass as well as some of Santa's red coat.  In this case the coat is considered to be part of the background because the leaves are in front of the coat.  Jan is now taking each leaf, tracing around it and then cutting the 'background' glass to ensure a nice even fit.  It's far faster to do it this way than to cut all of those pieces individually in the beginning of the project.  There's far less grinding this way.


Linda L's first Beach Scene is looking incredible and a lot of that has to do with the fact that she's mixing greens throughout her palm fronds.   Right now it's hard to see but when this gets a little light behind it this will truly come alive! 


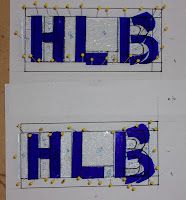
Linda F is getting all HLB'ed out.   She has got the majority of work done one these five panels having just two more borders left to cut, grind, and foil.   After that the soldering should be a nice and relaxing change of pace for Linda!


Barbara H has the flower to her Louisiana Iris all ground and she's going to be wrapping this when she comes back in.   Again, this is a case of making the subject flow around the background because Barbara will tack the flower together and then set it on top of a piece of background glass which measures 7 x7 which she will then cut into the individual pieces.   This may also turn into a 'step by step' tip in the weeks to come...


Lastly we look at Ann's Lady Of Guadalupe Window.  It's almost completely foiled now so it's easy to see the details throughout the design now that each piece is defined by foil.   This will surely have a border attached when we see it again next week. I can't wait to see what Ann picks for a border color.


And that wraps up everything for the second week of March.   This year is flying by so fast that I'm expecting to see new Christmas Windows started any day now!

Paul


Monday, February 28, 2022

Separation Anxiety

Straight lines are (almost) always unsightly.  Unless your pattern consists of nothing but straight lines the lead lines that you add to make your background glass 'cut-able' should always follow the curves that they are connecting to.  There are four straight lines in the pattern below which are needed to allow you to efficiently cut out the pieces that make up the background glass surrounding the letter 'N'.   The problem here is that they are very distracting.  Those lines should continue to follow any of the curves that they originate from.
 
  
Just look at what a difference curving a few lines makes!  Do you see how three of those lines follow the curves that they originate from?  Also note that even though the line that runs to the top of the window comes off of a straight line, we've curved it as well.  Now the entire window flows effortlessly and gracefully.   Just remember that straight lines create harsh separations but curved lines make elegant transitions.


Mary's Circular Morning Glory and Butterfly Window came together very quickly yet you'd never suspect that when you look at how perfectly Mary managed to cut and grind this (in so little time).  Case in point:  Look at the leaf in the upper center/left  and follow the vine (the lead line) that travels through the unopened leaf.  Notice how it aligns perfectly with the line on the green piece that bisects it  Also note how smooth and graceful her curves are.  This is what makes a window great.


Steve's Cheshire Cat comes complete with a gold tooth!  I know this looks fairly straight forward to make but pay attention to how all of the pieces fit together so well save for the 'gaps' near the front teeth which are completely intentional and reveal spaces which give added depth to the mouth.  Very nice indeed!


Then there's Betty whose work always speaks for itself and this Owl is no exception.  Aside from telling you that her colors and craftsmanship are incredible what else is there to say?  If anyone can get the job done, it's Betty.


Susan R's Chocolate Hearts Suncatcher had a slight major problem that we fixed this week.  When I drew up that pattern for her I accidentally mirrored the design instead of rotating it.   I had no clue that I screwed it up until I looked that her project after she left last week and I saw that the repeating design was NOT repeating correctly.   This week we detached and flipped one of the hearts and then knocked off one the fourth heart and replaced it.   The end result is what you see here, completed and perfect in its design. I guess you could say that it's  a testament to Susan's craftsmanship that I didn't notice the problem until (luckily) the last possible minute!


I had made this Rose/Heart a while back but I haven't had the space here to share it until this week when we have only a few completed projects.  If  I do this pattern again I'll simplify the Rose by removing about a quarter of the pieces that make it up.  In all honesty I love it as is but there's just so much work involved in making it that it's not very cost effective.  There's a 'size/number of pieces' ratio that  needs to be followed if you plan on making any money selling an item.  For this to sell you won't be able to get anything for the time it takes to make it.   Reducing the number of pieces in the rose won't change the amount of glass needed to make it but it would reduce the time it takes by half and therefore reduce the price to make it considerably.


Lisa began working on a small panel that showcases a small cut glass bowl in the center of it.   She's got everything cut out and only has to grind and attach 8 small pieces before she can put the final solder bead on this and call it a finished project.   She talked about putting a border on this but looking at it I don't believe that it needs a border for it to be structurally sound or to hang from.  A border would purely be cosmetic on this window.


Robert has decided to make two Transom Windows each with an outer beveled border.  As regular readers know, we ONLY start with the border if it consists ONLY of bevels.  This way we can size everything else inward accordingly.   What you see below are the bevels that Robert foiled for both of his transoms.  Next week he'll pin down the first set of bevels and then work on cutting and attaching the thin inner red border that will reside within the bevels.


Jan's Old Fashioned Santa is getting so close now.  This week she cut out the green that forms the Tree that Santa is carrying.   You can see all of that green glass on her pattern on the right.   Once these are ground and wrapped we will place them on top of Santa, trace around them with a sharpie marker and then cut openings.  This will result in near perfect fits before the glass even goes over to the grinder.


In one of our biggest projects to date, Cindy is making an Address Window for the Lamp Lighter Coffeehouse & Bistro in Franklin, LA.   The window will feature the numbers 731 in the center which will be book ended by an antique Coffee Pot on the left and Coffee Grinder on the right.   The pot itself is almost completed as well as most of the glass for the numbers which means that in just one week Cindy has made IMPRESSIVE headway into this project!


Barbara has all of the glass cut for her Louisiana Iris Panel and this time around we're going to grind the flower without having the background cut it.   I think that this will be done more efficiently if we save those few background pieces for last and just trace the finished flower onto a piece of glass.


Now that her Mr Bingle Boxes have been completed Cheryl has resumed work on the Fleur De Lis Window that she started a few weeks ago.   She's undecided as to whether or not she'll follow this with a second border but I'm thinking that it's just fine as is.  In fact, if she doesn't add another border this may very well be completed upon her return. 


Next up we have two more Fleur De Lis' that Betty is working on.  Both were cut and ground while she was in class and she only needs to wrap these before she can solder them and finish them off.   These are a piece of cake for Betty to solder so I'm thinking that these will be completed when Betty makes it back.


Simple aesthetics can turn a nice window into an absolutely spectacular window.  The first piece of glass that Melissa has chosen for her Heron Window is already setting this project up to be something incredibly memorable.  She's using a sheet of purple and ice white stipple glass for her irises and even though she's using only one sheet of glass she's alternating the purple sections with the ice white sections to give her flowers an incredible amount of realism.  She's going to be making this window one section at a time and tacking things as she goes along so we'll be seeing almost instant results from week to week.


Meanwhile on another table in the same class as Melissa, Annette is busily working away at grinding the roses and leaves that make up her Transom Window.  There are only two more flowers left to go before Annette can begin wrapping these and then tack them together.  This is another window that will be done in sections.


With only six pieces left to grind on her Lady Of Guadalupe Window, Ann is surely set to begin foiling her pieces when she comes back in.   You can make out the general feel of the window now that it's essential ground and fitting together but it's still hard to make out what's what without having the pieces wrapped in copper foil.   Once that's done you'll see far more definition than you see now.  That said, this is so nice that one of our other students have already asked about making it for herself.


Judy's got another Angel Suncatcher under way and due to the amount of pieces that make it up you may have already guessed that's it's larger than your normal suncatcher.  She wants to make at least one more of these but she also wants to cut back on the number of pieces in it.  That will be easy to do thus making this far more efficient to create.


Sheri's Mardi Gras Masks are just about completely ground and these are easily shaping up to become yet another stunning window.  Sheri's eye for detail has grown in leaps and bounds and her work is flawless.  These two masks will surely be turning heads when they are completed and hanging in a window with some sunlight behind them.


After getting the propellers and the four struts cut into the sky and wings June was able to wrap and then tack together the majority of her Plane Window.  Once that was done she picked out a color for the border, cut the strips out on our strip cutter, and then ground each of the border pieces.  She's taken those piece home with her to wrap so that she can immediately tack them into place and then begin soldering upon her return.


It's not four HLB Panels that Linda F has to make-- it's five!  Well, the good news is that she's essentially got four of them cut and ground already so it would appear that Linda has completely found her groove since she's moving through these like a hot knife through butter. Cool beans!


Linda is working on the first of her three Beach Scene Windows.   She's going to be mixing the leaves on her palm trees by using three different (yet similar) pieces of green within in frond.  To do this the easy way  she's cut three of each of the fronds out out three different green glasses.   When she cuts those fronds into their individual pieces she'll be able to mix and match them throughout her three windows.  She's planning ahead by doing it this way which means that in the end things will go far easier for her.


Martha's Yellow rose managed to grow a stem and some leaves and doesn't it all look striking!  In the end we may very well cut the background out of one sheet of glass after we've traced the completed rose onto it.   I think Martha will end up using less glass this way and things will just move a lot quicker.  Sometimes it's hard to know whether or not to use this technique until you actually see the subject matter completely cut out as it is here.


Which brings us to the end of our post where we look at the incredibly complex pattern that Susan D has drawn (on her own) and which she'll begin cutting glass for next week.  Her Summer, Winter and Spring Windows didn't take her long at all but I believe that this window has more in common with her Spring pattern when it comes to complexity.  That said, I have no doubt that Susan will command and conquer this pattern in fairly short amount of time!


With February behind us this year is passing quickly.  Before you know it it will be next week, Mardi Gras will be over, and we will be looking at even more completed projects.

Paul

Bayou Salé GlassWorks

Monday, February 21, 2022

Has Anyone Got A Beached Whale?


An inside curve is the toughest cut to make.  If you've taken a class with me then you've learned about cutting point to point and have seen how we can whittle away at glass to make an inside curve easier to cut out.  What people don't realize is that you can combine the two methods to achieve your final goal.  Let's start with a deeply curved pattern piece that we want to cut.  The most important thing is placement.   We need glass (a lot of it) behind the curves and that means that we should mark our pattern piece on the glass as seen below.  Note the amount of glass BEHIND the curve.  There's no way to place this any better.


Next most people will want to cut all those easy outside curves but don't do it!  The extra glass behind the inside curve provides stability and strength.  Remember to ALWAYS cut your inside curves first-- even before separating your glass pieces.  You'll note that by placing the pattern where we did on the sheet of glass we've already made the 'point to point' cut thus saving a step!  Our first cut would then be a small graceful scoop followed by yet another which would leave us with what you see below.
Many, if not most, stained glass artists would determine that they need to grind the rest out with their grinder or even use a glass saw.  Myself, I rarely use a saw mostly because I can get the curve cut faster alternating between my grinder and my cutter rather than taking the time to haul out and set up my glass saw.  In this case I'd tackle it as follows.  First I'd channel into the deepest part of the curve with my grinder.   Once I get to the line of the pattern near its deepest point I stop.   
 

Now you I can use my cutter to make straight cuts and remove large pieces of the excess glass easily without having to slowly grind them away.  You can see the first two pieces I've removed using my cutter below.  
 
  
At this point new opportunities arise that will involve either your cutter or your grinder.  Remember that you can grind anything into submission but that it takes FAR longer to grind something away than it does to cut it away.  Using a combination of cutting and grinding can save you both time AND grinder wheels.  I hope this helps.


So first up we have Lara's Tropical Beach Scene which is a perfect example of how mixing similar colors can add depth and realism.  It would be so easy to make this with just one green for the leaves, one orange for the sky, and one blue for the water but Lara instead used three greens, three oranges, and three blues to absolutely drench this Tropical Sunset with color.   It's tranquil yet vibrant as well as both cool and passionate.  In other words, it's exquisite!


Cindy's Nautical Tray which is purely decorative--NOT functional (of course) is absolutely stunning.  Cindy picked her colors knowing that there would never be any light behind the glass so her use of bright colors was essential.  What amazed me most about this was just how sturdy the tray became once the one inch bevels were added as a lip surrounding the edge.   Cindy put a lot of time in on this and it certainly shows.  This is gorgeous.


What is it about orange skies, red suns, and green leaves that evokes a feeling of peacefulness?  Lisa's circular Matsu Tree was certainly inspiring on its own but once she put it in the semi-circular display stand it took on a whole new magnitude of serenity.  The word Matsu means "waiting for the soul of a god to descend from Heaven" and this piece emphasizes that sentience perfectly.


Next up we travel a different route toward the opposite end of the color spectrum where we arrive at Let's modestly colored Dragonfly Panel.  In terms of color there's nothing here to draw the eye but once it's calming beauty has been noticed it's difficult to look away.  Here we have yet another peaceful window that provides serenity for the viewer, which was beautifully crafted by Let.


Now if you want something cute then look no further.  Betty's trio of birds depicts how a lot of us feel from time to time!  Based around a hoop, Betty created three similar birds and then simply tacked them to the horizontal bar that this hoop came equipped with.  It's a great idea and its simplicity is what makes this so charming and sweet.


Judy's Sunflower Panel shocked me when I hung it up to take its picture because I had thought that she'd used root beer for her border.  Imagine my surprise when I saw it light up purple rather than the expected brown.  I love that she broke the mold and went with something other than what we normally see. Although it's a dark purple it still brightens up the window immensely!   Also, Judy made this from start to finish on her own with a minimum amount of help.  I do believe that she's got a firm grasp on this stained glass stuff!


Barbara had been asked to turn a child's 'drawing' into a stained glass window and the end result is, honestly, a very satisfying avant garde piece! Yes, some changes had to be made to convert the original marker drawing into cut-able stained glass but the changes were minimal and the feel of the design was maintained faithfully through the conversion process.  I find it oddly compelling! What do you think? 


We had a new student this week and Robert began his stained glass career with a requisite Butterfly Suncatcher.  Robert  managed to cut his glass perfectly and also recognized many different techniques to make each of the steps go faster which I normally don't spring on students until they have a window or two under their belt.   He's a natural at this!


I believe it was two weeks ago when Linda L said that there was a window that she needed to have completed in time for Easter.   She wanted to know if she should stop working on the project that she was currently making (the three Beach Windows) or if she should wait a while before starting her Easter Window.  I always tell students to work on items that have deadlines first and then move onto windows that you can take your time completing.  That said, Linda finished her Easter Bunny Panel with time to spare for the holiday.   Now she can relax  knowing that this is finished and that she did an excellent job making it as well. 


Cheryl H finished the box bottoms for the Mr Bingle lids that she had completed last week and at the very end of class we got them attached to their box bottoms by using a tube and rod for the hinge system.  The end results are very 'Merry' looking, and dig those little lead feet in each bottom corner!


Number ten is finished and installed.  That means that MiMi only has four more windows to go and the good news is that they are MUCH smaller than any of the other inserts she's created.  Those last four are going to move quickly and then MiMi will move herself along to something that contains a curve or two, or maybe even nothing but curves in it!

 
The windows themselves are impressive but when you see all of MiMi's top cabinets decked out in her  Hexalong Multi-Texture®  design you have to admire just how much work MiMi has put into them.  They are astounding.  And don't you dare say Chicken Wire!


And finishing up our completed projects this week we examine Susan D's last four Tulip Flowerpot Ornaments.  They never need water, they never wilt, and they always look fresh and inviting.  Perfection indeed.


Mary Grace has her Peacock tacked together and ready for its first border.  She wanted to leave the top curved but I'm worried that a window this size won't be able to support its own weight unless it is completely surrounded by channel.  The small curved top prevents us from putting channel along to top edge which would help support some of the weight so Mary Grace will add a final clear border which will square off the top and allow for channel to surround all four sides.   That means that this window will surely be sturdy and last for a lifetime.


Jan resumed work on her Old Fashioned Santa Window and is determined to finish it.   The good news is that she only has the green leaves left to cut out which she will cut into some of the background pieces and some of Santa's clothing (that we've left unfoiled and untacked).   Once the leaves are ground and wrapped the rest of this will go fairly quickly.


Susan R's Chocolate Hearts Suncatcher is almost complete needing only its reverse side soldered before she can put some hooks on it and hang this in her window.  She's so very close and now I have a hankering for some milk chocolate!


Speaking of close, June's Biplane Window will certainly be tacked together when she comes back in.  There are about 3 pieces left to wrap and then she'll tack everything and then make the final cuts in the pieces that she intentionally hasn't foiled.   This enures that the struts line up perfectly as you'll see when we come back again next week.


Ann is grinding from the outside inward on her Lady Of Guadalupe Window.   With most of the background pieces all fitting into place she'll begin grinding the Lady herself when she returns.  Once that happens the subject (Mary) will become much easier to recognize.


Shelley's Circular Mermaid is all cut out and she's ready to begin the grinding process.   She's used the same glass for the water that Cindy used in her Nautical Tray so we know that it will be nice and bright.  Add the fact that this piece WILL have light behind it and you can see that Shelley has set herself up to have an incredibly vibrant Mermaid when this is finished.


Linda F now has one of her HLB panels ground and has shifted upward and onward to the second panel of the same design.   It's far more advantageous for her to grind during her class time rather than foil glass which she can easily do while she's at home.  Besides, why drop the ball when you're on a roll grinding, right?


Martha's making a Yellow Rose Of Texas, or perhaps it's simply a yellow rose.   Nonetheless, it's already looking beautiful even with only the petals having been cut and ground.  Just look how perfectly everything is fitting together.  That's what you call 'talent on display', plain and simple.


Annette has begun grinding all of the flowers and stems for her Transom Window starting at two opposing ends.   The upper left flower is ground and the lower right stems have been ground as well.   There are a lot of pieces here so it may take a while before she can begin wrapping these pieces but as I always say, "Slow and steady wins the race."


You can't really see it here but there is white glass  piled in four different humps which is actually the white 'background' glass that makes up the skull in this Sugar Skull.  Sheri's version is far more colorful than mine is and I love that she brightened it up so much!   This will surely be a stunning piece of stained glass when Sheri completes it.


Now that this is all ground and tacked together you can easily see how smoothly and elegantly Mary's  Morning Glory Window is.  Mary took her time on this, never rushing and always looking for perfection.   With the front side already soldered I'm thinking that this will be completed upon her return.


Barbara H apparently loves to work with tiny pieces.  She's extended the 'canvas' on this Louisiana Iris by adding an inch to the background on all four sides but she's kept the flower in the center the same size that it was when she originally made this piece.   In short, what you are looking at is a panel that measures 8x8 with only 6x6 of it consisting of small flower pieces.


Melissa is beginning a Heron Window that has a very detailed background that includes multiple irises and many, many kalanchoe blossfeldiana's!  There's a lot of detail here but the pieces are fairly easy to work with which makes this a fun window to make.


Lastly we look at a pattern that Shawn is about to embark upon.   We are going to change out the flower in the upper right hand corner so I've whited out the area for now.   This pattern is based on a painting and although the flower that was in the upper right corner looked fine in its original small form we all  agreed that it lost most of its definition after being enlarged.  You'll see what we replace it with in the weeks to come.


It was certainly a busy week as you can tell by the size of this post.   I was hoping to have this up quickly this morning but I didn't realize just how much I had to write which explains why it's well into the afternoon as I post this. 

Paul

Bayou Salé GlassWorks