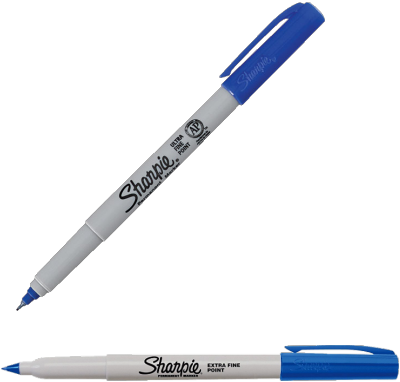
I've been making stained glass since 1978 and started doing it for a living way back in 1983. That was a long time ago and the best marker I've found for the job in all of that time has been a blue Sharpie Ultra Fine Point marker. In a pinch a Sharpie Extra Fine Point will do but the tip on the Ultra Fine markers make it the best marker for the job. Also, black ink will do the job but not nearly as well as blue. And just forget about any other colors because they aren't actually ink, they are in fact, just colored liquid that washes off easily in water.
Now then, onto the glass of the matter. Cindy made two Breast Cancer Ribbon Hearts which are both stunning. The design is a little flimsy on the bottom right of the ribbon and that is handled by the placement of a decorative (and fully functional) wire piece that helps anchor the ribbon end to the heart. All in all it's an excellent design with one small flaw that is easily remedied by some extra decoration. Beautiful.

Next we have the two Dress Suncatchers that MiMi made. As you can see there's a bit of wire work to these but it's that wire work that makes these so exceptional. They may only be made from just one piece of glass but these dresses sure have a way of speaking for themselves! And just wait until you see a 'similar' pattern that MiMi brought in for me to see-- it's going to be outstanding!


And that brings us to our works in progress section of the blog where we start with Beth who has all but the tiniest slivers of glass cut for her Flower Window. I've advised her to just skip those pieces because it will be far easier to assemble these flowers and then fill in the thin open areas rather than grinding little 1/8th pieces along with everything else. So Beth began grinding her window and she learned the trick of grinding by using a piece next to the one you're grinding as a template. One trip to the grinder usually makes a perfect fit using this method and once she understood the process it was as though a light went on above her head. If I said she had a BIG smile on her face it would be an understatement! Now she's running with it and as you can see she's got her bottom left corner fitting wonderfully.

As you can tell by her EXCELLENT use of pins, Terry has her Butterfly on a Flower Window almost completely ground now. There are only a few pieces left to go along the top right of the window and then Terry will begin wrapping all of those pieces in preperation for the big solder.

Roy has begin work on his Wine Bottle and grapes window and I think it's shaping up nicely and quickly. He was toying around with idea of adding a punt at the bottom of the wine bottle so I quickly drew one into place and I have to say that the more I look at this picture the more I think I'd like to adjust the top of the bottle as well. That's something we'll discuss when Roy returns next week and if we change things up we'll discuss it in our next post.

Aeroscopes are so very IN now! And what exactly is an aeroscope? It's a stained glass airplane that doubles as a kaleidoscope. Below we see the body of the plane that Tracey made with us this week. It's all assembled and waiting for its support struts to be added which will surely happen when she returns to class.

Here we see Brenda is making progress on her Magnolia Window. I love the flower petal in the 7 o'clock position. It shows that Brenda is making full use of the flow of the grain lines that exist in the glass that she is using.

Here are two more Aeroscopes that Barbara H is assembling which are also ready for their support struts (we'll see what those are a little further along in this post). Behind the planes you can see the triangular mirror sections which will slide into the body of the plane when to create the Kaleidoscope image when it's complete.

Susan R has only about 10 more pieces to grind on her Chef Window and then she'll be able to begin the wrapping process. It's all coming together and I suspect that won't be long before we see this among our completed windows.

These are our last Aeroscopes for this post and these belong to Carol. She was able to start attaching her support struts and now the wings of both her planes are rock solid since the wires are attached. There are only a few wires left to add to other sections of the plane and I have no doubt that these will both be washed and colored when she returns. Once the bodies are completed she'll move along to making the glass wheels that form the propellers.

Cindy is making a Waterfall Scene Suncatcher with a lot of tiny detailed pieces (just the way she likes them). It's really quite a beautiful (large) suncatcher when its completed and at the rate she's moving we'll see this finished soon.

Lara now has all of the glass attached to her Flower Of Life Window. We I had a slight accident while carrying her border glass to the strip cutter which resulted in a lot of broken glass on the floor and Lara having to rethink her color selection for the final border. In the end I think she did very well and she'll easily begin soldering this when she comes back in.

Ivory is the name of this dog and he is just two borders away from being ready to be soldered. The dog itself is white but the background glass surrounding him is clear and what you are seeing is the white pattern paper through the clear glass. He actually stands out much better when this is off of the work table.

Becky S has most of her background cut for her Seahorse Window and she's hopefully going to get the missing pieces from the remainder of the aqua glass she was using. It's going to be close but I think we can get this all together next week without dipping into a second sheet of glass. I know I love a challenge and just by looking at the detail in this window I'd say that it's safe to say that Becky loves a challenge as well!


As I predicted, Mary Grace has her first border attached and more importantly she has all of her missing pieces filled in. The final border for this will be cut when she comes back in and I have no doubt that it will be tacked together and ready to be soldered.

And to end this post we take a look at the pattern that Linda L has begun working on. This is another HUGE window measuring almost 4 feet tall. The design is beautiful and I have no doubt that Linda will handle it like a pro. The only hard part will be the coral in the bottom left but once all of those tiny pieces are completed the rest of this should be a piece of cake.

So there you have it. Another look at what's been going on during our classes. They're always fun and I hope all of that fun shines through here in our weekly posts.
Paul
Bayou Salé GlassWorks
No comments:
Post a Comment