Let's start things off with a quick but simple tip that deals with separating your pieces once you have them traced onto your sheet of glass. Take a look at the example below which represents 6 pattern pieces that have been traced onto some glass. The first step is to separate those pieces.

Here we see the same sheet of glass with red lines indicating the starting cuts that a lot of people try to make when separating. Sadly, this is wrong. Those curves are far too complex to strive for when there is a much simpler way. Remember that a straight cut is the easiest of all cuts to make while a curved cut is more difficult.

Here we see the same sheet of glass with the same placement of the pieces and you can see that it's all been separated using just straight cuts. Just look for the straightest lines that you can make and then new straight cuts will appear as sections of the glass are removed.

When separating your pieces never try for fancy cuts, make it easy on yourself!
Ok , so with that out of the way let's see what we have to look at this week.
Carol made a spinner this week and although it looks easy enough I have to say that these are a bit tricky because they are made in 3 dimensions. What you see below is NOT a simple flat suncatcher. You start by making three six 3" x 3" squares and then joining them in a way so they are equal in depth, height, and width. I know that makes little sense but the video will show exactly what I mean.

Here's Carol's Spinner in action. As you can clearly see this is a piece that needs a video for it to shine!
Next up we have Lara who made this Flag Panel in just one night and whose end result is wonderful. You just can't lose with an American Flag!

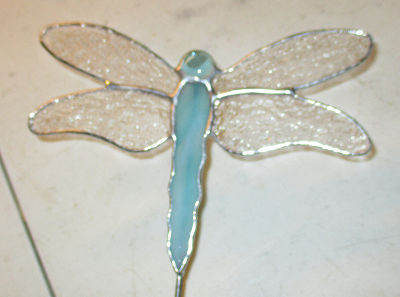
I wish my camera hadn't blurred this simple Dragonfly that Jeannette made this week. She's mounted it onto a rod so that it can be staked into in a standard flower pot. There's a stylishness about this design that really makes it stand out, blurry or not. Pure elegance!
Barbara H put the finishing touches on two more Butterfly Lawn Ornaments and I have to say that her soldering is looking better and better! Practice makes perfect and as you can see below the proof is in the pudding. (Whatever that means!)

For our last completed project we have a window that I made which I like to call the 'Faux Bevel Cluster Window'. Although you may assume that there's a bevel cluster in this design you would be wrong. It's just a mash up of different sized square stock bevels. There's not a single curve in this entire window which means that this very EASY to make-- if you take your time cutting each of those straight cuts.

Angie is working on a Tiger's Eyes Window and she came into class with it already cut out. Before class ended she had half of it ground! She didn't like the colors that she saw it was originally done in so she changed them up and I must say that it's for the better. The center of the eyes still need to be cut but we will do that AFTER the rest of this is ground (which I'm guessing will be next week).


Susan R saw this 3D bird on the internet and decided to make one of her own. This bird itself is ready to be soldered and you can see that we've made a pattern for the leaf that it will mount on which doubles as a stand. You'll see exactly what I mean in our next blog post when this will be completed.

And Jeannette's latest Corvette Window is very close to being finished. This week she tacked it together and got her black border glass attached before getting the front side completely soldered. I'm pretty sure we'll see this window completed next week because Jeannette gets windows done pretty quickly!

Tracey has her latest Cardinal Window all ready to be wrapped. She doesn't care for the fit of two of her pieces so she'll be replacing them once she had the rest of this tacked together. Once things are ground you can't rely on using the paper pattern to re-cut a piece since things shift. Placing a piece of glass under the window and tracing the opening will give you a perfect fit every time.

With the first third of the subject of his Flower Scene all ground and wrapped, Jeff is about ready to begin working on the few background pieces and the humming bird of this section. First he'll tack what you see below so that nothing shifts while he's cutting and grinding the surrounding pieces. In fact, he could easily start working on the subject matter of the second third of his window before he cuts his background for this section. That would be fine to do.

Annette's Cardinals Window proved to be a bit perplexing this week when it came time to put a border on it. We initially tried to come up with two colors so that this could have a double border but in the end this beautiful green/brown mix was all it really needed. The front side is all soldered so I have a sneaking suspicion that this will walk out the door all ready to be hung next week.

Linda F was certainly busy during the month of June because she's got not one but two(!) projects just about completed! Her Geometric Window is all set for solder and her Children with Umbrellas just needs the second side soldered before it is finished. I know that we'll see at least one of these featured among our completed projects next week.

Jan's Jessie Tree is just about ready to be flipped around and soldered on its back side. We had discussed replacing the bottom clear piece with either green of brown glass but I'm unsure if she ever mad up her mind about that. We'll find out when Jan returns and then work from there.

Susan D has permission for us to show exactly what it is that she's been working on so here's our first real look at this window. Based on a photograph, Susan drew up the pattern on her own and the likeness and exactness is uncanny. There's just one border left to add to this and then Susan will be able to jump into the soldering process.

Mary got the front side of her Cross Window all soldered and then flipped it over to begin the back side. I have no doubt at all that she'll be able to get this finished upon her return and I can't wait to see this hanging in a window with some light behind it.

MiMi's about halfway completed the grinding of the seafood portion of her window. Once this is all ground she'll tack it together and then work on the background glass. Normally we would cut the background and grind it along with the rest of the pieces but MiMi is using a glass that she needs to have lined up PERFECTLY and this is the only way to achieve that.


Mary Grace was able to get her final border attached to her Flowing Flowers Window. Next week she'll attach the corners and the channel and then she'll be able to begin soldering this beast! I'm hoping she's feeling better because she had a rough time during class this week.

Here we have a look at Shawn's Stylized Fleur de Lis Window which she now has almost completely ground. It's all about pinning a new piece into place and then replacing all the other pieces around it to learn what has to be adjusted on the new piece.

Lastly we look at Cindy's next project which is one of her favorite (and best selling) pieces-- Birds On A Wire. Her pattern is ready to be traced and she's got all her scrap glass lined up for a very colorful project.

So that wraps things up for our first class in over a month! It was fun to be away so long but I will also say that it's good to be back.
Paul
No comments:
Post a Comment