
Linda L's Celtic Window is finished and it is a very professional job indeed. I defy you to find a stained glass Celtics window that looks better that this. It can't be done, period.

Jeannette's the winner this week when it comes down to getting the most amount of work done in a single class. She started working on this three pane window when she walked in the door and by the time she left all three panes were completed, mounted into a beautifully distressed frame, and then taken home to hang. Gorgeous!


Betty's on a roll as you can easily see with her latest trio of Yard Post Ornaments. I'm unsure if she tried for the effect on the wing of the bottom Pelican but doesn't it look like the wing is made of two different pieces of glass? That's some really excellent placement there!


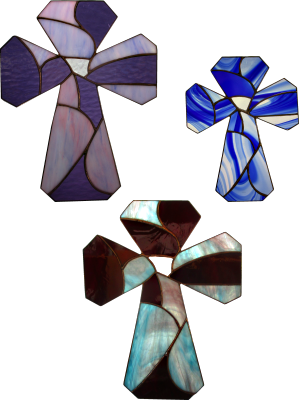
Ann got three more crosses completed and then we retooled the patterns for these just a bit to eliminate some straight lines which had crept into the original pattern. The differences are small but they'll make a big difference structurally and add some extra stability to the design.

Sheri saw this Broken Window Rose on the internet and is running with it. It's hard to believe but the majority of the window is all cut out already and Sheri is ready to begin grinding at this point. Once the broken borders are attached she'll fill in the two empty areas with a piece of glass to finish it all off with a look I've never seen before.

Belinda knocked my socks off when she walked into class with her Church all ground and her slats all cut! She's begun wrapping all of those slats so this is getting close to being completed already. I told you the second window always goes faster!

Cindy's Cross Window looks fantastic. When you see this lit up from behind you will surely be impressed with the glass she's used for the sky and the glass that she used for the ground. This is ready to be foiled so it won't be too long before this is hanging up.

Betty started making a Pumpkin Panel for her yard post but liked the pattern so much that she added two borders to it and turned it into a full fledged window. It still needs to be soldered but that won't take her long at all.

Cheryl had a VERY productive night with us as she wrapped her final border, tacked it into place, added a zinc channel and then began soldering her Address Window. We won't see this finished for a few weeks though as Cheryl will be some classes, but when she returns I expect this to be finished fairly quickly.

Angie is making a similar window to what Betty made but with more pumpkins and in a much larger format. With all of the glass cut she's ready to begin grinding and since Angie works at home as well as in class she could finish this up pretty quickly.

Jan almost completely finished cutting out the glass for her Poodle Window but then moved along to a small Bird Panel so she could work on it at home (since it's smaller and easier to transport). Look to see the Bird completed upon her return and even more of her Poodle ground.

Barbara H not only got the glass for her purple shadowing cut out but
she also got the clear textured background cut as well. Next Barbara
moved over to the grinder and began fitting her pieces perfectly into
place. It won't be long now.

Mary Grace has her Praying Hands Window all tacked together and ready for solder! That was some fast work on her part and people are already praying that they are the one to get the pattern next!

In keeping with a religious motif we next look at Roxane's Angel Window. She got not one but TWO borders cut and attached and then moved along to soldering this beautiful Window. With the front almost completely soldered (exquisitely I might add) she'll be finishing this very quickly.

Martha's moving full steam ahead on her third Franklin Street Lamp Window. Now get this-- she's planning a fourth as well! After that I think it's time to take a break and do something else though she's becoming rich making these and selling them!

Beth B has finished up with all of the grinding on her Cardinal Window and moved along to the wrapping phase of her project. Her foiling is wonderful and she's taken it home with her to wrap so there's a good possibility that she could begin working on border(s) when she comes back in.

Shelley's Address Window got halfway ground while she was in class and she's already decided that her border will be a mix of colors featuring irregular cuts at varying angles. We've seen this effect before in a handful of Tree Of Life Windows and I think it will really make this window stand out without distracting from the numbers at all.

And to wrap things up we take a look at four Lily Pads and four Cattails that Susan D cut, ground and began wrapping. She started these when she walked in the door and all of the heavy lifting has already been done in just one single class.

And there you have it. This new version of Blogger seems be be even worse than it was last week. Any formatting errors you see in this post were things that I simply couldn't fix. Highlighting text and trying to format it usually doesn't work and even worse, text and pictures above and below the highlighted text can become permanently linked to the text resulting in bizarre effects. I hope they fix this soon. (I just found a way to revert to the old version but since this post was created in the 'improved' version it still doesn't want to do exactly what I want it to.)
Paul
Bayou Salé GlassWorks
No comments:
Post a Comment