Monday, March 27, 2023

Making Simple Things Complex

Linda L's center panel of her three part Nativity Scene has officially been completed. She fell in love with the heavily textured brown that she used to form the boards of the stable and knew that would be THE perfect glass for the stable.  She wisely chose to use a different brown for the six pieces that make the (also) wooden manger to prevent it from blending in with the stable.  That's what I consider to be good and proper planning.


Our students have been closely watching this Rooster that I've been making come together so I thought I'd post it this week so everyone could see it lit up.  It's certainly colorful and the best part is that it's already sold!


Judy's Crab Window was difficult to make (there are a lot of long, thin pieces) but it was certainly worth the effort.  I still don't understand why she's so down on her soldering.   It may not be absolutely perfect but it's far, far better than she thinks it is.   She did take her time on this and that makes all the difference.  You can't rush soldering, it's like a cake-- if you don't take your time and remove it from the oven too soon it's not going to be a good cake!


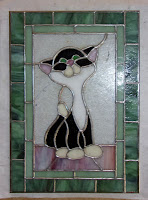
Check out June's cute Grinning Cat Panel.  She wasn't sure what colors to use for the borders but in the end she picked out two perfect colors with the help of some of the other students.   Border colors set the tone for a window but it's the subject, which is the cat in this case, that steals the show and is thus the focal point of a window.


Melissa knocked off this large Tulip Suncatcher in record time and walked away with a beautiful gift for someone.  It's light, it's airy, it's delicate and it's perfect.   It was also a nice diversion from the larger Address Window that she wasn't into working on last week.   Now that she's completed something she feels better about returning to her larger, more complex window.
 
 
Annette completed two 3D Butterflies this week as well as some smaller ones.  The butterfly on the left is a Lawn Ornament which has been affixed to a stake which allows it to be displayed in a garden while the one on the right hangs from chain that can be hung from a ceiling so that it resembles a butterfly in flight.  Also, the one on the right has never been made this way before as it started out as a side view of a butterfly with only one wing being visable.


The first of our two Large Modern Cross Suncatchers was made by Ann who used extremely rippled glass to create this stunning blue and aqua/teal cross.
 
 
Our second Modern Cross is actually slightly smaller than Ann's up above (although you can't tell that from the picture).   Jeannette made her cross out of assorted clear textured glasses which really sparkle with light behind it.


Let fell in love with a sheet of translucent green glass that she found in our glass rack and decided to use it for the background of a Magnolia Window.  With everything cut out she's already begun grinding each of her pieces.   The background looks GREAT on the pattern paper but when you see this lit up after she finishes it you will be amazed.   I don't understand how I didn't notice this glass myself because everyone says the same thing when they first see it--"It's beautiful!"


With Lara's woven border all tacked together and the front side of her African Sunset Window soldered I have no doubt that this will be finished when we next see it.   We've already held it up to see what it will look like with some light behind it and all I can say is that it's magnificent!


You know, when I drew this pattern for Cindy I had no clue that it would look as good as good as it already does in this uncompleted state.  Of course, that may easily be because Cindy is doing such perfect work on it.   I know that colors where a concern for her when she was picking them out but I think that everything compliments each other perfectly.  That horse has been tamed!


Barbara worked on her newest  Beveled Window by getting the bevels all tacked together and then cutting, grinding, wrapping and tacking the thin trim that surrounds the bevel cluster in the center.  That simple, thin quarter of an inch trim adds so much to the overall look of the window.  It takes a little time to line it all up but it turns an elegant window into a stunningly elegant window when all is said and done.


Next up we see that Linda L is already far along with the second panel of her Nativity Scene.  There are only 12 pieces left for her to cut and grind before she can start foiling and ultimately solder this window.  I suspect that this panel will easily be completed before Easter rolls around!


Angie is soldering her Seafood Window and it already looks like it's the pièce de résistance in her stained glass portfolio.   There's a lot of work involved in this window but what also makes it so spectacular is that she chose to have it set in a glass that no one else can use.  The newspaper printed glass is our own creation and it's the perfect compliment to Angie's hard work!


Jeannette's Seashells Window is all ground, almost all foiled, and therefor almost ready to be tacked and bordered.  I'm sure that will happen upon her return.   You know, I think that all of that class time that Jeannette was forced to miss due to circumstances beyond her control was a good thing.  I've can't help but notice that her work is more accurate and moves along far quicker than it ever has before.  Touché!


Grinch Hands are Susan D's thing (I guess) because she's got six of them in the works.   As we've seen in the past, the Grinch has always been a bit handsy with his Christmas balls and these will be no exception because once they have been completed an ornament will be suspended from a chain that will be attached to the Grinch's fingers.


MiMi only has a single row of  her background left to cut and then she'll be able to add the borders to her Traditional Window.  Sadly, she had left her pink and grey accent pieces at home so we weren't able cut out that final row of background since she couldn't trace around the accent pieces.  Alas, I can assure you that the final row will go on quickly next week.


And Susan R started a new Reindeer this week and just look at it already!   Talk about flying through a Reindeer.  This woman is becoming stained glass fire!


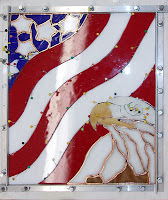
Guess who made a guest appearance this week?   Rowena was back in class and resumed work on her American Flag and Eagle Window as if she never missed a beat.   Not only did she finish grinding it, she also got a good majority of it foiled as well.  It was great to see her smiling face and hopefully we'll see it again in the near future.
 
 
And here's another American Flag window, but rather than having a traditional Eagle in front of it we have a rifle.  Shelley has taken this along home with her so that she can (hopefully) solder it there and end up with a completed window when she comes back in.

 
 And lastly we have Sheri's Coffee Window which has begun its construction this week.   She's actually got glass cut out for it (which you can see in the black container on the bottom right) but I didn't get a picture of the pattern with the glass set into position.   That will surely happen in our next post though.

 
Jolly good then!  I'm chuffed about how things are turning out in the shop and can't wait 'til next week when we see even more completed projects.
 
Paul


Monday, March 20, 2023

As If

Annette's Angelic Window is all about flowing gowns and intersecting diagonal lines.   You'd think that the two ideas would clash but together they make a delightful window that Annette loved making. Sure, a window this size takes some extra time but the end result is always worth extra effort (and time).


Let's Traditional Rose Oval highlights her abilities to keep her cuts lined up and beautifully connected.  Her curves are neat as a pin without a hint of a bulge or point and her outer oval edge is nothing short of perfection.  Wonderful work indeed.


Cindy finished up her Deer Head Window however I didn't realize that until class ended.  I love the deer itself but her choice of background glass is only topped by her pick of a border color!  This is  another one of those perfect windows that we keep seeing our students make.


Cheryl's Cardinal Window got to see the light of day and it's part of a cardinal series that she's made.  The first one featured three cardinals surround by the same blue background glass that she used in this window along with an identical border arrangement with both windows being the same size.  If you want to marry a pair of windows which have different subjects just use the same color scheme between them and a matching border.  The more elaborate the border, the more obvious the two windows will pair. 


Cindy also made this Angel Winged Cross.  It's her second time making this and she seems to have easily flown through the creation process.   I know where the slight flaw was on her first one (well, it was a flaw to Cindy) and she's avoided that problem on this one altogether.


Susan D has two more suncatchers completed- one small and one large.   Her Silverware Dragonflies are a signature piece but her Honeycomb and Bee are completely new.  The Bee itself was made separately from the honeycomb and was also made with curved wings and a curved body.  Wire antenna were then attached and the whole bee assembly was then tacked onto the honeycomb giving the entire piece a three dimensional effect.


Susan R's latest Rosebud Ornament was completed this week and isn't it elegant?   This would look good anywhere.  Next up for Susan?  Possibly a Santa Sleigh for the series of reindeer that she's been making.


Our final finished piece is a clear assorted textured heart Suncatcher that Let designed and made completely on her own.  You might be worried about that straight line running down the center of the heart but the wire that forms the hook was connects to both sides of the heart which prevents that straight line hinge point from hinging. Problem averted! Again, I have to congratulate Let on her shapely curves. 😎


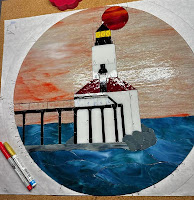
So first up in our (as yet) uncompleted projects is the Lighthouse Window that MiMi is making at home.  With all but the border pieces cut and ground I think that this will be tacked together before you know it.   Once that is done MiMi will bring this into the shop so we can figure out the size for the border and then get a rounded zinc channel attached to it to finish it off.


Barbara spend her class wrapping the bevels that she'll be using in this window with black backed foil since she plans on coloring the lead black when this is completed.  She used 3/16 foil on all of the bevels but will use the standard 7/32 foil for the remaining (unbeveled) clear glass pieces.  This is  coming together quickly!


Lara's 176 piece woven border has all been wrapped and is ready to be tacked into position.  It was a lot of work but it already looks fantastic.  When this lights up you'll then be able to easily see the two different textures and shades of brown that she used to form even more of a weaving motion.  This African Sunset Window is spectacular.


Jeannette's Seashell Window has completely taken shape now that almost all of her background has been cut out.   One of the background pieces was too large to fit on the glass that she wanted to use so we fixed that problem by simply altering where the lead line resides on the pattern.  We slid things over by about an inch and the problem was easily solved.


Sheri's cut and ground a Sunflower Heart Suncatcher but she's done something a little bit different by making the five pieces of her background glass from red glass rather that blue.  It works wonderfully by bringing a whack of color into the piece and by accentuating the heart more than ever.


With everything cut for his Cardinal Window Kerry only has to foil a few more piece of glass so he can finish tacking it together and then add his beveled border.  It won't be long now!


Melissa just didn't feel like working on her Address Window this week so she took a break from it and cut out this beautiful Tulip Suncatcher instead.  She made quick work out of the cutting and grinding of this project and I know I can safely say that this will be completed when Melissa returns.


Martha's '59 Belair is pretty much cut and ground at this point.   There are 2 or 3 pieces that will need to be replaced but she's going to do that AFTER she tacks it together so she can get a nice perfect fit.   With just the car itself left to be foiled, the tacking together of this window won't be that far off.


Lisa is biting the bullet and working on a 3D Succulent.  Her husband, Steve, is also making one but Lisa's features rounded petals cut from a multi hued opalescent pink glass which will be tacked together to form a 4 layer flower.


Meanwhile, Steve's 3D Succulent will have pointed flower petals.  He's cutting his all out from one sheet of glass but he's positioning his pattern pieces upon different sections of the sheet so that each ring of the flower has a slightly different color to it.  It's a subtle but extremely effective use of  hue and variation.


With the borders that form the stable attached to her Nativity Scene Window, Linda L is just about ready to finish the first of this three window set.   The front has already been soldered leaving just the back side to lead.   This will get a medium zinc channel around it and will placed into a wooden framework that will be build for it after all three windows have been completed.


Judy has her Crab Window very close to completion.   It's all soldered now and she only needs to touch things up, apply a brass channel to the edges, and then two hooks to call this finished.   Look to see this among our completed pieces in next week's post.


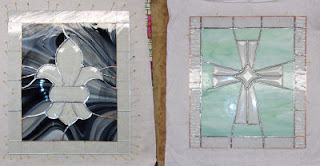
Betty has  two more windows in the works.   Both windows used a single piece of fitted glass for the background which has each been strategically cut to position cross and the fleur de lis in the center of each piece of glass.  This allows the grain (the flow) of the glass to be uninterrupted throughout the window.   The effect is very easy to see in the Fleur De Lis Window since it uses a heavily textured baroque glass.  Note how the grain of the glass remains unbroken throughout all of the background pieces even when a lead line splits it.


With her last border cut and ground, Angie is about ready to put a final solder bead on this impressive window.   There is still the matter of the eyes which need to be cut but I believe they will be handled during her next class with us.  After that it's all about the soldering.


Linda F had much difficulty in picking out a color for the final border of her Fruit Bowl Window.   That's actually hard to believe when you see it looks below.  It was a difficult decision though because she had planned for something more transparent.  Alas, in the end it looks wonderful because she went back to a color that she used as an accent color in the bowl itself.   You can also see that she's got a Five Bevel Cross in the works as well.  She had no trouble cutting and grinding that difficult Cross in a very short amount of time.


You can easily see that the bottom row of MiMi's Traditional Window is missing (largely because I placed the reflection of the light along the edge of her glass).  That's because she cut as much of the background as she could from one sheet of glass without using poster board pattern pieces.  Instead she laid the sheet of glass on top of her pattern covering as much of it as she could.  Then she traced the pattern onto the glass and cut all of the straight lines at once before breaking it apart.   Alas, the sheet wasn't  big enough to get the entire window on so now that this is tacked together MiMi will splice another row onto the pieces you see below using the same technique with a much smaller piece of background glass.  Uniformity is wonderful!


Shelley has most of her Flag/Rifle Window wrapped and will tack and solder this when she comes back in.  She's taken the few unwrapped pieces home with her so she hopes to be ready for tacking the minute she walks through the door.


Jeannette is making another Modern Cross suncatcher and is using an assortment of different clear textured glasses to make it with.  You just can't lose when you use assorted clear textures.


And here's Ann's latest rendition of the same Modern Cross pattern.  She's used a HEAVILY textured glass on her cross which required her to double wrap some of the pieces so that foil would be on both sides of the glass. Heavily textured glass can go from very thin to EXTREMELY thick in less than a quarter inch.   I selected this picture because the reflection of the light really shows the rippled effect of the glasses.


That's it for this go around!  Come back next week to see these projects get further along as well as entirely new projects started.
 
Paul

Bayou Salé GlassWorks

Monday, March 13, 2023

Get That Pointy Thing Away From Me

Betty's Beveled Cross Panel is slightly smaller than the second one that she is currently making (which we'll see later on) but equally as appealing.   She's had the beveled cross sets sitting around for years now and is very happy to finally use them and get them off of her shelf.


Jeannette's Easter Basket was finished this week and she made the entire process look easy.   This went together quickly and efficiently and we already have someone else asking about using the pattern.


Linda L completed her Easter Bunny Window which was going to be a gift until she realized that she'd already made one of these for the person she was going to gift it to.   That just means that Linda has another window that she can sell in time for Easter (and who wouldn't want this?)


Sheri's latest Mushroom is another wonderful window decoration.  he also knocked out this stunning Iridized Green Hummingbird as well.  Again, her colors are spectacular and her craftsmanship is perfection.


Ann's completed her newest Modern Cross and what can I possibly say about this that hasn't been said before?  I don't think its possible for her to make a bad cross at this point in time!


Betty also  got another pair of Silverware Dragonflies completed, one in teals and the other made in blues.


What if you took the standard Bathtub Lady and made it to fit in a 10" steel hoop?  That's what I wondered and this is what happened.  In the end I felt it needed something extra so I bent two fancy metal accent swirls for the top and then decided that hanging a crystal from the bottom would make it even better.


Kerry's Cardinal is coming together in a large way now that his background glass has been cut.   He's had to reverse  the pattern and the glass pieces so he could grind it with the back side up since the Holly Berry glass is so heavily textured on the back side.  The pieces were just raised too high when compared to the rest of the  (smooth) pieces.  Don't even ask about what happened when I tried to flip everything all at one for him.  Talk about a bad idea!


Here's a look at a Beveled Fleur De Lis and the second Beveled Cross that Betty is working on.  This cross doesn't touch the border glass the way the one at the top of this post did.  It doubles the amount of background pieces that it takes to make the window but There isn't that much of a difference between four pieces and eight pieces.


Jeannette wanted a Seashell Pattern and this is what we came up with.  She's got one shell done and has 3 more to go on what I'm sure will be a beautiful Window.


Cindy's Deer Head features a very heavily textured glass embossed with leaves which was NOT easy to cut.   One piece was broken and will need to be replaced but due to the heavy, busy pattern it won't be anything that grabs your attention.   Before she called it a night Cindy goat a beautiful multi-colored border cut out.  This window is almost finished.


Martha's '59 Belair Window has completely taken shape now that she has everything cut out.   Her grinding is spot on and everything is fitting together nicely.  Alas, many of the pieces of the car itself will need to be wrapped in the smaller 3/16 foil since they are so thin.   If she used the normal 7/32 foil on the thin pieces the odds of them breaking while they are being soldered would increase dramatically, and no one wants to try to break out thin pieces to repair them.


Susan D has numerous projects underway(as always) which include a new silverware Dragonfly, and a stunning 3D  Bee which will be tacked on top of the multicolored Honeycomb that you see below.    


Annette's Angels were so close to being completed that it was a shame we had to call it a night and not get them finished.   With the entirety of the the front soldered and a good third of the back side started this will surely be completed upon her return.    If you look to the right of the Angels you'll see that Annette also has a Butterfly Lawn Ornament started as well.  She's always working on something while she's at home, that's for sure.


 Susan R's Rosebud is all ground and wrapped now which means that this will be soldered and staked before you know it.   You can also see that Susan made a stained glass candy corn to replace the jewel that she originally hung in the center of her Geometric Suncatcher.


With her background newsprint glass all foiled Angie was able to carefully (and sparingly) apply flux to her pieces and then tack everything together.   Although the print has been fired onto the glass the flux may affect the deepness of the color so we're playing it safe and being very careful while applying it.   There are now just two borders left to go on this!


Linda cut the final piece of her background and once that was attached she decided to use a thin purple border as an accent color.   The problem after that was deciding what color to use for the final border.   Going back to the background glass is always a safe choice for a final border  but but no one in class cared for the way that looked.   After much pondering and after holding MANY pieces of glass along side her window Linda settled on using the accent glass that she used in the fruit bowl itself.  We will see how that looks next week when she actually cuts it.


Let was busy as she always is and her final border has been perfectly cut and ground for her Oval Victorian Rose.   I have no doubt that she'll have this soldered when she comes back in because Let never rests (when it comes down to her glass work).  


Shelley has her Flag and Rifle Window all ground together now and then took it along home with her so she could wrap it before she comes back in.    All this needs is a channel around it and some solder to finish it off since she's forgoing a border.


Judy's Crab Window had its missing pieces filled in and then she picked out a sheet of reeded root beer for the border.   There are some delicate, thin pieces in this window so Judy will have to be patient and use the 'One Pass and Let It Cool' method of soldering on it.  Thin pieces break easily with heat so you want to apply as little of it as you can by constantly jumping around while soldering.  This allows the heat to dissipate from those thin pieces so that heat-breaks don't occur.


Linda L got the border and the roof cut for her Nativity Window this week.   I suspect she'll be soldering this upon her return, after which she'll begin the side panels for this set of three windows.


MiMi has cut as much of her traditional window that she could from one sheet of the hammered glass she's using.   The rest will be pieced onto this large section once she tacks what has already been cut and ground together.  This will ensure a practically seamless match. 


Jan's Our Lady of Guadalupe Window was essentially completed this week.   The only thing left for her to do on this is to wash it, color it, and hang it up for its picture which we'll see when we return.


With the front side of her Cat Panel soldered June has flipped it over and begun applying lead to the back side of it.  There's no doubt that we will see this completed upon her return.  


And here at the end of the blog we see that Cheryl completed the soldering on both sides of her Cardinal Window and will touch it up and finish it off when she returns.  That means that her window will be at the top pf the blog next week!  


And that's all she wrote!
 
Paul