Annette's Angelic Window is all about flowing gowns and intersecting diagonal lines. You'd think that the two ideas would clash but together they make a delightful window that Annette loved making. Sure, a window this size takes some extra time but the end result is always worth extra effort (and time).

Let's Traditional Rose Oval highlights her abilities to keep her cuts lined up and beautifully connected. Her curves are neat as a pin without a hint of a bulge or point and her outer oval edge is nothing short of perfection. Wonderful work indeed.

Cindy finished up her Deer Head Window however I didn't realize that until class ended. I love the deer itself but her choice of background glass is only topped by her pick of a border color! This is another one of those perfect windows that we keep seeing our students make.

Cheryl's Cardinal Window got to see the light of day and it's part of a cardinal series that she's made. The first one featured three cardinals surround by the same blue background glass that she used in this window along with an identical border arrangement with both windows being the same size. If you want to marry a pair of windows which have different subjects just use the same color scheme between them and a matching border. The more elaborate the border, the more obvious the two windows will pair.

Cindy also made this Angel Winged Cross. It's her second time making this and she seems to have easily flown through the creation process. I know where the slight flaw was on her first one (well, it was a flaw to Cindy) and she's avoided that problem on this one altogether.

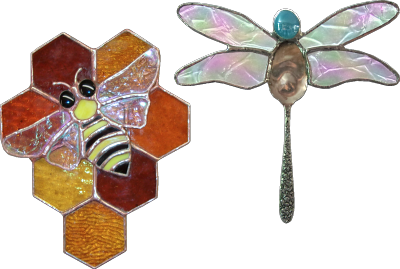
Susan D has two more suncatchers completed- one small and one large. Her Silverware Dragonflies are a signature piece but her Honeycomb and Bee are completely new. The Bee itself was made separately from the honeycomb and was also made with curved wings and a curved body. Wire antenna were then attached and the whole bee assembly was then tacked onto the honeycomb giving the entire piece a three dimensional effect.
Susan R's latest Rosebud Ornament was completed this week and isn't it elegant? This would look good anywhere. Next up for Susan? Possibly a Santa Sleigh for the series of reindeer that she's been making.

Our final finished piece is a clear assorted textured heart Suncatcher that Let designed and made completely on her own. You might be worried about that straight line running down the center of the heart but the wire that forms the hook was connects to both sides of the heart which prevents that straight line hinge point from hinging. Problem averted! Again, I have to congratulate Let on her shapely curves. 😎

So first up in our (as yet) uncompleted projects is the Lighthouse Window that MiMi is making at home. With all but the border pieces cut and ground I think that this will be tacked together before you know it. Once that is done MiMi will bring this into the shop so we can figure out the size for the border and then get a rounded zinc channel attached to it to finish it off.

Barbara spend her class wrapping the bevels that she'll be using in this window with black backed foil since she plans on coloring the lead black when this is completed. She used 3/16 foil on all of the bevels but will use the standard 7/32 foil for the remaining (unbeveled) clear glass pieces. This is coming together quickly!

Lara's 176 piece woven border has all been wrapped and is ready to be tacked into position. It was a lot of work but it already looks fantastic. When this lights up you'll then be able to easily see the two different textures and shades of brown that she used to form even more of a weaving motion. This African Sunset Window is spectacular.

Jeannette's Seashell Window has completely taken shape now that almost all of her background has been cut out. One of the background pieces was too large to fit on the glass that she wanted to use so we fixed that problem by simply altering where the lead line resides on the pattern. We slid things over by about an inch and the problem was easily solved.

Sheri's cut and ground a Sunflower Heart Suncatcher but she's done something a little bit different by making the five pieces of her background glass from red glass rather that blue. It works wonderfully by bringing a whack of color into the piece and by accentuating the heart more than ever.

With everything cut for his Cardinal Window Kerry only has to foil a few more piece of glass so he can finish tacking it together and then add his beveled border. It won't be long now!

Melissa just didn't feel like working on her Address Window this week so she took a break from it and cut out this beautiful Tulip Suncatcher instead. She made quick work out of the cutting and grinding of this project and I know I can safely say that this will be completed when Melissa returns.

Martha's '59 Belair is pretty much cut and ground at this point. There are 2 or 3 pieces that will need to be replaced but she's going to do that AFTER she tacks it together so she can get a nice perfect fit. With just the car itself left to be foiled, the tacking together of this window won't be that far off.

Lisa is biting the bullet and working on a 3D Succulent. Her husband, Steve, is also making one but Lisa's features rounded petals cut from a multi hued opalescent pink glass which will be tacked together to form a 4 layer flower.

Meanwhile, Steve's 3D Succulent will have pointed flower petals. He's cutting his all out from one sheet of glass but he's positioning his pattern pieces upon different sections of the sheet so that each ring of the flower has a slightly different color to it. It's a subtle but extremely effective use of hue and variation.

With the borders that form the stable attached to her Nativity Scene Window, Linda L is just about ready to finish the first of this three window set. The front has already been soldered leaving just the back side to lead. This will get a medium zinc channel around it and will placed into a wooden framework that will be build for it after all three windows have been completed.

Judy has her Crab Window very close to completion. It's all soldered now and she only needs to touch things up, apply a brass channel to the edges, and then two hooks to call this finished. Look to see this among our completed pieces in next week's post.


Linda F had much difficulty in picking out a color for the final border of her Fruit Bowl Window. That's actually hard to believe when you see it looks below. It was a difficult decision though because she had planned for something more transparent. Alas, in the end it looks wonderful because she went back to a color that she used as an accent color in the bowl itself. You can also see that she's got a Five Bevel Cross in the works as well. She had no trouble cutting and grinding that difficult Cross in a very short amount of time.

You can easily see that the bottom row of MiMi's Traditional Window is missing (largely because I placed the reflection of the light along the edge of her glass). That's because she cut as much of the background as she could from one sheet of glass without using poster board pattern pieces. Instead she laid the sheet of glass on top of her pattern covering as much of it as she could. Then she traced the pattern onto the glass and cut all of the straight lines at once before breaking it apart. Alas, the sheet wasn't big enough to get the entire window on so now that this is tacked together MiMi will splice another row onto the pieces you see below using the same technique with a much smaller piece of background glass. Uniformity is wonderful!

Jeannette is making another Modern Cross suncatcher and is using an assortment of different clear textured glasses to make it with. You just can't lose when you use assorted clear textures.


That's it for this go around! Come back next week to see these projects get further along as well as entirely new projects started.
No comments:
Post a Comment