Monday, October 7, 2013

Feed It To The Dog


Cindy's Celtic Knot Window is an exercise is precision glass fitting.  Round, symmetrically uniform visually stunning and colorful without being overdone, there's just nothing to fault in this window.  And the speed with which she knocked this knot out really impressed me.


Myrt made it back this week and she didn't come empty handed.  She brought in two completed projects that just needed some hooks and then resumed working on a project that she had to set aside a while back.  This is her finished Fleur De Lis with a Ribbon Border and I have to say that her soldering was VERY good on the two projects that she worked on at home.


This is Myrt's second completed window this week.  It started off life as a suncatcher project but then she decided to turn it into a bordered window.  That was simple.  She just added 5 pieces of background glass and then a border to finish it all off. 


Terry completed her two Cross Geometric windows that she started last week.  The coloring on the first one is different from what we normally see and it really did add even more emphasis to the white cross in the center.
 

Terry's second version of the window is more standard in it's color scheme but there has always been something very appealing to me when it comes to granite back red on top of clear granite.  These two window feature great work by Terry all around.


Becky has finished all of the glass work on her horse window.  With the final round border now attached all she has to do is add a bead of solder to finish it.  She managed to almost completely solder the front side of it while she was in class and from what I can see her soldering is exemplary!  Then she resumed working on her smaller Fleur De Lis Window.  She's decided that what it really needs is a ribbon border so we'll have that drawn up for her when she returns next week.


Next up we take a look at the four of the seven candle holders that Bonnie started this week.  After cutting a series of 1 inch strips she then shortened the strips into four various sizes to create  what you see in the picture below.  Each of her candle holders will be a different color --these are just four of them.  Bonnie cut 112 pieces, ground them and has taken them home to wrap.  Nice work! I suspect that we may see one of these completed next week which will enable you to see exactly what she's assembling here.


Brenda would have had this window completed this week but as luck (or was it misfortune?) would have it she discovered a tiny crack in the lower right part of her cross.  Sadly,  we didn't have any more of that glass in the shop to replace it with and Brenda didn't bring the glass into class  so she knocked out the broken piece and will finish this at home by placing the glass under her project and tracing the outline of the missing piece, cutting it out than soldering it into place.


Cindy started working on another LSU window but discovered that she left her pattern pieces at home.  (I distinctly remember that happening to someone else this week but I can't remember who it was.)  Rather than trace the paper pattern out yet again Cindy decided to cut her transparent pieces by placing the glass on top of her pattern and then tracing the outline of the pieces onto it.  It seems to have worked well for her because the lower left tiger eye is all cut and ground!


Janet resumed grinding her Fleur De Lis Window and when that was completed she had a quick refresher course in wrapping glass.  With the sticky side of the foil facing upward she began wrapping her pieces and I must say that she managed to not only center the foil but to also smooth it out perfectly as well.  Your soldering will only ever be as good as your foiling so this is a very important step in the stained glass process.  And I suspect that she'll begin soldering this window next week.


Jeanne came in, finished wrapping the remaining pieces of her final purple border and then tacked it onto her window.  Then we added the brass channel that surrounds (and protects) the outer edge of the piece and Jeanne began to solder.  Everyone panics when they hold the soldering iron for the first time and there really isn't any need to.  The solder will practically flow itself if you just take your time.  And in the end Jeanne did wonderfully.  With the front side almost finished she'll certainly complete this next week.  


Linda F has started a new project this week and it's a Fleur De Lis  pattern that she's using Baroque Glass with.  She's got the FDL cut out as well as the background glass which means that she'll need to grind and tack it together next before cutting her border.  She was worried about using baroque glass since the front side is heavily textured but she made out just fine.  Hopefully her fear of baroque is behind her now!


Lynn is back!  She was pretty sure that she wanted to make a panel lamp but the style she planned on making was undecided.  After looking through books for ideas she decided that she really liked the Peacock lamp and after making an adjustment or two concerning the length and width of the lamp we ended up with the pattern you see below.  12 repeats of three separate pieces are going to make a panel lamp that will look as though it was made on a mold.  She's most likely going to use a traditional tan/amber color scheme and cutting will start (and most likely end) next week. 
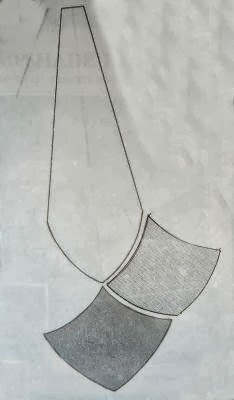


Martha also made it back to class this week after a two week hiatus of sickness and vacation (not concurrently, thankfully).  It was great to have her back as she resumed working on her final three cross windows.  With all the backgrounds cut and ground (and one even tacked together) all that's left is to attach the borders.  The end is near and Martha is saying No More Multiple Projects!


Mary began cutting out what she says is her last Beveled Cross Window.  When she got to the border she couldn't decide what color to use so she's going with the option of forgoing a border altogether.   The design will support itself without one and there's even a place to hang it from so we'll see what it looks like.   She's begun wrapping it and will most likely finish this when she returns next week.


Susan's Abita Window is really starting to take shape now.  And in terms of square footage she has almost a third of it cut out already, however,  piece-wise she still has a way to go since the rest of the window consists of MANY small pieces.  Her background glass is something that needs to be stretched out as much as possible since she has a limited amount of glass.  She's  going to cut all of the larger pieces first so she can cut the smallest pieces out of the scrap.  This is always the most efficient way to cut glass. With the surprising amount of small background pieces in this design it's truly the best way to handle the situation. 


Terry came in and saw a pattern I had drawn up for Betty hanging on the wall and decided that she needed to make it before she did anything else (especially since Betty won't be in next week and therefore won't be needing the pattern right away).  So Terry got everything cut out save for the border (which she will do last anyway).  She's already made short work of this window.


And Myrt, having completed the two windows she'd been commissioned to make, resumed work on her Hot Air Balloons Window.  With everything tacked together and the zinc channel attached the only thing left to do is solder this and she made wonderful progress on that while she was in class.  I did a quick refresher soldering course with her (as I've been doing with almost everyone) and what she soldered looks absolutely beautiful. 


Our classes are really humming along.  There are more and more projects in the works and our students are moving onto bigger and more technically advanced patterns.   I never know what's going to walk in the door anymore and I can't wait to see what next week brings!

Paul
Bayou Salé GlassWorks

Tuesday, October 1, 2013

I'm Gonna Fly Like An Eagle, Into the Future


I find it hard to believe but my 'little' wrapping tutorial has turned out to be longer than I expected.  Rather than tack it onto the front of this update I think I'm going to re-post the first two parts as separate posts and then add the remaining installments as special edition versions so they can be searchable from this page.   So expect to see some slight re-posting throughout this week.

So let's start with my favorite window this week.  I just love this pattern (and I'm embarrassed to admit that I've never seen Beauty and the Beast, where it came from). Brenda's execution of it is flawless right down to the soldering.  I love the subtle differences in the glass that don't draw attention but end up adding so much to the overall design (two different reds in the rose, and the different textured blue in the circle section). 


Brenda also completed her Ribbon Border Cross window and the combination of the granite backed red with a clear granite background is stunning.  Both of Brenda's window brought a smile to my face this week.


Linda F's Nativity Scene Window is now complete and looking great as well  She and Mary had refresher soldering lessons and as you can see they paid off in spades!  The most interesting thing about these next two windows is that they were both pretty much made from the same glass.  The borders are really the only difference between them yet they look anything but identical.  Why?  Well, Linda version is back lit while Mary's is front lit.  What a difference a little light behind a window makes, huh?


Here's Mary's version of the same Nativity window.  Only the borders were changed (to protect the innocent) but the overall feel is completely different.  And that's the magic of stained glass-- striking that perfect balance between what looks good with light behind it and what looks good with light in front of it.  In my opinion this window looks great both ways and that's what they (Mary and Linda) were striving for.


Terry completed her Beveled Cross Geometric window and although her cross isn't made out of bevels she managed to get make this version work by incorporating the border color into the cross along with 5 bevels.  The result is every bit as satisfying as the beveled versions, don't you think? 


Cindy completed a Faerie as well as a 3D Flower and they both look better than anyone could hope for.   The flower has a center made of glass beads adding even more definition to the double 3D layer of overlapping petals. Very nice indeed.


Meanwhile, Ann continued cutting and grinding her latest stained glass hand mirror and it's ready to be tacked and then soldered.  With only the mirror left to cut out I'd say that we'll see this as a completed project in our next post.


Beck got all of her Horse window wrapped while she was at home during the week and then she tacked it together here in class.  Once it was tacked we traced out a pattern for a double border which she then began to cut out.  Becky also brought a brand new grinder home with her so I'm thinking she's going to very busy with her glass work even when she's not in class with us.


Brenda liked Terry's version of the Geometric Cross so much that she decided to make one for herself.  Brenda is using a clear light blue glass and is (as you can see from the picture) almost completely finished with the grinding part of this project.  I guess you can say she about to wrap this up soon. 


Cindy also worked on her Knotted Window which looks astounding.  The number one goal in a window like this is keeping everything symmetrical and Cindy made it look easy.  The clear glass that she used to form the interlocking knot has all been kept at a consistent width which means that everything about this is plumb perfect.


Janet had plowed through the cutting portion of her stained glass class and this week she started grinding all of her pieces.  She started in the lower left and is about halfway up her window now.  I can tell by looking at her work that she understands how the pieces truly fit together since her pieces are fitting wonderfully.  Grinding is a strange process because there are so many ways you can get things to fit together.  The trick is figuring out which way is the better way which Janet appears to be doing.  She'll be wrapping this next week for sure.


And Jeanne's LSU window is moving right along as well.  She had the strips for her double border all cut out and then she used the pistol grip cutter to cut those strips to the correct lengths.  With all of her glass cut she'll be set to solder this when she comes back in.


Susan's Abita Window is taking shape now that the glass cutting process has begun.  The fun part of this window is going to be right at the end when she solders 2 actual bottles into the window so that half is hanging out the back and the other half is coming out of the front.  Talk about 3D!


Mary Grace's Eagle window is almost completely cut out now.  She's decided that she wants to make the thin layer of water that runs along the bottom a little thicker than what the pattern showed.  That's an easy change that she'll accomplish once she has this ground and tacked together.   Sadly, Mary Grace is about to have some shoulder surgery so she's going to missing class for a little bit while she recovers.  But she's left her project here in class to make sure that makes her way back to us.  We wish her all the best!


Terry (as always) has two windows in the works this week.  One is a red version of the Geometric Cross and the second is a two toned green version that has been altered slightly through the use of color.  Using a colored background should make the clear cross stand out more than usual.  My only complaint is that I didn't turn the windows around so that they weren't lying on their sides in the picture.


Lastly we have Shelley's Beach Scene and it's just about completely cut out.  She's making 2 minor changes to the pattern to adjust for some glass that came out just a little too small to use as it was originally intended.  In the end, I like the changes and won't even mention where they are in the window.  If this manages to get foiled during the week it will certainly be tacked together when Shelley returns to class.


And that's it for this post.  I put this off until the last minute on Monday evening and then we had a power outage which delayed the posting of it one more day.  But it's still being posted before classes start this week so as far as I'm concerned we're on time since we haven't fallen behind.  Look for a few special edition blog posts in the weeks to come-- we have a lot to show you!

Paul


Monday, September 23, 2013

Sticking To The Pattern


Okay, we're back and starting off with part 3 of our basics in stained glass Lesson.  This time we're delving a bit deeper into grinding by bringing up something thta many poeple feel is an unimportant step--Pinning your piece to hold it in place.  (remember to click the pictures to see a larger version)

Our first picture is a quick refresher of where we left off.  All of the pieces need to fit on the pattern so that the back line of the pattern is visible all around the glass.  If it isn't your finished project will grow once you apply the copper foil to your glass.  The picture on the left clearly shows how the black line of the pattern can be seen even when the glass is placed on top of it.


The picture to the right shows how I've anchored all my pieces securely to the pattern using pins.  This isn't an option part of the grinding process.  Without pins your finished pieces can slide making you think that the piece you are currently grinding when it reality it doesn't.


Here is our completed suncatcher all ground and ready for copper foil.  You can cleanly see the black lines around every piece of glass (there may appear to be spots where there isn't visible line but that's only because I couldn't get the camera perfectly centered).  This space provides clearance for the foil without making our project twist out of shape.  If you grind a window and it's locked tightly together before you foil it you're starting off on the wrong foot.  Trust me.


Well with that out of the way let's look at what was completed in our classes this past week.  And in doing that we'll start by taking a look at Bonnie's latest Fleur De Lis Window.  She used a frosted background, kinda-white but kinda-not along with amber and a transparent black for the actual FDL and the borders.


Bonnie also put the finishing touched on her layered Cross Suncatcher.  This design is made with just just 3 different sized strips of green glass and 5 quarter rounds.  A pattern is BARELY required for this which is interesting because even without a pattern the finished piece always look great.


Brenda worked on her Beauty and The Beast Rose Window and had it completed but there were a few broken pieces that we had to knock out so it wasn't completed in time for this post but we'll see it next week for sure.  Meanwhile, let's look at this Flower Window that Brenda made at home.  The only reason she brought it into class was so that I could drill holes in the channel so it could be hung.  Talk about a defining piece!  Her straight lines and beautiful soldering show me that Brenda has definite strengths in this art.


Ann made this Cross Window as a wedding present and she's done a wonderful job.  Like every stained glass artists she sees flaws in her work that she wants to fix the next time she makes this pattern (that she designed) but that is par for the course.   I have never made a window that I've been 100% satisfied with it-- There's always something that the artist sees that no one else ever will and that's the case with this window.


And Ann didn't stop with her cross.  She's also began working on this stained glass Flower Mirror that she's been grinding as she's been cutting.  The left side is pretty much completed so I suspect this won't take too much longer before we see it as a finished project.


I only just noticed that the top part of Becky's Horse Window closely matches Ann's hand mirror.  This week Becky resumed grinding her pieces and when I say 'resumed' I mean 'finished'.  Everything is ready for wrapping and then Becky will tack this together and add her borders.  And those borders won't take long at all meaning that this window is very near completion.


Brenda worked on her latest Beveled Cross which features another Ribbon Border.  As I always say, it's extra work but it's work that is painfully apparent in the final piece.  This one is red and clear granite so it will most certainly light up any room it gets hung in.


Our newest student, Janet, is moving along quicker than I had expected.  She decided to go with this  Fleur De Lis Window that was inspired by a Peace Lily and she has really made short work of it.  Within her three hours of class time she managed to get this window completely cut!  Janet's next stop will the grinder where I believe she'd do just fine.


Our next three windows have stopped looking completely identical so I can now tell the differences between them and hopefully know who is making each one.  We'll find out just what I know in a minute.  First up is Betty's version of the Nativity Scene which she just loves.  And how do I know this one is Betty's, you ask?  Well, hers has amber hay under the baby Jesus


Then we have Linda's version which is almost identical to Betty's save for the color of the hay.  Linda went with a yellow glass that has a slight hint of black running through it (which is hard to see even if you enlarge the picture).  Like Betty's, this window is complete save for the soldering. 


And the last of our Nativity Scene windows belongs to Mary.  Her's is easy to differentiate from the other two because she put Joseph on the right rather than the left.  I'm actually kidding-- what you're looking at is the back of her window so it's reversed.  The big difference between the three of them appears in Mary's window because she decided to use a lighter brown for the border.  There's no right or wrong in the color selection but if you want to know which one I prefer you'll be disappointed to hear that I like both versions equally (almost).  lol


Mary Grace's window has really taken flight.  We talked about what she would do as her next step when she came into class and we both agreed that grinding the eagle would be the way to go.  Once it is ground she can tack it together and then treat it as one piece when she's grinding the rest of this window.  That prevents any pieces from getting lost or mixed up as well as making sure that the window doesn't grow when the foil is applied to everything all at once.  So Mary Grace started grinding and discovered that when you cut the line off of your pieces there isn't much left to grind!  She not only got it completely ground (within an hour) but she also wrapped and tacked all 75 pieces!  The hard part is certainly done and the rest of this will be easy.


Susan continued fine tuning her Abita Window and I must say that I really like the changes she's made.  The pattern has been heavily penciled in now so there's actually something to see this week.  For some reason I had it in my head that the bottle on the right would be tipped (at 9 degrees for that perfect amount of whimsy!) but Susan straightened it (among other changes) and it looks MUCH better.  Susan should talk to the CEO of YAHOO!


And then there's Terry who had three irons in the fire this week.  She had her blue cross window completed but I didn't get a finished picture of it.  Her LSU window just needs some soldering and she left class with her second (red) Cross window almost completely ground.  It was a quiet night Tuesday with only Terry and Brenda in but it was a fun one even without some of our favorite people being there. 


And that wraps things up this week.  With a little luck our Suncatcher tutorial will continue next time around and we'll cover the skill (it's a skill, not an art) of foiling.  The movie of the week is the original version of Death At A Funeral which everyone on Tuesday night has watched and loved as much as Russ and myself.  So until next week, may all your cuts break cleanly!

Paul