Monday, June 1, 2015

Groat Spurts


What's the most important rule of glass cutting?  Always cut 'Point To Point'.  If you want your curves to come out intact you MUST cut a straight line from the curves starting point to its ending point.  This is is NOT an option (especially on deep cuts). The odds for you making a successful cut go up from 50% to 90% if you simply make a straight cut across your curve first.  Before you attempt to cut out the shape below you NEED to cut along the red dotted line first.  Success is easy if you follow this rule at all times.


Terry's new Iris Window is her pièce de résistance -- at least for this week!  Everything from the design to the colors and even the soldering make this one window that she can certainly be proud of.  But it's the shading of the Iris that won me completely over on this window.  The grain of your glass can make or break a window and in this case it's made it in a big way.


Mary Grace finished her Fruit Bowl Window and you can bet that it looks great before you even look at the picture.  That thin red border was the perfect way to bring red into the window without having it overpower every other color that Mary Grace used.  And for the record,  Mary Grace has gotten the hang of soldering down pat because the lead lines on this window are 'Slow Good'.


Bonnie's  Elsa window is *almost* officially  completed.  I say 'almost' because although all of the stained glass work is finished, Bonnie still needs to find the perfect snowflake for Elsa which Bonnie plans to attach on her opened hand.   If Bonnie can't find anything I have an idea or two which may work.


And Cindy has already completed the large Tiger Eye Suncatcher that she began working on last week.  Talk about a fast turn around.  The joy of a Tiger Eye Pattern is that you needn't worry about following the stripes perfectly. Just make sure the outside shape is symmetrical and smooth and you're fine. But that's not to say that just anyone could make something like this as quickly and efficiently-- That praise goes to Cindy.


Carol has completed her first two Hand Mirrors.  Having never worked with mirror before she, like so many others, thought that there would be some secret to working with it but there isn't.  The only thing you have to be careful about is scratching the back (painted) side of the mirror and that's about it.  I even find that mirror cuts easier than most glass.  Do you want to know why Carol's pair of mirrors look so exceptional?  It's because she's always striving for perfection and never settles for second best.


Myrt's got her Medium Sized Double Bordered Fleur De Lis Window completed and ready to be mailed out.  She'll be double boxing this beauty and then she'll resume working on the sky of her Outhouse Window when she returns next week.  Myrt knew that the only way she could reduce the size of this design and get a second border on it was to have the Fleur De Lis cut into one of the borders.  And that's exactly what she did.  For the record, I've always liked that effect anyway.


Susan finished up work on her Shrimp De Lis Lawn Ornament by wrapping, soldering, and then adding the all of the wires that form the shrimp's legs and antennas.  The wire work went quite easily for Susan which isn't generally the case for most students.  Many find it difficult to bend wire smoothly while straightening out any sharp bends but Susan achieved perfection without even batting an eye.


And Brenda completed her latest red and black Fleur De Lis.  I'm sort of losing track of these so I may be wrong but I think that this is the third time she's made this window in these colors.  Or I could be mixing these up with her red and white 'CC' Windows.  At any rate, she left this at the shop and everyone who sees it says the same thing, "It's so rich looking!"  And it is.


Sue finished her second (and last) Featherized Window which officially completes her Transom Window project.  She did a great job on both of these and I must say that they make a perfect pair.  I can't wait to see what's up next for Sue although a little Bee told me what I might expect when we see Sue again. 


Martha began soldering on her round Magnolia Window after getting its green border all wrapped and  tacked into place. But before she started her Magnolia she was working on her Orange-Yellow border for her Cardinal window which will also be ready for solder shortly.  It's official-- Martha is a 'Two Projects At A Time' student now!


Brenda also began work on an elaborate flower window this week and trust me when I say that this picture doesn't even show half of its complexity.  There's a complex border system running around and through this window that will really add a lot to the look of this piece.  And if anyone can handle it, it's Brenda.


Charlie skimmed and wrapped all of his yellow 2x2 squares while he was at home and then worked on grinding his eight 3 piece corner accents for two of his windows (that's a total of 24 pieces altogether).  He used a square to make sure that his corners are a perfect 90 degrees and I won't be surprised to see him cutting out his white background glass when he comes back in.


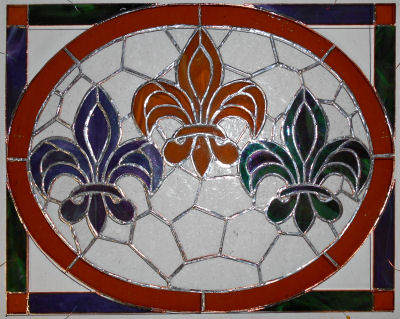
Not content with just accomplishing a Tiger Eye, Cindy also brought in her purple and green iridized glass and got the border cut and attached for her Tri De Lis Window.  She went with alternating colors in her border along with gold corners which fits perfectly with this design.  This window is officially ready for solder now.


Wow, Ann is flying through her Flower Window.  Last week she had about a quarter of  the background glass ground and wrapped while this week she completed the remaining three quarters of her background.  There are a few tiny fill-ins left along the edges (the pieces can be seen resting on top of the bottom center red flower) but they're barely worth mentioning.  Ann's just about ready for her final border!


Gale  came in and immediately set to work on soldering her Tribute  Window.  She started that by learning how to attach a zinc channel and then moved on to making an actual bead on all of her lines.  By the end of the night the first side was completely soldered.  Next week she'll resume soldering on the back side of this project.


Jeanne made great strides this week as she got all of her background glass ground, wrapped and tacked into place.  Then she added a second border which she also ground wrapped and tacked.  And for good measure she even added the final brass channel to it which means that Jeanne's Beveled Fleur De Lis is ready to be soldered.


And last but not least there's Jane who is working on a rather large oval window filled with flowers.  Each week she manages to put away all of her pieces before I get a picture taken and this week was no exception.  Even though you only see one flower cut and ground I can vouch for the fact that most of the leaves and flowers have been cut out and most of it has been ground.  Jane still has a way to go on this but don't let the picture fool you-- she's much further along than you would believe.


And that's about it.  Classes begin again Tuesday and I'm ready for another round!


Paul
Bayou Salé GlassWorks

Monday, May 25, 2015

Slower....Slower...Slower

With this post we are officially caught up and on time once again.  However, there's no tip this week because I lost my list of tip ideas and am currently in the process of reassemble (reinventing?) them.  Expect something next week because although I have an idea I just don't have the time to make the illustrations for it this week.


So Carol's Kaleidoscope Window is completed and as I expected, it all lines up perfectly.  The trick to making this window work is to maintain straight lines throughout their joints and to follow the curves in the pattern perfectly.  If you're off on one side the effect of a mirrored image is destroyed, simple as that.   Carol has this window made perfectly and does it ever look great with light behind it.


Sue's first Featherized Window is also complete and doesn't it light up wonderfully?  This is a perfect example of how matching textures can add so much to a design.  Sue did a great job on this and will finish up the second of the pair when she comes back in.  I love this and Sue should be proud of it.


Jeannette's Mickey Mouse is finished and as I expected it looks fantastic.  Like I always say, cartoon figures work out very well in glass.  I love the way Mickey looks as though he's walking out of the frame since is foremost foot is stepping out of the border.


Brenda completed her stylized Cross Window in record time.  She opted to go with just two colors (and a clear background glass)  but was unsure of how it would look since she'd only ever seen it done with three or more colors in the past.  As you can see, it looks wonderful.  I hope this helps Brenda understand that changing up a pattern's color scheme isn't worth fretting over. 


Betty made her first Bumble Bee Lawn Ornament and had no problem understanding how the pieces are tacked together to give the bee it's curve.  Janet also made her first Bee as did Jane!  Yes, we had three Bees this week but I'm only posting one picture since they all looked fairy similar.  I think everyone enjoyed making these and I really hope that Janet did because she has a second one ready to be assembled next week.


Becky B  got all of the pieces foiled for the round section of her Bird Of Paradise window and then decided to make a few design changes to fill out the petals on the top flower.  Once everything was squared away and looked the way she liked she re-foiled her altered pieces and then tacked the circle section together.  That means that she's ready for her corner sections.


And Bonnie finished all of the cutting on her Elsa Window.  She's foiling this at home so she can begin soldering when she comes back in.  It looks like this princess is just about ready to  
♪ ♫ Let It Go! ♫ ♪


Ann has begun grinding and wrapping the bottom right corner of her window and has that section ready for solder.  Next week she'll resume another corner and keep doing so until this is all wrapped and ready for its border.


Charlie came in and worked out a pattern for some of the the inserts that he's making as his first project.  The design is simple enough but the corner clusters will stop it from being too easy.  Charlie will need to take his time shaping these small curves so they're all symmetrical and I have no doubt that he'll easily handle that.


Carol also worked on a hand mirror and now that the actual mirror has be cut and foiled she'll finish this one (and possibly a second one) when she comes back in.  You can even see that we didn't forget to trace out the mirror onto a piece of felt so it will be the perfect size to protect the mirror's back when it's finished.


Brenda  has started another of these Red and Black Fleur De Lis' at home and she's already soldering it.  Brenda is officially our Fleur De Lis Queen and I don't know what she'll do when she finds out that we're banning Fleur De Lis' in the very near future.  ;-)  Maybe she can turn her efforts over to Tiger Eyes...


Becky S has all of her flowers, stems and leaves ground and mostly wrapped.  She's taken the whole thing home with her to resume foiling there and when she comes in (after her vacation) she hopes to have this all tacked so she can cut her background without using any pattern pieces.  I'm so jealous that she's on a cruise and I'm not!


Cindy planned on working on her Tri De Lis Window but unfortunately forgot to bring in the glass for her border.  Luckily she did have the glass for her next project (an oval LSU Tiger eye) with her so she began working on that instead .  Again I was amazed at how much she accomplished in a single class because its already been cut and ground.


And Susan's  Shrimp De Lis Lawn Ornament is officially ground and ready for its foil.  I guess I'd best move on to drawing up her next pair of lawn ornaments (which will be bunnies!)


Jeanne's newest window is a Beveled  Fleur De Lis which she's finished cutting all the glass for (unless she decides to add another border).  As it stands it just needs the tiniest bit of grinding and then some foiling.  You've got to love working with bevels.  The add so much and really help pick up the pace.


Terry has made some amazing progress on her Iris Window.  All of the leaves and the background cut, ground and tacked as well as both the double borders! Yep, she's already begun soldering it.  It's amazing how fast Terry moves on her projects.


Martha got the round  border for her Magnolia Window cut and ground into place and then she resumed work on her Cardinal Window.   She had a white border cut and ground but when she started to wrap the pieces and saw them resting in place she decided that it sort of made the window look, well, blah.  So she put the white border off to the side and cut out an Orange/Yellow border that matches the flower centers and brightens it all up.  I think it's a BIG improvement and I know that Martha is happy with it now.


Gale, like Martha,  changed her mind about one of  the colors that she'd cut for a border so the first thing she did was pick out a new color and re-cut.  One she replaced the army green with a light blue she was back on schedule.  Before she left she had her window ready for soldering.  And if you ask me that's a nice relaxing way to spend a class evening.


Myrt resumed work on her smaller than normal but bigger than small (Shall we call it 'medium sized'?) Stylized Fleur De Lis window.  She not only has her double border cut and attached but her channel as well  With the front side soldered she'll resume soldering the back when she comes back in.  She plans om finishing it so she can take it home, pack it, and ship it out in the mail sometime next week-- And I have no doubt that will happen.


Shelley made excellent use of her time and got her the entire front side of her Flower and Bird Window soldered.  I was even able to pry her away from it so I could put a brass channel around it for her.  I have no doubt that she'll finish this in her next class and then be ready to start her next project.


This week we saw Linda L begin to solder her Wild Things Window in a very official manor.  She's done tacking this window and has moved on to the official soldering process.  With everything in place and the zinc channel attached this Wild Woman is hoping that she'll soon be ready to knock back another drink and party down!


And in the end we take a look at Sue's second Featherized Window which is actually a mirror image of the first one you saw way up there in the start of this post.  All it needs are a few minor touch ups and then a bath.  Look to see it completed when we come back.


And there you have it.  Everything that happened last week in our fun but busy classes.  I can't wait to see what our next set of classes brings us.


Paul


Friday, May 22, 2015

A Red Snapper!

What's with all of the different fluxes out there?  Well, I've just about tried then all and I've formed an opinion that I'm going to share here with you.  I base my preference on my years of experience and the fact that when students use flux other than what we sell they ultimately have a bad soldering experience.  I believe the most popular fluxes out there are Blu Glass Flux and Classic 100 Gel Flux which are not easy to work with.  Hobby Lobby carries these so the fact that they're readily availability is what I largely believe is what's made them so popular.   I prefer to use Glastar Glasflux.  The difference between Glastar and the other fluxes are astounding when forming a smooth and even solder line.  When I'm repairing something was was soldered poorly I'll use the Classic 100 Gelflux ONLY so that my lines will match the other lead lines and not 'outshine' the work on the rest of the repair.  Consistency is what we're striving for and in the 35 years I've been doing stained glass I've found no flux that comes close to Glastar Glasflux.  If you're one of my students I not only recommend but insist that you use this brand.  (And no, I'm not getting a kickback for that!)

Onto our students now.  Janet's Melon Window is officially completed and, like on her Peaches Window, the wire work that forms the spirals adds so much to the finished design.  Don't get me wrong though-- her work on everything from her glass cutting to her soldering is far above average. Yet she's strives to be better with each passing week.  And she puts up with me which is REALLY saying something!


Terry finished her Geometric Window which is another pattern that she came up with on her own.  She started with the bevel cluster in the center and then worked outwards from there. The four square 2x2 bevels in the corners helped Terry change this from a circular window into a square one.


And we're pleased to announce a new student this week.  His name is Charlie and his butterfly says it all.  I was most impressed with his ability to cut nice smooth curves without making sudden changes in his cutting angle.  That's the tricky part to cutting which most students seem to have the most trouble with early on.  Charlie will be working on a few windows to fill in the opening for a piece of furniture that is being made as you read this.


Carol's Kaleidoscopic Window is an exercise in precision cutting.  All of her glass is cut and ground and this window is just about ready for some solder.  I think everything lines up beautifully  and when this is hanging I think that Carol will surely agree.


Brenda's Stylized Cross is two classes into being made and it's already taken shape.  Once the background and the corners are ground and tacked into place Brenda will cut a border and be ready for solder.  This is another project that Brenda seems to be flying through.


I was amazed when I saw how far along Cindy got with her window by the time class ended this week.  She got her all of her background pieces cut and ground and her oval border is cut and ready to be ground.  Cindy isn't sure what she'll be doing with her final border but I'm leaning towards a mixture of purple and green.  We're going to throw this into Photoshop and see what it looks like with various color combinations before we actually cut glass.  It's the safest way to handle this situation.


With only background glass left to go I'd say that Becky S has this well under control.  Her subtle green shading of the leaves stands out perfectly against the bright yellow Irises.  It's no wonder this is such a popular pattern-- there are so many ways to go with it!  Next up Becky will start wrapping these pieces and tacking it together before she cuts into her background glass.


Janet also managed to work on two Lawn Ornament Bees (which are stacked on top of each other in the picture).  The bodies are all ground and that just leaves the wings which will surely take less than 5 minutes to do all eight of them.  Then she only needs to cut 4 eyes and she'll be set to bend those bodies and wings!


Susan's working on a Lawn Ornament of her own and it's one we haven't seen in a while-- The Shrimp De Lis.  She's got this all cut out and will begin grinding it when she returns.  I must say that it looks like it's fitting together nicely before she's even started her grinding.


Jeanne's newest project is another Fleur de Lis Beveled Window.  She started by making a border out of pencil bevels.  The inside glass will be cut to fit inside her border.  Beveled borders HAVE to be done this way because bevels only come in certain sizes.  You can't just cut out a square or rectangle and make bevels fit around it.  It's a limitation but it's easy to work around if you know about it from the start.


Terry's newest window is an Iris (again of her own design) and she's used a piece of purple glass that is absolutely beautiful.  The only problem with the glass is that there was far more white in it than purple.  Because of this most people have looked at it and then put it right back in the rack.  But Terry had a unique way of looking at it and decided that even though it contained far more white than purple, she could use it to make something spectacular  And look at what she's done.  By carefully positioning each of her pieces Terry's transformed what most people thought was a piece of glass that would never be used into a stunning work of art.


Shelley's Bird and Flower window is ready for its border.  She had a small break in her background but we just added a fourth leaf to the flower and used the glass that the leaf displaced to fill in the small missing section of the background.  Rather than re-cutting a large background piece with glass she didn't have she was able to fix the problem by adding a small scrap of green glass.  Perfect.


Sue's Featherized Windows are really close to completion now.  Everything has been attached, including the brass channel which means that Sue has begun soldering one of these already.  With a good portion of the front side completed I'll bet that we see one of these windows finished in our next update.   I liked the fact that Sue was willing to change the border layout. It takes nerve to change things up at this stage in the game but if you aren't happy with it on the table you certainly won't be happy with it when it's in your window.


Ann had all of her flowers cut ground, wrapped and tacked together.  We took the time to cut out a piece of poster board to the size of her back ground and then laid her completed pieces on top of the poster board and traced around everything with a pencil..  This gave us pattern pieces that EXACTLY match the flowers and stems that Ann had completed.  She cut up the paper pattern that you see in the picture below, traced them onto glass and then cut them out.


And here's Ann's window after she cut out her background glass.  It isn't even ground yet but you can barely tell since everything fits together so nicely.  And that's the payoff to taking the time to redraw her background glass pattern pieces.


Martha's got two projects going on at the same time.  Her Magnolia Window is almost all wrapped now and once that part is done she'll be able to cut her border.  And her Cardinal window has it's bevels tacked together and is now waiting for it's five background pieces to be cut.  I guess you can say that Martha is burning the candle at both ends!


Gale's back and her Soldier Tribute Window is ready for borders.  She got it all tacked together in class and decided to finish this off with not one, but two borders.  She's picked a thin inner border of army green and will finish it off with a wider border of brown.  She's taken the rest of the green pieces home with her to wrap so I'm sure she'll be soldering this when she comes back in.


Myrt took a quick break from her Outhouse Window and came in with the center of a Stylized Fleur De Lis all cut out.  She wants to make it smaller than the pattern but she wants to also add another border to it as well.  And, as you'll see, that isn't a problem at all.  She tacked her FDL, she added the background glass, and then she cut a thin inner border.  Next week she'll add the last border and then start soldering. 


Check it out!  Linda L's Wild Things Window is all cut out and her final border is ready to be skimmed, wrapped and tacked.  All of her hard work has paid off because, as you can see, it looks great already.  And it hasn't even been soldered yet!


Jane's begun working on this large oval window of Roses and they're going to be a colorful assortment.  She has the flowers cut out already but I wasn't quick enough with my camera to get a picture of the glass laid out on the pattern.  So I guess you'll just have to live with looking at the pattern itself.


Ok, so this brings us pretty much up to date.  We'll have another timely post on Monday or Tuesday and we'll finally be back on schedule here. See you then!

Paul
Bayou Salé GlassWorks