Tuesday, August 11, 2015

I'm Bleeding Again, Pass Me The ShamWow

As I mentioned last week, 'wrapping' or 'foiling' is one of the most important parts of making a stained glass window.  If the foil on your pieces is damaged, not straight, kinked, folded over, or uneven your solder will reflect this.  Solder doesn't cover foiling mistakes.  But you already read about that if you were here last week.  I've wrapped a clear piece of textured glass with some black back foil in the picture below and made as many mistakes as I could think of while I did it.   Any black that you see is the underside of the foil (Which shouldn't be seen on a well wrapped piece).  So then, let's take an in depth look at what you should avoid when foiling


A) This is call 'stair-stepping' and it occurs when you don't overlap the end of your foil perfectly to the start of your foil.  Sometimes it's impossible to get the two ends to align because the foil tends to warp a bit when you tear it from the roll.  No matter the case you should always use a razor knife or exacto knife (just make sure it's not dull) and cut from the widest point on backward to the smaller point.  If you apply just a little pressure on the blade you will feel it travel along the foil under the overhang resulting in a perfect line up.

B) Torn edges usually occur when you are pressing down your foil with something that isn't smooth (standard yellow painted pencils are notorious for causing this problem).  Be careful as you are pressing down your foil because in most cases this problem can only be fixed by re-wrapping that section of the piece.  This can also be a sign of reversed foil edges which are almost always the result of careless handling of your pieces before you've pressed the foil to the top and bottom side of the glass.  These sections have the sticky side of the foil facing upward after you've pressed it down.  Sometimes you can fix this by picking at the foil with your fingernail and bending it back into  place.

C) Uneven foiling comes from not centering your glass on the foil as you are wrapping.  Remember to always have the sticky side of the foil facing you and to pull the foil taut before pressing it against the glass.  If you see the foil isn't overhanging evenly on both the top and bottom of the piece just pull the foil back and reposition it.  You can easily remove and reposition the foil several times without causing the foil to lose its stickiness.  Uneven sides can also be so extreme that there will be no foil on one side of the glass at all which is completely unacceptable.


D)  Splitting is a common problem when it comes to foiling.  This only happens on tight inside curves and sometimes can't be avoided.  When you become proficient at soldering you can hide these small splits with solder but it takes a lot of time and skill to do so.  The best thing to do when bending your foil over the top and bottom edges of an inside curve is to slowly apply pressure to the edge of the glass with a wooden dowel (or plastic pen) while SLOWLY angling the dowel (or pen) a little more with each full pass over the curve.  Do this to both sides and I can guarantee that your split foil will be reduced to next to nothing. 


E) Reverse folded corners happen when you don't take the time to make sure your corners fold over as you would a Christmas present.  Be sure that the foil on one edge of your piece is compositely flattened before moving to the second side.  I rarely short fingernails and can easily do this in less than a half second.  Practice makes perfect! This can also be fixed bu simply flipping the foil back to its proper direction before pressing it down

These are the most common foiling problems that I can think of right off the bat.  Remember that your soldering job will only ever look as good as your foiling job.  they go hand in hand with making a beautiful window.  If you have any questions about anything here (most specifically the part about preventing your foil from splitting) be sure to ask me in class.

So that was pretty long winded.  I didn't think it would take near that long to cover all of that!  But now that it's over with let's take a look at what our students have accomplished this past week.  And we'll do that by starting with Paula whose Bayou Mirror has been a long time coming, but whose time is now officially here.  I think it turned out beautiful and I believe that in the end Paula is very satisfied with the results.  There are a lot of memories in the making of this mirror but it started on a high note and it has ended on one as well and isn't that what really matters?  It's beautiful but I defy you to show me something that Paula's made that hasn't been beautiful.


Linda L's first transom window insert is officially completed and it's a spectacular window.  Clear glass and bevels are a timeless, classic design and within a week or two Linda's home is going to have three of these timeless, classic windows in it! 


Carol completed her latest LSU Window and thanks to this project I think I've discovered the secret of getting glass texture to show in my photographs.  But the drawback is that it also highlights any problems in the window but as you can see here there isn't a problem to be found even if you went over this with a magnifying glass. Carol even tinned the brass channel on this beautifully.


Sue completed scarecrow and likes it so much that she'll be making another.  The suspender look on this scarecrow is a very good one and in the end Sue decided to make this to hang in a window rather than from a stake in the yard.  The beauty of lawn ornaments is that you can always  just add a hook or two and turn them into a suncatcher.  I went ahead and added pupils (which I forgot to do before Sue took this home) but if she brings it back in we can easily fix that oversight. 


Cindy never slows down at all because this week she knocked out three more Fleur De Lis suncatchers and,well, what else can I say about these?  Cindy's on a roll.


Bonnie came in and immediately got to work at a grinder to finish fitting together her second Iris.  Once it was ground she set her sights on getting the leaves for both windows cut out.  And she did!  Next week she'll be at the grinder once again and then she'll be wrapping these two windows and preparing to cut background glass.


Terry is holding off on her Cross De Lis and has begun work on this Tiger De Lis that she redesigned.  And saying that she's BEGUN working on it is very misleading because, as you can see from the picture, she's very closed to having this all cut out and ground already.


Charlie got his four bevels cut and wrapped (which wasn't hard to do at all) and then re-cut the one piece of background glass that had met with a slight accident the week before.  Once everything fit  together he tacked it all into place and then began working on the final border.   That border is now cut and ready to be skimmed on the grinder and then wrapped when Charlie returns.


Vickie's first project looks astounding!  She picked some incredible looking glass globs to use for grapes and then began grinding her glass.  Before class was over with she had everything ground and everything but the grapes wrapped.  I think it's safe to say that the hard part is behind Vickie now.


Jeanne's had all of the purple glass cut out for her Tiger window last week and this week she got her gold glass cut out,  We laid everything out on the pattern and she's going to begin  grinding her pieces when she comes back in.  The mouth was going to be especially challenging so I helped her out by hitting it with the glass saw.  We'll do the same with the piece of background glass that fits inside the mouth because it would be impossible otherwise.


Ann started wrapping her Fleur De Lis that she ground last week and within a half an hour she was ready to start tacking it together.  Once that was done we discussed size and borders.  Ann is going to go with three borders and make this into a perfect square.  We have the details all hammered out on paper in pencil and Ann is ready to begin cutting her background.


Carol is making a crab that is so beautiful it brought tears to her eyes before she even finished it.  Sadly, the main body of the crab has a few cracks in it due to an accident, but even though Carol thought it was pointless to continue I've convinced her to keep forging ahead.  Once all the glass is tacked together and the window is a little more sturdy we'll knock that bad piece out and restore this window to the glory that it once promised to bring to Carol!  That's a promise.


Becky resumed work on the initial side of her Bird Of Paradise / Initial Window.  With the oval completed and fully soldered Becky will begin adding background pieces to her Bird Of Paradise side when she comes back in.  Once both sides are complete she'll join everything together with  connecting pieces of background glass.  Building it this way makes things much more manageable and is the best way to handle larger windows.  


Brenda has her two bevels wrapped and the fill in pieces all tacked into place.  We drew up a quick pattern but it's off due to the fact that I was under the impression that Brenda's original window had a double border.  No matter, we've got a final size and know exactly what to do to easily put things right.  Next week it will be background for this project.


Gale completed the soldering on her Humming Bird Window and Wow! what a job she did.  She came in with only the the back side left to solder and I demonstrated to her what the problem was that she experienced on the first side; too much speed.   When it comes to soldering, slow and steady always win the race.   At the end of the class Gale had everything but one flower soldered.  I looked it over and have to say that Gale is now officially one of our best solderers at this point in time.  If I told you that her soldering was perfect I'd be making it sound bad-- it's that good!  When she comes back in all she'll need to do is wash and color it.  I can't wait to see some light behind this.


After completing her mirror Paula began working on a small 3D Rose Lawn Ornament which kept her pretty busy for the night.  Everything is cut and 95% of it is ground, so if she manages to come in with these pieces wrapped she'll certainly get this completed next week.  In fact, even if she DOESN'T have everything wrapped I'm sure  this will still be completed because putting these together is a quick and easy process-- once you know the trick.


Linda L has 2 more transom inserts to go and all of the glass has been cut and attached.  She's taken this pair home with her where she hopes to get a little extra soldering done.  Both of these windows front sides are nearly completed so I'm sure we'll see at least one of these finished (possibly both) when Linda returns.


Shelley is grinding full speed ahead on her Aquatic Scene Window.  She's beyond the halfway point (starting from the bottom moving upward) but is having second thoughts about the color of the top most fish.  I say change it out now because once you put solder on it you're pretty much committed to the color choice.  You don't want to look at this when it's finished and wonder why you didn't fix it when you had the chance.


Only three Fleur De Lis' for Cindy this week you might have asked yourself?  Heck NO!  Cindy also cut out, ground, wrapped and tacked together this cross suncatcher as well.  Now that she's made one with a pattern I'll ask her of she wants to see how much easier it is to make without using a pattern.  I think it will really impress her.


Myrt  finished cutting and grinding the last of her butterflies and has officially begun wrapping her pieces.  The flower and leaves are completed so there's only the butterflies to go.  Once everything is wrapped she'll tack it together and be ready to trace this on top pf her background glass.  Myrt is making short work of this window!


Natalie resumed work on soldering the second side of her  crab window.  By the end of the night she had it completed save for some touch ups and hooks.  Next week she'll give it a bath, color it and  be ready to start a new project.  Look to see this project showcased as a completed window in our next post.


And lastly we take a look at Jeanette's Kevin The Minion Window.  This is the back side which means that she has the front side soldered already.   Jeannette would most certainly have this completed next week but she's going to be out of state next week so we won't get to see Kevin completed until the following week.  There's still a little wire work left to do on his hands but that won't take long at all.


And that pretty much brings us back up up to date.  We have a fusing class occurring in two weeks so that will certainly be fun, especially since I know everyone who is signed up for the class.   Be sure to look for another update next week!

Paul
Bayou Salé GlassWorks

Monday, August 10, 2015

Déjà Vu and Idioms

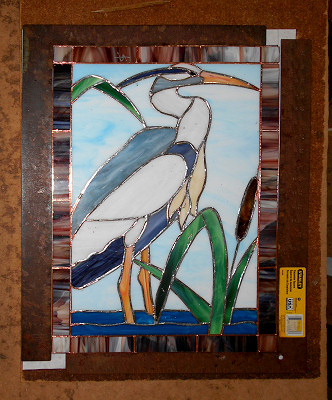
We've had another Weekend Workshop and as you can see from the pictures below, everything went wonderfully.  Our students included two familiar faces; Roxane and Angie, as well as two new faces, Natalia and Jacob.  Natalia is the wife of one of our weekly students (Charlie) and Jacob is Angie's son so it was a very familiar and friendly atmosphere.  But that's always been the case in any of our past workshops as well.  From left to right we have Jacob's Heron, Natalia's Daffodil, Angie's Crab, and Roxane's Heron.  Let's get into this and see exactly what they did while they shared their weekend with us.


We'll start with Jacob who began by cutting out his paper heron pattern and then traced those onto glass with a permanent marker (which isn't so permanent on glass).  Once his pieces were all traced out he set to work on separating them with a glass cutter.  As you can see, he decided to get his feet wet by cutting out his heron's beak and leg pieces first.


Jacob had no problem when it came to cutting glass.  Here is his window all cut out BEFORE being ground.  When things start out fitting this well you know that your grinding experience will go smoothly (no pun intended) and quickly.  In fact, I think Jacob may have finished all of his grinding first.


After he ground everything to ensure  a perfect fit Jacob spend the remainder of his first class  day wrapping his pieces with copper foil.  Its a tedious process but once you get the hang of it things get easier.  You can see things fit together beautifully and you can also see that Jacob is deciding between two pieces of glass for his border.  They are sitting on the right and on the top of his newly foiled pieces.


And here is Jacob's finished Heron.  As you can see he went with the glass on the right (gray) for his border and then he chose to leave his lead silver since it went so nicely with all of the grays in his window.  Jacob took to the copper foil method effortlessly (he's worked with Lead Came in the past) and really enjoyed himself.  In fact, he's already planning on things to do later on down the line which I'm sure he'll have no trouble with.


Up next we have Natalia who had her husband Charlie beside her every step of the way (for reassurance).  Using the cutter was a bit trying at first for her but after a few cuts she realized that you don't need to put an extreme amount of pressure on the cutter to make a nice score line.   Once she 'reeled in' all of that extra energy she was able to relax and enjoy the cutting process a little better. You can that she's about to begin working on some of her yellow flower pieces because she has her pattern pieces on top of the glass ready to be traced out and then cut.


Once her window was ground and everything fit into place perfectly she began foiling her glass pieces.  Natalia didn't have any problems with any part of making her window but if I recall correctly this was one area where she truly excelled.  I think Charlie may have a glass foiler for all of his projects from here on out! In the picture below you can see one of the border choices that Natalia decided not to use sitting atop her window.


When it came time to solder her window Natalia was full of doubt.  She was positive she wouldn't be able to do it correctly but when I handed her the soldering iron her first line wasn't bad at all.  I told her to take a deep breath, to relax, and to just move slower while doing the second line and then it happened-- She made a perfect lead line on her second pass!  Once she experienced how easy it was her confidence was over the top and she had no problem finishing off her first stained glass window.


And here's Natalia's finished piece. She changed the border from the color we usually recommend and it worked out so well that we've decided to use this glass for this window from here on out. I think this weekend really helped Natalia gain confidence with her artistic abilities because she was absolutely radiant with joy when she saw her completed window hanging in the light. And she SHOULD be proud of her work.


Now, our next two students should be familiar to anyone who regularly reads our Weekend Workshop Blog Posts.  Roxane and Angie have been here three times before so we upped the ante for them a bit by allowing them to pick out a subject for whatever they wanted to make and then I drew something that was a little more complex than the standard patterns.  Jacob also did one of these advanced patterns and I was impressed (extremely) that he had no trouble at all with it.

Angie had decided to make a Crab Window and although you can't see the pattern below you can see the glass that she's using for the ocean floor bottom.  She has her paper pattern on the glass and is utilizing the straight edge of the glass by aligning it to the straight edges of the pieces.  By positioning her pattern on the glass this way she avoids having to make the hardest cuts of all, a perfectly straight line.  Nonetheless, these were easy cuts to make and Angie picked them as her first cuts so she could get back into the grove of things since she skipped the glass cutting lesson that Jacob and Natalia had at the start of the first day.


Here's is a look at her window at the end of the first day of class.  Angie ground, wrapped and tacked her crab and ocean floor together and then traced it onto the glass she picked for her background.  Doing it this way made a perfect fit with just a minimal amount of grinding.  Here's you can see that the background has been cut and ground but not yet wrapped. 


With everything cut into place, ground, wrapped, and tacked we began Sunday by cutting her border and applying a brass channel to the outside edge of her window.  Below we see Angie intently soldering the front side of her Crab.  When it comes to soldering, slow and steady wins the race. 


Angie's blue border choice is the perfect fit for this window.  Note the little bead eyes that she's attached to the lead for a truly authentic look.  I was initially worried about the number of leg segments that Angie would have to cut to make this pattern look good.  The more pieces we add, the more time it takes to make and we only have two days in our workshop.  In the end we were able to come up with a pattern that featured nice detailed legs and claws without having to resort to extraneous lead lines that add extra pieces and take away from the flow of things.  It's really a beautiful window.  Angie is always blast to work with but next time I hope to be able to spend more time with her during our two days together.


And last but not least we have Roxane.  She wanted to do a Heron and her pattern came out a little taller than normal to make the pieces easier to work with.  But it's also a little smaller in width than our standard 16x20 windows so I guess it all works out in the end.  Here's Roxane laying out her paper pattern onto the white glass for her first cuts.


Roxane remembered how to do it all and before I knew it her window was ready to be tacked together.  She ended up picking a darker border than the one  that Jacob chose for his heron which looks more like a frame rather than an extension of the window like Jabob's does.  I'm equally pleased with either choice but I will admit that I was happy that Roxane went with a different border because it made sorting through all of the pictures I took that much easier for me!  There was one other difference between the two heron windows that helped me sort out which one belonged to Roxane and which belonged to Jacob.  Can you spot it?


It's amazing how different glass can look from one side to the other.  Here's Roxane soldering the back side of her window and notice how light the border looks on the other side.  When it lights up it will certainly be dark again which is the magic that having light behind a window will do to stained glass.  It's also something you should always pay attention to because glass can light up very differently from what it looks like when it's sitting on the table.


And here's Roxane's completed Heron. The dark border really sets this off nicely and made Roxane's choice of copper colored lead the best choice.  Have you eyed the other small detail that was different between the two heron windows?  The eye on Roxane's heron is all black unlike Jacob's which is white with a black dot in it.  It's a subtle difference but it does change the look more than a bit.  This is lovely work from the most danceyist woman that I've ever had the pleasure to meet-- and we will dance again!


It was a very fun weekend spent with four wonderful people who all had a great time together.  The fact that Angie and Roxane are well known to us makes things even more fun because there's no 'getting to know each other' period.  We just start laughing and having fun from the minute they walk into the door.  And as luck would have it they are both signed up to rejoin us again in next year (twice!)

Paul

Thursday, August 6, 2015

She Read A Book

Foiling.  Most students don't enjoy foiling their pieces but it's one of my favorite parts of the process.  Beginners to stained glass always assume incorrectly that the lead will cover their foiling mistakes but nothing could be further from the truth.  In fact, once lead is applied any foiling mistakes are exaggerated.   Lead will only adhere to foil, it cannot stick to glass.  If your foiling is haphazard, irregular and spotty then your lead will be that way also.  If you take your time foiling your pieces your soldering experience will go much smoother.   Well look into to this in more depth in the next few weeks.


Well, in just three short weeks Carol was able to outdo herself by making this incredible panel lamp.  Her attention to detail was amazing from start to finish and her soldering was magnificent.  I don't want to embarrass her but when someone does something this wonderful well I have to make sure that she gets her fair share of credit.  Let me tell you about the soldering on this:  I touched up two lines, that's it.  And they were fine as they were but Carol just wasn't happy with them. I'm just amazed at her work.  Carol is now our official Lamp Queen and I'm not saying that for brownie points, Richard!


This is Terry's Horse, her horse is amazing.  In fact, I've already had one student from another class ask about the availability of this pattern.  You can't lose with this design because it always looks great but when you put Terry into the mix well, you know you're going to have something extraordinary when it's completed.


Hip Hip Hooray!  Betty has completed her twenty-four(!) Angel Nightlights.  It may have been a bit overwhelming (twenty-four of ANYTHING is a bit much) but she got them all completed in record time and the craftsmanship just kept getting better and better with each one she turned out.  In fact, Betty is now my resident expert when it comes to putting a bead around the edges of suncatchers.


Cindy actually completed 5 of these Fleur De Lis Suncatchers but the camera's memory card filled up before I got a chance to snap the last one.  But this certainly shows you what Cindy accomplished this week.  And although these are suncatchers they are no small feat.  They're all nice and symmetrical which says a lot.


Then there's Ann who has all of the grinding completed on her latest Fleur De Lis Window.  She may not have noticed how closely I was watching her grind but I have to give her extra credit for placing previously ground pieces on top of other pieces and tracing around them to make perfect fits.  Why students insist on guessing how much glass to grind away rather than marking exactly what should be ground away will always confuse me.  Great job, Ann.  As you can see all of her pieces make a perfect fit all throughout the Fleur De Lis and her thin border never wavers in size. This is ready for foil.


Bonnie began cutting glass for her two Iris Inserts.  This is the bottom panel that will flow upward into the second pane of her frame and connect to it through the flowing leaves that trail up and out the top of this panel.  careful eyes may spot a stem leading upward as well which means that Bonnie will have a second Iris in the top panel as well.  I love the glass she used and have no doubt that this will be gorgeous when it is lit up.


Brenda is all set to begin a few more clear beveled windows and has started wrapping the bevels that she'll be using.  Here's one of them (though I'm not sure how many she plans to make I'm sure I saw at least a pair of these bevels sitting beside her).


Carol not only completed her Panel Lamp but got all but the yellow border for this LSU Window that she'd been working on at home.  She came in, added the border, started soldering and was working on the back side when she finally called it a day.  I have no doubt that this will be a completed window when Carol returns.


Charlie is just about ready to add the final border to the first of his pair of Beveled Window Inserts.  Before that final border is cut he's going to learn how to cut a stock, rectangle bevel.  It's very simple until you get to the wrapping part but then there's a trick to make it easy.


Becky S got the left half of her Bird Of Paradise Initial Window all tacked together (save for the background) and resumed work by starting on the right hand side of her window.  Her C has been cut from wispy black while the oval border has been cut from a solid black.  The border itself is a good 20 inches tall and it's only cut from two pieces of glass which means that the points where the two pieces meet mustn't be off by even a 1/16th of an inch, and as you can see Becky accomplished that easily.


Jeannette's Kevin The Minion Window looks great and is only a border away from being ready for solder.  She's done a great job on this and I'm sure the recipient of this window is going to love it because I already do.


Gale has her border all attached and her channel in place so she's taken her Humming Bird Window home to solder during the week.  The border took most of the night to complete but now that it's attached you can see the fruits of Gale's labor.  No extra work goes unnoticed when you are doing stained glass. 


As of this week Linda F has all three of her hearts ground and will begin wrapping and soldering them when she returns.  These should go fairly quickly for her because, let's face it, Linda's got a unique set of skills when it comes to stained glass.  :-)


Linda L has her first of three Beveled Transom just about ready.  The final border and brass channel was added during class this week and then she started soldering.  She's taken it home with her along with the other two so she could possibly solder the front sides during the week.  What a difference these are going to make to her house when they are installed.


Susan has her two Halloween Scarecrow Lawn Ornaments almost completed.  When she returns to class she'll start foiling these and then adding the final solder to finish this fun looking pair.  We'll hang these two smiley faces on stakes and see if they keep the birds away.


Mary Grace cut out the orange pieces of this Pumpkin Lawn Ornament while she was at home, came in and got the leaves and stem cut and then wrapped everything.  She's got her pumpkin tacked and ready for solder now.  Then when it's all soldered she'll tack on the leaf overlays and call it a day!


Myrt's Just got a few pieces of wing left to grind before she can start wrapping this.  In fact, she can start wrapping her pieces now if she wants because the easiest way to cut this background will be to trace around all of the butterflies and the flower on a piece of glass cut to the size of her window.  This will give her a perfect fit and a much quicker experience in cutting the background since things will fit almost perfectly from the start.


Natalie started soldering the front side of her Crab Window  after she got her border attached and her brass channel on.  It's been a while since Natalie has soldered but I feel great in saying that she hasn't forgotten a thing.  She's soldering at a slow but steady pace and the need for touch ups is almost completely non-existent because of this.  Slow and steady always wins the race.


Martha began grinding her angels now that they're both completely cut out.  She even has a great deal done on the first one but I turned my head for just a moment and Martha was outa here!  Before I even got a picture.  So enjoy this picture from last week again.


This is the back side of Paula's Mirror and since it has solder on it you know that the front is complete now.  That means that Paula will be moving along to another project when she returns because this just needs a few final touch ups and then a good cleaning.  I know that Paula will be exciting to get this mounted on the wall in her bathroom.  How will she do that?  Mirror clips!


With the bottom ocean floor all ground on Shelley's Aquatic Window you can see how this will be falling into place.  Yes, the top is in a bit of disarray, but that's the way it goes when you grind-- things get messier before they get better.  But you can surely see the progress that Shelley is making here as she works from the bottom up.


Sue is working on a larger version of the Scarecrow Head and she's changed the fringe around the neck so that it looks like suspenders  going over an orange shirt.  I love the ingenuity here.  It's always great to see students take a pattern and run with it.


Rowena has five of her six panels completed and the sixth one is already soldered on the front side.  That means that we'll be seeing these completed next week without a doubt.  All she needs to do is spend a few minutes soldering and then wash and color each window.  Next week I'll even have them arranged in the proper order so you can get the full effect of the finished window that these will drop into.


And lastly I have a 'sort of' picture of the Cross De Lis that Terry is working on.  Actually this was the first version of the design that was done but the cross looked like it was hanging a bit low so we re-drew it with the cross centered and the entire pattern looked so much better.  And that's the version that Terry is actually making.  But I forgot to snap a picture of that one so you'll have to get an idea of what she's working on from this picture.


And that's it.  We had four students join us this past weekend for another of our quarterly Weekend Workshops and we had two new patterns drawn up for this one.  That will be covered in our next post which will happen quicker than you might think.  Where is this year going anyway?

Paul