Well, in just three short weeks Carol was able to outdo herself by making this incredible panel lamp. Her attention to detail was amazing from start to finish and her soldering was magnificent. I don't want to embarrass her but when someone does something this wonderful well I have to make sure that she gets her fair share of credit. Let me tell you about the soldering on this: I touched up two lines, that's it. And they were fine as they were but Carol just wasn't happy with them. I'm just amazed at her work. Carol is now our official Lamp Queen and I'm not saying that for brownie points, Richard!
This is Terry's Horse, her horse is amazing. In fact, I've already had one student from another class ask about the availability of this pattern. You can't lose with this design because it always looks great but when you put Terry into the mix well, you know you're going to have something extraordinary when it's completed.
Then there's Ann who has all of the grinding completed on her latest Fleur De Lis Window. She may not have noticed how closely I was watching her grind but I have to give her extra credit for placing previously ground pieces on top of other pieces and tracing around them to make perfect fits. Why students insist on guessing how much glass to grind away rather than marking exactly what should be ground away will always confuse me. Great job, Ann. As you can see all of her pieces make a perfect fit all throughout the Fleur De Lis and her thin border never wavers in size. This is ready for foil.
Bonnie began cutting glass for her two Iris Inserts. This is the bottom panel that will flow upward into the second pane of her frame and connect to it through the flowing leaves that trail up and out the top of this panel. careful eyes may spot a stem leading upward as well which means that Bonnie will have a second Iris in the top panel as well. I love the glass she used and have no doubt that this will be gorgeous when it is lit up.
Gale has her border all attached and her channel in place so she's taken her Humming Bird Window home to solder during the week. The border took most of the night to complete but now that it's attached you can see the fruits of Gale's labor. No extra work goes unnoticed when you are doing stained glass.
Linda L has her first of three Beveled Transom just about ready. The final border and brass channel was added during class this week and then she started soldering. She's taken it home with her along with the other two so she could possibly solder the front sides during the week. What a difference these are going to make to her house when they are installed.
Susan has her two Halloween Scarecrow Lawn Ornaments almost completed. When she returns to class she'll start foiling these and then adding the final solder to finish this fun looking pair. We'll hang these two smiley faces on stakes and see if they keep the birds away.
Mary Grace cut out the orange pieces of this Pumpkin Lawn Ornament while she was at home, came in and got the leaves and stem cut and then wrapped everything. She's got her pumpkin tacked and ready for solder now. Then when it's all soldered she'll tack on the leaf overlays and call it a day!
Natalie started soldering the front side of her Crab Window after she got her border attached and her brass channel on. It's been a while since Natalie has soldered but I feel great in saying that she hasn't forgotten a thing. She's soldering at a slow but steady pace and the need for touch ups is almost completely non-existent because of this. Slow and steady always wins the race.
Martha began grinding her angels now that they're both completely cut out. She even has a great deal done on the first one but I turned my head for just a moment and Martha was outa here! Before I even got a picture. So enjoy this picture from last week again.
This is the back side of Paula's Mirror and since it has solder on it you know that the front is complete now. That means that Paula will be moving along to another project when she returns because this just needs a few final touch ups and then a good cleaning. I know that Paula will be exciting to get this mounted on the wall in her bathroom. How will she do that? Mirror clips!
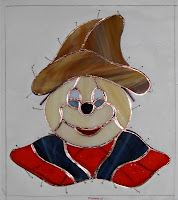
Sue is working on a larger version of the Scarecrow Head and she's changed the fringe around the neck so that it looks like suspenders going over an orange shirt. I love the ingenuity here. It's always great to see students take a pattern and run with it.
And lastly I have a 'sort of' picture of the Cross De Lis that Terry is working on. Actually this was the first version of the design that was done but the cross looked like it was hanging a bit low so we re-drew it with the cross centered and the entire pattern looked so much better. And that's the version that Terry is actually making. But I forgot to snap a picture of that one so you'll have to get an idea of what she's working on from this picture.
And that's it. We had four students join us this past weekend for another of our quarterly Weekend Workshops and we had two new patterns drawn up for this one. That will be covered in our next post which will happen quicker than you might think. Where is this year going anyway?
Paul


No comments:
Post a Comment