Tuesday, August 25, 2015

Richard, Richard, Richard!


One common problem we keep seeing occurs when someone starts a new roll of foil. What would be the lose end of the foil is secured with a two inch length of doubled sided tape (see B in the picture below).  A lot of times this tape is red and it's actually under the first wrap of foil.  To prevent the foil from coming off of it's backing a piece of clear tape is placed over it (see A in the picture below).  You should never wrap a piece of glass using foil that has either of these pieces of tape on them.  In fact, you should always throw the first full round length away on any new roll foil.  Solder will NOT stick to these taped sections of the foil!  I've had too many repairs to overcome this issue which has prompted me to post this as a Blog Tip.


First up in our completed projects is Jeannette's Kevin the Minion who is another fun looking cartoon character window.  The mouth was painted on and  Jeannette used wires to form the thumbs of his hands so there's a little extra work involved in this window.  The end result is (expectedly) wonderful and Jeannette's soldering is really taking shape now.


Terry's newest Tiger is certainly ferocious and has a wonderfully hidden cross in it.  It's easy to miss if you aren't looking for it and that may be the entire point in this subliminal window.  As always with Terry,  the work is top notch. 


And Linda L made this wonderful keepsake all on her own while at home.  She sent me the picture so I'm sharing it with you.  She took some sand and some small shells from a beach in San Juan along with a small scrap of paper with the details of her vacation and sealed them in a container that she made from 3x3x3 triangle bevels.  The end result is perfection!


Sue's Tiger Claw LSU Window is really taking shape here.  She has most everything ground and wrapped save for the seven clear background pieces surrounding the LSU. I think she'll be adding borders to this one when she returns to class next week.  And when we add borders we tack them on one border at a time.


Brenda's Beveled Window is just two small pieces away from its border and then she'll be soldering this.  I'm going to make a prediction here, and that prediction is that Brenda will have all of the glass cut for this when you see it again.


Ann's working on the triple border of her latest Fleur De Lis Window and it's very near completion as well.  The corners are still going to be a little tricky but  I have no doubt that they'll be cut when Ann comes back in.  She has some wrapping left to do but Ann is a very fast foiler so that will go quickly enough.


No, this doesn't say TOOT.  It's actually two beveled Crosses and two oval Bevel Suncatchers that Cindy completed this week.  You can't see the etched patterns in the ovals but hopefully we'll get a better picture of these when she makes a few more.


Vickie's Fruit Basket has 90% of its background cut out and it's reminded me of what a nice pattern this is.  I haven't seen this made since I was up in PA back in the 90's but I'm happy to see Vickie doing it now.  And not only is she doing it -- She's doing it beautifully!


Rowena's certainly been busy.  She has an Oval Fleur De Lis ready for a background and border as well as a Butterfly Lawn Ornament ready to be attached to a stake! And she's been cutting away at other projects that we'll look at next week as well.


And Shelley not only re-cut the glass for her top fish (in MUCH better colors than it was originally cut out of) but she manages to begin foiling this window as well.  It's a large window  standing more than three feet in length.  This may be one of those windows that needs a double border and if so, I have an idea.


Becky S joined the two large sections of her Bird Of Paradise/Initial Window and managed to get the inner border cut as well.  Once that's tacked together she'll only have the final clear outer border to go and then she'll be soldering.  She was toying with the idea of using two clear borders but we all agreed that it needed something to separate the central picture section.  I think it's worked out perfectly


Gale started another Fleur De Lis Window and she's matching her first one piece by piece, color for color.  I always say that the second time you do something it always goes quicker and this window is proving to be no exception.


Carol is also matching a previous project and in this case it's her Magnolia Lamp.  She has another table in the same room that a second matching lamp would look great on and this week she got 2/3rds of the way through that second lamp.  She also made the small Fleur De Lis Window that you see next to her two lamp sections and decided to add a second border to it. Expect to see this completed shortly as well.


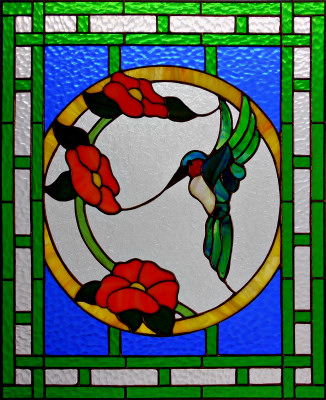
Linda F started this Humming Bird and Flower Window and is moving right along on it.  Although we've simplified the pattern a bit from the original there's still more than enough subject matter filling out the window.  And with just one night of cutting under her belt there isn't all that much left to go before she moves on to her background glass.


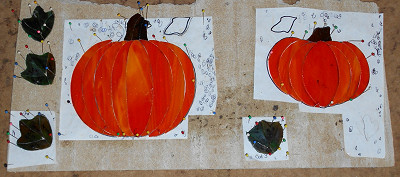
We have a three different students working on Pumpkin Lawn Ornaments and we're going to start by looking at Linda L's.  She's making 3 sets of these double pumpkins and she's got two of them pretty much under control here.  I suspect that we'll see her third pair next week.


This is Martha's first of two Angel Suncatchers and I've forgotten to mention that we switched up the pattern a bit.  The original design had the angel blowing a trumpet but Martha didn't want the horn so we just re-positioned the top wing to make it stable without the horn and Viola!  This is nearly wrapped now and will be ready to be soldered before you know it allowing Martha to begin wrapping this same angel but in another color.


Bonnie now has the background glass attached to one of her Iris Panels and will get the second one cut, ground, foiled and attached when she comes back in.  She did the tougher one first so the second one will certainly be a breeze for her.


And Jeanne's Tiger is fitting together perfectly.  As you can see there's only the tail left to grind and I don't see that taking Jeanne any time at all.  Once that's completed she'll be able to start wrapping this and then tack it together.  And the background will be a piece of cake.


Natalie cut and ground a Dragonfly and now that it's all wrapped she's all set to solder this when she returns.  I think she said that she was going to make this a Lawn Ornament which means that we'll just add a stake to this when it's finished rather than hooks.  She plans on making more ornaments and I expect to see another one started when she comes back to class.


Here's another pair of pumpkins that were made by Mary Grace.  They were even soldered before the end of class MG is going to add a few leaves to these before she washes them and then impales them on a stake.  That gruesome act will occur next week for sure.


Myrt's Butterfly Window is nearing completion as all of her glass is cut. Everything is tacked together save for the border which will be done when she comes back in.  I have to say that Myrt's grinding abilities are through the roof as this window fits as perfectly as anything that I could ever do.  I think it's safe to say that Myrt has her act together even if she does stand us up for Garden Club meetings every now and then.


This border was a fun one to do because although there are only two layers to it, it's essentially a triple border.  It has the same entwining design as a triple border but the key difference is that some of the second and third border section have been joined.  This allows the entwining sections to stand out much better but it's just as complex to make as a three border window.  But as I always say, any extra work you put into a window will always show in the end.


Susan has Lawn Ornament Pumpkins of her own under way and although they are different patterns and sizes I couldn't pick one or the other as my favorite. Both are ground and that means that they'll only need  little foil before they can be tacked, soldered and then staked!


Susan has also begun working on her Tiger window as well and is doing it using the 'Completion Backwards Principle'.  She cut her background out first to be sure that she had enough glass to go with the color scheme that she has planned for this project.  Looking good!


And in the end we take a look at Terry's Fleur De Cross Window which is nearing completion as she only needs to attach the border before she can start soldering it. Both designs stand out prominently but they compliment one another perfectly.  And using the glass that forms the cross as the border is the perfect way to go on a window like this.


And there you have it.  The end of August is almost here which is why we're seeing so many pumpkins-- October is just a few weeks away!

Paul

Wednesday, August 19, 2015

Turning Lead Into Gold

Accuracy is something that you should always strive for in your glass work.  Initially students believe that once a piece fits into place they are finished with it and ready to move on but this isn't always the case.  Remember that the window you are working on is a sum of all of its pieces and if they don't fit correctly your window will be off.  Sometimes the reason is easy to spot, other times it's just a general feeling because everything is off just a 16th of an inch.  Remember that even a a round peg can fit in a square hole, but that doesn't make the circle a square.
Below we have a basic octagon or 'stop sign' if you will.  If you cut it out and it looks like the image on the right (in blue) anyone will see that it isn't an octagon.  To make matters worse, it's not really off by all that much as you can see in the lower overlapping image.  Detail is an important key to making good stained glass.  Problems like the one shown below lead to windows that just leave the viewer feel as though the window is 'off'.  As I always say, if you're going to take the time to do the window you might as well make it the right way. 


If you want to see a window with all the right cuts you don't have to look any further than Rowena's Six Paned Falling Leaves Window which is officially completed and looking spectacular!  The patterns themselves were a careful mix of randomness blocked out within the confines of a structured theme.  I didn't point that out to Rowena but she picked up on it immediately and followed suit with her colors and her placement.   I must say that she handled it exactly as I would have which obviously proves that great minds think alike!


Gale's Humming Bird With Flowers Window is another example of stained glass perfection.  The circle is perfectly round, the straight lines never waiver, and the soldering is magnifique!  Gale has a penchant for perfection and her work clearly shows this.  There's nothing 'off' here.


The Flart has flown the coup!  Linda F's three Heart designs are all finished and don't they look great?  I especially enjoyed watching Linda make sure that her glass never left the outside lines of the pattern and never moved too far inward from those lines either.  It's what makes these three suncatchers look like hearts rather than a heart in need if a transplant.  Excellent work!


Natalie now has a Crab Window under her belt and it really did turn out to be a beautiful window indeed.  The red inner border was the perfect color choice and Natalie's soldering was spot on all the way through this project.  This was a very elaborate design but Natalie tackled it as though it was a beginner's pattern.  Natalie's been reading the blog and has been impressed with the Lawn Ornaments that she's seen so that's what she will be working on when she comes back in.


Linda L wrapped up the work on her last two Beveled Transom inserts and they look even better than her first one (if that's possible).  Some people say that you don't learn a lot doing beveled windows because so much of the window is already cut for you, but I'm sure that Linda will agree with me that there's more here than meets the eye.  Learning the best way to grind her background pieces is something that Linda will take forward with her to every other project that she makes with us.


Susan's got her two Scarecrow Lawn Ornaments finished and they look very cheery to me.  If I were a crow I'd land on these guys shoulders (as different as those shoulders might be) and try to be friends with them.  I love how Susan has taken complete control of her wire work and used her new found skill to add straw poking out of their hats.  It's just a little extra touch but it  adds so much more to these fun faces. 


Did I mention that we have some Lawn Ornaments because Paula's got a completed 3D Rose Lawn Ornament this week which is complete perfection.  She did such a wonderful job with this I forgot that she'd been out of our classes for a while now.  I guess it's just like riding a bike-- you never forget.  At any rate, Paula must really like the way this turned out also because she's started 2(?) more of them!


This is Carol's latest window and it's her rendition of the crab window that Jeannette had made a while back.  The colors are completely Carols and the work is flawless.  Carol had a bit of an issue with this when the biggest piece of the body needed to be replaced but you can't tell that there was once a time when this little crab was broken and causing Carol heartache.  Now he brings a smile to Carol's face. 


Here's Mary Grace's Pumpkin Lawn Ornament and even though it doesn't have a line running down the center it's attached to its post quite firmly.  Mary Grace is learning that if you just take your time you can make magic happen.  You get out of a project what you put into it and as you can see Mary Grace put a lot into this one.


A while back Vickie made her Butterfly Suncatcher but I had forgotten to take a picture of it.  She brought it back this week which reminded me of how wonderful her cutting and grinding was on this.  I guess that explains why her latest window is already looking so great.


Becky has moved back to the left hand side of her Flower/Initial window and that side features her Bird of Paradise.  This week she managed to get all of the background cut and ground.  You can't really see it in this picture (because it's all clear glass) but take my word, it's there and it fits beautifully.  Becky will be joining the two sides of her window into one big window and adding borders before you know it.


And speaking of background glass, Bonnie's Iris Window is ready for it's background to be cut.  The hard work is completed on this and since there aren't any borders that means that there are only 20 pieces left to cut and ground.  And those 20 pieces are very easy cuts.


Charlie's Clear Beveled Window is all tacked together and his front side is completely soldered.  With just the back side left to go I'd say that we'll be seeing this completed very soon now.  Charlie has come a long way from when he first walked in the door a few months ago.  He'll be started a second companion piece to this as soon as this one gets its back side completed.


Martha's first angel is completely ground and just awaiting foil now.  There's one very tiny piece that's missing but we're going to fill that in when this gets tacked together so we can insure a perfect fit.  It's just so much easier to handle it this was rather than re-cutting a new piece from the pattern which is surely off from the rest of the pieces at this stage of this Angel's life.


And Jeanne's Tiger Window is really taking shape now that she's begun grinding her pieces.  You can easily see that the right hand side of this window is fitting together perfectly.  Jeanne's speed has really picked up now that she's confident in working with glass and I have no doubt that this will look wonderful.


Linda L has begun working on this single image of two pumpkins which I believe will turn into a single Lawn Ornament when it's complete.  There's not much left to go on this pair, just some stems and possibly some leaves.  Expect to see Linda make a few more of these as the weeks go by.


Ann's made impressive strides with her latest Fleur De Lis.  With her background cut, ground, and tacked into place she's ready to begin the most complex part of her window-- the triple, interlocking border.  I've inked in the tricky corner sections on her pattern because unlike most borders these get confusing as you try to figure out what pieces span two sections and which two sections should they span.  I have no doubt that Ann will be very far along on them when she returns.


We have a lot of beveled window this week and Brenda's window, although clear and beveled, doesn't get lost in the mix at all.  This is a very stylish design that I initially drew incorrectly, so when you enlarge this picture and see that the bevels aren't in the right place rest assured that they are NOW residing in the correct place for this particular design.  We roll with the changed here in our classes!


Sue began working on this small version of the LSU/Tiger Claw LSU Window.  She's shrunk down the pattern so these claws aren't going to be near as easy as you might think they'd be.  She has half of those claws cut out and then there will just be background and borders left to go on this.


Look out because Terry's Tiger is nothing short of ferocious.  But then, if you look really closely you'll see the cross that he's sporting in the design!  I'm looking forward to seeing what this one looks like in the light so we can get the full effect of the subtle cross.  As I tiger alone I think Terry completely nailed this one!


Vickie's Fruit Bowl Window is all tacked together and her grapes are ground and wrapped.  This isn't going to be a nice window, it's going to be a STUNNING window--  In fact, it already is.  And next week she'll get her background all cut and hopefully ground.  I love showing someone how to cut from the actual glass pieces rather than the paper pattern.  There's always a little confusion and then a lot of awe when they see how quickly things go.


With just the top fish left to re-cut, Shelly has made this intense window look down right easy!  Interestingly enough, that top fish was the first one she cut out before I mentioned that her fish should best be cut from vibrant colors so they wouldn't just disappear in the strikingly bright blue water.  Now that it's all ground and fitting together Shelley plans to re-cut this fish when she comes back in.


Cindy began working on 3 Cross Suncatchers and she's learned the hard way that straight lines really require a strip cutter to make things go easily.  She has a third one all cut out and that one WAS done on the strip cutter so that should go far more easily for her.


Myrt got the rest of her background pieces cut out and has begun grinding them.  There are a few pieces left to go but since these were cut from the actual glass butterflies and flowers things already fit very well with just a minimum amount of grinding required.  Once this is tacked together Myrt can get her border cut and she'll be ready for solder.


Triple borders are becoming quite the thing here!  Betty is doing an interesting variation of an interlocking triple border that really showcases the interlocking part of the border by combining sections of the border.  It may not make sense right now but it will next week when you see how it all fits together.


And Mary Grace is obviously on a pumpkin kick as she has begun cutting out her own version of a Double Pumpkin Lawn Ornament.  She was paying attention when I told her that anything could be a lawn ornament because she walked in with this pattern and asked, "I want to do this but only the two pumpkins and the leaves.  Can we do it?"  And the answer is......................................(insert drum roll here)....................YES!


Whew!  It's been a hectic week and this post is a day late but it's finished now so I get to concentrate on the new set of classes that have already begun.  We also have a fusing workshop this weekend featuring Martha and Becky S.  It will be a busy first day but it should be fun as well.

Paul
Bayou Salé GlassWorks