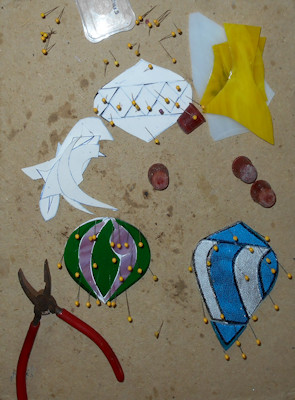
Monday, December 19, 2016

There's No 'L' In Christmas

Our tip this week is a seasonal one not related to glass but important just the same.   With the Holiday Season around us we want to wish everyone a Merry Christmas and a Happy New Year.   But most of all we want everyone to be safe especially around New Years.  Be happy and have fun, but be safe. 

So Rowena managed to complete her Peacock window just in time to ring in the new year with a new project.  This week she washed, colored, and then rewashed her Peacock window.  After that you'd think she was ready to move along to the Lawn Ornament Butterfly she brought along with her but instead she then took her tome and waxed window to bring out a nice shine to the copper.  It's stunning (as I knew it would be) and Rowena will be framing this large window in a wooden frame to hang it because wood and glass go together so very well and this window deserves the extra attention.


Speaking of spectacular windows-- Lara's African Woman (whose name I knew yesterday but can't remember for the life of me today) is astounding!  Believe it or not, Lara's new at this stained glass thing but she's been pushing herself with each new project (rather than doing simple projects) and it's been paying off in spades for her.   Her work on this is wonderful and she should be very proud of this accomplishment.


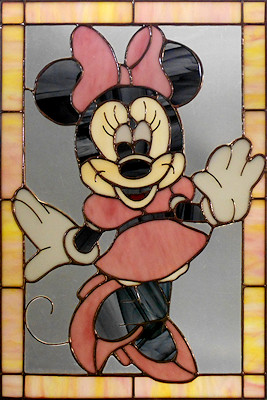
Jeannette finished her Minnie Mouse Window and it's spectacular.   Linda L saw the pattern and plans on making both the Mickey and Minnie windows after the new year and her inspiration came from this lovely piece that Jeannette has left in the shop.  The wire work on this is extensive but it adds so much detail that it really shouldn't be overlooked.  That said, it's not just the dress but the eyelashes that really make this Minnie Mouse Window rock!


Well now, Bonnie has completed her latest window in record time.  As I've stated before, geometric windows rely on perfect symmetry if they are going to look good and, as you can see, Bonnie's window looks GREAT!  This is how it should be done.


 Paula's last two boxes were finished well ahead of her Dec. 25th deadline and that's the way (uh-huh, uh-huh) I like it (uh-huh, uh-huh).   Perfection all around, Paula is willing to go the extra mile to make a project stunning.  Just look at those clouds in front of that moon!  And she even assembled the box bottoms herself which is no easy feat!


Tasha started this Owl last week and got it all cut out before she left class.  She took it home, ground it and even had all of her pieces foiled before she came back into class which guaranteed that she'd get this finished before she walked out the door again.  And here it is!   We were going to paint black dots to form the eyes but then Rowena said that we should try some googly eyes (which we just happened to have).  We loved the look and then Russ tried even bigger ones and , well, the rest is history.  This looks GREAT!


Brenda completed her version of the Christmas Bells Window and she made hers with a double border.   I've always been a fan of the double border but I'm far too smart to say I like this one better than the one Terry made with a single border because they both look GREAT!


Jeannette had a deadline this week and she managed to get both of her projects done in time so she could rest easier when she got back home.   There's nothing worse than having an unfinished project  in the days leading up to Christmas.  Luckily Jeannette managed to get this hand mirror finished and now she can focus on more important things this week (like maybe wrapping this in gift wrap rather than foil!)


Martha was able to finish all of her holiday suncatchers in time for Christmas just as I predicted she would.  And replacing the broken head of one of her angels was easier than she ever imagined.  Repairs aren't hard, they're just unfortunate.  In the end, these are a lovely assortment of suncatchers.


 I knew we'd see this completed when Carol walked in the door and she didn't disappoint me.  Mrs. C struck yet again with another window that blends perfect color and perfect cutting wonderfully.  Trimming a bevel in glass involves a lot of hard precision work but the end result is always worth it, wouldn't you agree?


Terry's Scarlet Letter Window was completed this week and she did yet another wonderful job with it.  The red 'A' makes me wonder if there's a story behind it though...


Myrt completed this Christmas Tree Ornament while she was in class and then moved onto another one with even more pieces to it.  Another great job with flawless execution!


Terry also worked on another Christmas Window which features a large bow perched atop a white poinsettia.  Again, this is Terry's design and again she's done a beautiful job with the patterns creation.


Ann's latest Cross Window is officially ready for its final border.   She got the first one attached and then added a clear second border which is very hard to see in the picture.   Once the third and final border is attached you'll be able to more easily appreciate just what she accomplished this week.
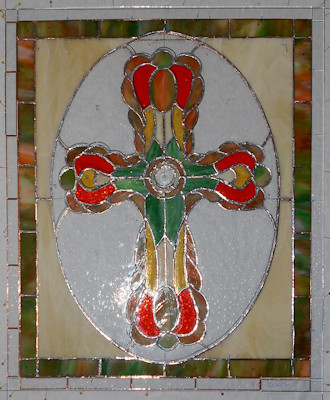


And Becky S got her flowers all tacked together.  One that was accomplished we slid her clear background glass under the finished piece and then carefully traced around everything.  We then took the glass out from under the window and used a ruler to precisely add grid lines to the clear glass.  Everything has now been cut and a lot of it is already ground.  Once the pieces are wrapped in foil you'll easily see how all this extra work has paid out.


Betty's got so much of her Fleur De Lis cut and ground that I can see the end of this project fast approaching.   This week she learned how to cut and fit the bevels into the open, circular sections of the FDL.  Many people love this window but don't understand why certain pieces HAVE to be cut from certain pieces of glass.   The extreme closeup nature of the window gives it a wonderful look but the bigger picture is definitely obscured.  One day soon we'll discuss how this window looks with a wider field of view.


Carol made this cute Frog Night Lite while she was in class but it's a little different from the last one she made.  In this one the eyes are actually soldered into the frog body-- only the hearts have been tacked on top of the rest of the piece.    I'm not entirely sure but there may be a wire mouth that gets added to this as well.  Time will certainly tell.


Susan R completed an Easter Bunny last week and then went to work on this NOEL suncatcher.   She's made excellent progress and has decided to use clear glass for her fill-in pieces to make the suncatcher to support itself without bending in half.  Although there's still a week left to go before Christmas gets here I have a sneaking suspicion that this is being made for Christmas 2017...


Linda L loves all thinks Mickey so she began cutting glass for a Santa Mickey Mouse Window this week.  She's already made great progress and you can really get a feel for what this will look like when it is completed since a lot of this is cut out already.


Mary Grace got her red letter 'A' completed and then went to work on her yellow version of the same window.  She's got all the glass cut out and will surely finish it while at home.  Mary Grace is feeling more confident with her work and it's really showing with every step now.


Sheri has all of the pieces to her Peacock window all cut and tacked into place.  She'll be soldering this over the holidays and even though the final channel isn't attached (she's making this window without any borders) she'll be able to flip it over to get the back side soldered after the front is finished.  If she gets it all soldered we'll add the zinc channel to this when she returns.


Linda F continued working in her Autumn Leaves Window and she now has all of the glass attached and tacked together.  Before she left for the year she got a brass channel attached as well so this window is all ready to be soldered.


Shelley made sure to bring her pattern along with her and managed to get all of the glass cut out for her three legged cat window that her son has drawn.   We'll be applying a face onto the cat with paint when it's finished which won't be long now.


Susan D almost got her second Christmas Tree completed.  What's left she'll easily do at home so consider this project a done deal.


Next we take a look at the second Christmas Ornament that Myrt was working on this week.   She has it all cut out already which means that all she has to do is grind all of these tiny pieces until they fit together to form her newest tree decoration!


And lastly we look at the picture that I took last week of Lynn M's Tree Of Life window.  Somehow I managed to let her slip out with her window before I could haul out my camera.  She's almost got it all ground and it's looking wonderful so I'm thinking that very shortly after the New Year Lynn will have this completed.


And that wraps things up for 2016.  It's hard to believe that it's flown by so quickly but when you look at all of the projects that have been finished this year it's hard to believe that so much could have been accomplished in such a short amount of time!  We want to wish all of our students and readers the very Merriest Christmas possible and we also want to wish everyone a Happy New Year as well.   We won't be back until the third week of the new year but I promise that we'll have plenty to show you and that it will be well worth the wait!  Take care, we'll see you soon!

Paul and Russ


Monday, December 12, 2016

They're All Charming People


Your soldering iron is a tool that does a lot more than just melt lead-- it also plays a big part in how smooth and rounded your bead is as well.  All of our students know that they should keep the tip of their iron clean but you should also pay attention to any build up that occurs on the shaft of the iron as well.   The red arrow below points to the spot that everyone cleans regularly but the blue arrow points to the most neglected part of the iron.   When (not IF) you see crust forming at the point where the tip meets the barrel you need to clean it off immediately.  A quick drag across a damp sponge won't do the trick here.  Instead, grip the crusty substance with your Breaker/Grosier Pliers and lightly rotate the iron while holding the pliers still.   Removing this crust will help keep your iron hot and more importantly, prevent your tip from burning up on you.

Also, never forget to unplug your iron if you won't be using it for over a minute.   This alone will add months to the life of your soldering iron.

So, WOW!  Linda L's Fleur De Lis is completed and it looks absolutely incredible!  It was certainly her attention to detail from start to finish that made this turn out so beautifully.  I'd put this along side the one I made any day.   Linda has never been afraid to tackle a challenging project and I can honestly say that she learned a lot while making this.  Her talents just keep on growing.


This is Paula's latest Keepsake Box and the irregular curved front made this one a little different and a whole lot more whimsical!   All in all it's another top notch job by Paula. 


Terry's Cypress Tree Window was completed before I really got to say anything about it while it was under construction.   She also did an amazing job and this is a pattern that I'm sure we'll see used again.  I love it!


But Terry didn't stop with her Cypress Tree Window-- she also made this variation of the Jesus Fish Cross as well. 


And this is the first of Susan D's Christmas Tree Lawn Ornaments.  As you can see it fits together perfectly.  She's got one more in the works and I know we'll see that completed when she comes back in.


Brenda completed her Beveled Transom Window and she even sent me a picture of it as it was being installed.   To both the left and right of it peeking out from behind the curtains you can see two other windows that she will begin working on after the new year.  You have to admit that beveled transoms really add elegance to a house.


Cindy sent me a picture of these three suncatchers that she was working on while she was at home this week.   More beautiful work from another talented student for sure.


Becky is about ready to add the background glass to her Tulips Window and it is coming together beautifully.  I see no reason why the background won't be cut and ground when she comes back in.  Becky plans on adding a clear border to finish this off and then she'll begin soldering.


Carol's newest window is a Beveled Fleur De Lis that we've seen done before but the twist to this one is that she's added a colored trim around the Fleur De Lis that matches the final border of the window.  It's certainly stunning!


Our next Fleur De Lis is not just a fleur de lis, it's a tiger's head as well.   Jeanne finished soldering the front side of this while she was in class this past week which leaves her with just the back side to go.  Jeanne may very well wrap this project up when she comes back in.


This Tree Of Life Window by Lynn M is fast becoming a favorite design of mine.  The leaves were made entirely out of scrap glass and the color coordination was done by luck of the draw.   That's right-- she'd pick a few pieces and then pick a random color to use with them.   The end result is this wonderful window which is now three quarters ground.   She'll be foiling this before we know it!


Lara's African Woman window was all tacked together and got its channel attached at the beginning of class.   Then she managed to get the front side of this completely soldered as well.  This is another window that will surely be a done deal next week.


Here our latest look at Betty's version of the Fleur De Lis Window.   She's using the same pattern that Linda L and I had used but she's changed the colors ever so slightly.  Most of the Fleur De Lis is ground and wrapped which means that Betty will begin working on the inner clear pieces that trace along the FDL.  Once those are completed she'll be able to start cutting her bevels and then add the final three borders to this.


Paula's newest box is a Rose Bud design which she made the bottom for while she was in class this week.   She's got one week of classes left and two boxes to go which I suspect she'll easily get together before Christmas arrives.  Look to see them completed when we return next week.


Then there's Tasha who cut out this Owl Suncatcher in record time and even got a lot of it ground as well.   You can't see the pieces that make up the eyes yet but there was a trick to cutting them out that we'll discuss further in weeks to come.


We're at the home stretch now because Sheri's Peacock Window is almost all cut out.   There are still a few filler pieces left to go for the background but once that's done she'll add some channel to this and then get soldering.  The end is near! 


Shelley had forgotten the pattern pieces for her Three Legged Cat Window so she started working on this wonderful Glass Glob Tree.   She's picked out the color scheme she'll be using and has ground of of the globs so the foil will stick to them.   Since there are only actually six pieces of glass to cut in this window Shelley may very well finish it in record time.


Mary Grace started her second 'A' Window and went with a red color scheme on this one.  She's got one more left to go after this and that one will be yellow.  There's also a good chance that we'll see that started when she comes back into class.


Here are Martha's thirteen Christmas Suncatchers all soldered and ready for hooks and halo's.  We also have an Angel head to repair when she comes back in but for all intents and purposes these are done!


Brenda is ready to solder her Christmas Bells Window and she would have had her Candy Cane completed but at the last minute we found a broken piece and she had left the glass for it at home.  Much like Martha's projects we're going to consider these a done deal as well.


Susan R has made a hop from Christmas to Easter all in the span of one short week.   Now that her Christmas Ornaments have been completed she's decided to look ahead to the near future and start preparing for Easter.  She got this Bunny Lawn Ornament all cut out and ground in just one class and if you look closely you can see that a lot of it is wrapped as well.  Now that's what I call progress!


Terry's got an 'A' Window of her own started and she got the border cut out for it while she was in class.   She also has her window repair just about repaired as you can easily see below.   There's only the back side left to solder and then it can go back to its owner.


Now that Linda L has her Fleur De Lis Window completed she's ready to move along to something a little easier and less stressful.  This Santa Mickey seems to fit the bill!   Look to see some glass cut for this when Linda returns next week.


And that's it this week.  We have a lot of Windows about to be completed so next weeks post may be filled with finish projects!

Paul
Bayou Salé GlassWorks

Tuesday, December 6, 2016

You Deserve a Break Today

Last week we discussed the importance of using a straight edge when cutting straight lines and this week I'm going to demonstrate why that is so important.  If you are cutting something curved and your curve is off a bit your eye usually won't notice it (unless you are cutting a circle).  A simple curve has a fair amount of leeway before you can see that it's off.   Look at the image below pick the curve that you think matches the top curve.


Now, instead of telling me which curve you think matches tell me how long you looked at those curves to make your choice.  2 seconds?  5 seconds, 15 seconds?  30 seconds?  Now look at these shapes made of straight lines and tell me which one was made with a straight edge to draw the lines.


How long did it take for you to see that the box in the upper left is the only shape made up entirely of straight lines?   It's fairly apparent even though each of the 'bad' lines only vary by 2 pixels at most.  A line that is crooked is very easy to spot while a curve that is off may never be noticed.  That doesn't mean that you shouldn't pay attention to your curves-- it means that you should pay extra attention to your straight lines and always use a straight edge to cut them. 

And lastly, I sort of tricked you because none of the curves match each other in the first image so if you think any of them do then my point has truly been made!

OK, with that out of the way let me say that Tasha's Standing Vanity Mirror had the cards stacked in its favor to be an amazing piece and now that it's completed I can honestly say that her attention to detail in the grinding and fitting of all those small flowers and leaves has certainly paid off.   Attaching the mirror to the shelf proved to be a bit taxing and although the finished piece is sturdy, it is something that needs to be handled with care.  Nonetheless, this is certainly a beautiful piece of glass.


Terry's Christmas Bells Window is finished and looking even better than I ever thought it would (and my expectations were high for this).  She's used leaded glass sections for the stripes of the bells as well as the clappers and the effect is wonderful.   Needless to say, the colors are as perfect as the design itself!


Paula managed to complete four of her boxes this week and they all look equally wonderful.  She's learned how to attach the tops to the bottoms using plenty of scotch tape, two small pieces of wire, and two drops of solder.  Once the solder is applied the tape is removed and you have a perfect hinged box.  Paula has 3 more to go before Christmas and I have no doubt that she'll complete them in time.


Susan R's pair of Christmas Wreath Suncatchers are every bit as beautiful as I remember this pattern being.   I used to sell these in amazing numbers every Christmas but I've somehow forgotten about them over the years.  Well, thanks to Susan's wonderful work they are in my mind once again.  Don't you just love these?


This Christmas Tree is the first of Martha's many Christmas Suncatchers that are under way.  We completed this one quickly because we used brass channel to surround the entire tree.  Since it was all straight sides this was easy to do and it prevented the tree bottom from just twisting off (straight lines in stained glass are never a good thing).  O Tannenbaum, O Tannenbaum, Wie treu sind deine Blätter!


Cindy put the finishing touches on her Cross Suncatcher while in class and then slid the pattern on over to Martha so she can begin one of her own.  The bevel in the center usually doesn't photograph very well but it shows up perfectly in this picture.    


Terry worked on two different projects this week, one being a repair and the other being a Tree Window.  The repair is on the right and the original Cypress Tree pattern is something that Terry designed herself.  I think it's amazing, yet I fail to understand how she manages to surprise me with her original designs as much as she does since this is the norm for her!


Roxane's 1189 Street Address Window made some MAJOR progress this week as she managed to finish grinding the numbers and background as well as get a border cut to size for it.  She's added a thin white strip of glass along the top and bottom of the background glass so that the red numbers don't bump against the blue border.  It's extra work but it helps give some space to the numbers and allow the window to 'breathe' a bit more.


Bonnie has all of her Traditional Geometric Window tacked together now and has moved along to the soldering process.  I've been impressed with how quickly and exactly this has come together for her.   All this needs is a little solder and some channel and then we'll call this a completed window.


Mary Grace worked on her first Beveled 'A' Window and managed to get all of her background cut, ground and attached followed by the outer border as well.  And just for good measure she also got her brass channel tacked on as well.  And let's not forget about having the front side soldered also!  She'll be working on her Red 'A' Window before you know it.


Lara's African Woman Window has so much attention in all of our other classes that it's hard to believe.  I've never had so many students ask to see a window that was still being worked on!  This week Lara got her two borders cut and ground so this is nearing completion.  She's taken it home with her where she will attach the final border and maybe even get some soldering underway (if time permits).  This is stunning.


Jan completed the wrapping of her second Bookcase Window and then tacked everything together so we could get a zinc channel on the outside perimeter of it.  Once that was done she began soldering it and almost completed the front side.   That means that she'll most likely finish this when she comes back in next week.


Cindy not only completed her Cross this week-- she also began working on these three Christmas ornament suncatchers as well.  She already has two of them cut and ground so look out!


Jeannette's Minnie Mouse Window is all soldered and would be ready to be washed, colored and waxed, but  there's still some wire work to do on it.   Minnie looks great already but when you see the accent wires attached to this you'll see Minnie all dressed up to the nines.  And that will surely happen next week.


Here are the rest of Martha's Christmas Suncatchers, all wrapped and ready to be soldered.  I know she's been soldering at home so it will be interesting to see how far along she is on these when she comes back into class.  I know they'll be completed in time for Christmas but with a little luck she'll have them finished when she comes back next week.


Ann made major progress on her Cross Window by getting the four corners cut and attached.  She has the strips for her first border cut and ready to be cut down to the proper lengths so she'll have a second border attached by the time you see this again.


Our first Industrial Fleur De Lis is Linda L's and just minutes before class was over with she proudly exclaimed, "I'm finished!"  She's done a wonderful job on this and next week she'll color it and then we'll get its final picture.   Talk about a gorgeous window!


Our second Industrial Fleur De Lis is being made by Betty and although she started this just two weeks ago she's already making great progress with it.   In fact, she's got most of the FDL and the clear pieces that will form the thick lead lines ground already.  That's what I call fast work!


Sheri has most of the grided, bottom portion on her background cut and wrapped and she'll be tacking it to her Peacock Window before she cuts out any more background pieces.  This is how it's done when you want grid work to line up perfectly.  Sheri is nearing the end of this project and I can't wait to see it with light behind it.


Our second Peacock Window is being made by Rowena and it's all completed save for the channel and framing.   I'll look it over for any problems with the soldering but Rowena knows what she's doing so I don't expect to have to do much at all to get this ready to be colored.   She's purchased a wooded frame for it as well so this more than three foot tall window will really bea finished piece of work.   I can't wait to photograph it next week with some light behind it.  BTW, this is the back side.


Brenda worked on her Beveled Transom Window this week and actually almost completed it.  We'll see the finished version next week but until then let's look at the Christmas Bells Window that she's making.  The colors have been changed to protect the innocent but you just can't lose with a pattern like this. 


And lastly we look at the picture that will soon inspire a window as Shelley begins her three legged cat window which will be based on this drawing that her son made.   It will surely be interesting to watch how this progresses from painting to glass.


Christmas will be here before you know it and I want to mention that we'll be taking a bit of a break for the holidays.  When we disappear for a few weeks I don't want anyone to be concerned because we'll certainly be back in 2017!!!  Be sure to come back for the next two weeks though because there are still two weeks left before we take that break.

Paul