Sunday, July 3, 2022

What Do You Mop Your Floors With?

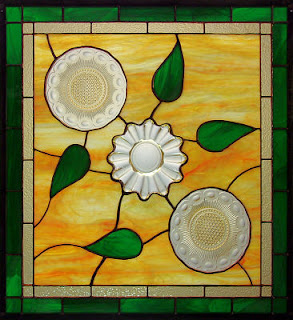
Check it out, Susan has finished her Plate Window which she designed herself!  She had seen the plate-in-a-window idea online and when she saw the Flower Plate Window that Linda L had made about a year ago Susan decided to run with the idea and come up with something of her own.   She wanted plates as flowers with a vine running behind them and that's exactly what she got!  She worried about the splits in her border pieces but she did a beautiful job figuring out where those cuts should reside.  Perfection all around.


Well, this is a first and I'm sure that it won't be the last because after Cindy completed her Blue Bowl this week  she immediately began coming up with a color scheme for the next one that she plans to make.  Now this can't me used for food, lead free solder or not, but as a decorative piece it really rocks!  I'm also expecting other people to begin making these as well.  The best part of this is that there's no pattern required-- just a stainless steel bowl and some random assorted cutting and fitting.


Susan D also finished the Bird On A Branch that she'd begun last week and since she's made five of these now I think we can safely conclude that she can complete one of these each and every week (as well as working on a second and third project as well).


Truth be told, I love when students come up with their own patterns and Let (our newest student) designed this herself while she was at home and brought in the finished piece so I could take a picture of it.   Circular projects are far more difficult to make over square or rectangular pieces and that makes her Peace Sign even more impressive.


As you can see,  Lisa's no longer working on single feathers but combining them into 'Feather Bouquets'!  This is her first and my hat goes off to her for NOT making the mistake that many people would make when picking colors for this.  Most people would make two identical fathers which would result in a large clump of one color where the feathers overlap.  Lisa steered clear of that by making one feather brown and tan and the other blue and tan.  This allows you to clearly see a distinction between them resulting in a colorful and easily recognizable pair of feathers.


Robert can make a beveled border Transom type window with the best of them at this point.  In just seven days he assembled and soldered 3 more windows to add to his collection.  Some of these will be installed running taller than wide but they fit within the confines of this blog better in this direction without losing any of their charm so that's what you're seeing here.


Never one to sit still, Cindy also completed a Landon Water Tower and Blue Angels Box.  Blue Angels, you say?  Yep, look in the sky (above the water tower) and you'll clearly see the silhouettes of six F/A-18 E/F Super Hornet fighter jets.  The picture on the right shows the lid partially opened.


Betty took our standard Bee Lawn Ornament design, shrunk it down, flattened it out and turned it into a rather delightful Sun catcher.  You can't lose with this design and Betty knows that because, as you'll see further on down below, she's got two more of these almost completed already.


Susan R completed her second Rose Bud Ornament but I forgot to snap a picture of it.  I figured that I'd just throw the one she made last week into Photoshop and change the color from red to pink but this was the best I could come up with.  I was able to easily (and believably) change the flower color to blue, orange, purple, yellow, violet, or even green(!) but pink was elusive to me.   Nonetheless, even though the color is off by a mile, the design itself clearly matches what she made this week.



Meanwhile, Susan D is taking advantage of these hot summer days and firing up her kiln to about 1500 degrees to create wonderful glass Bracelets.  These innocent looking baubles have something which isn’t innocent at all: touchability.  Light COE-96 glass fused with assorted shards of color.  A delicate, almost silk-like feeling. One size fits all while maintaining a deliciously relaxed fit.  These are innocence and mayhem all at once.


As you can see, Let is already well under way with her newest project.  These two Cardinals nestled in a series of branches are about to become her latest and greatest window.  She's moving along at lightning speed both in class and at home but the quality of her work never reveals the speed at which she's making these windows because her pieces always fit together perfectly.


Susan R showed me a picture of a geometric suncatcher that she wanted to make but the picture was out of square so we didn't use that as a pattern.   I've always had trouble making these circular spirals perfectly so that you could use a single pattern piece to make the entire design but this time something clicked in my head while drawing it out and I stumbled upon the secret to rotational patterns.   And I'd say that it worked because Susan used one pattern piece to cut this all out and it already fits together wonderfully before she's even taken it over to the grinder.


Speaking of geometrical patterns, this one has been making its way around the internet and I should have guessed that it would appeal to Cindy. She started it when she walked in the door and by the time the night was over she only had two more 'bands' to go before she can begin wrapping her Polygonal Spiral.  It's like a math equation exposing its inner beauty. I wonder if I can find a video of this rotating somewhere online...


Ann is back!  Her walk through Spain was an incredible experience and now she's even more inspired to get this colorful 3D Cross Window assembled.   I had thought the cross was going to be tacked on top of the pieces but Ann actually wants it to be raised from the window.  We'll do that with posts and I have an idea for the cross itself that I want to run past her when she returns next week.


June's Nurse Window has been tacked together and she even managed to get the background for it all cut and ground.  The background glass is next to impossible to see in the picture because she picked a wispy white glass which disappears when it's resting on top of the white pattern paper.  Trust me when I say that it will show up wonderfully once this is hanging in the air and off of the table.


Betty's got two (well, technically three) other projects that are each very close to being completed.  As I mentioned up in the beginning of this post you can see here just how far along she is with her other two Bee Suncatchers.  Also, Betty has her Pendant Fleur De Lis all tacked together and has the front side of it completely soldered.  With only the second side left to go I'm fairly sure that we'll see this one hanging up in our next blog post.


I jumped the gun last week when I said that Barbara had six of the eight panels ground for her Flower Panel Lamp.  She actually 'only' had five of them ground.  This week I can very factually state for the record that she only has one more panel left to grind before this lamp starts coming together in a big way.


Barbara also has two irons in the fire with this Hibiscus Window being the second project that she's working in one week.  It's all cut out and she's even got a large chunk of it ground already.  That's some quick work indeed.


Judy has all of her Teddy Bear Window ground and the first thing I need to say is that he most certainly no longer looks evil.   It's all about the eyes when it comes to faces and this bear is no exception.  We also removed the super dark (almost black) snout pieces and although we don't have the new pieces cut I'd say that Judy could easily use the same glass that she used for the rest of the bear and he would look great.  She's begun wrapping this and once it's tacked together we'll place different sheets of glass underneath it to see which color Judy will end up picking for the snout.


Here's a fun picture of Steve and Russ joining two heavy pieces of copper rod together with solder.  A simple spot of lead would never hold so Steve has overlapped a good 4 to 5 inches of rod, secured them in a vise, and used a blow torch to melt the solder onto both pieces for a nice secure joint.   Copper solders extremely well but the more of it there is the harder it is to get hot since it's also an excellence conductor of heat.  That's why Steve has a torch involved here.  What is this going to be?  I'll hopefully reveal that to you next week when the framework is completed.  I don't want to ruin the surprise.


Mary Grace has her second Peacock tacked together and will begin cutting out her background pieces when she returns next week.   We're going to re-adjust her two brown branches so that they come out to the edges of the window and perfectly match the first version of this that Mary Grace made.  Rest assured that the re-cutting of those two branches won't take any time at all. 


As promised, here's a look at the next Bird On A Branch that Susan D is working on.  With just the leaves left to cut out she's well on her way to getting this installed into her 'Bird Window'.   How many birds can you fit in a single window?  I promise to get an answer to that when I talk to Susan  again.


Linda L's third Beach Scene is all cut and ground which means that the only thing left for her to do is wrap three more pieces of glass and then solder it.  This will undoubtedly be finished when Linda comes back in next week.


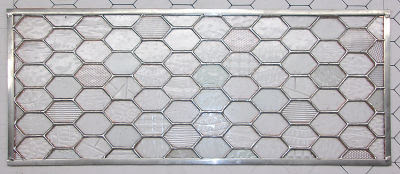
MiMi's final Hexagon Window is tacked together and has its front side completely soldered!  I'm positive that she'll get the back side soldered and have this ready to be installed well before class happens next week.  So then, that means that this is it.  Pop open the Champaign and let's toast to MiMi's mental well being after spending a year and a half on the same project which involved thousands of the same piece over and over and over and over and over and over and over...   Look out stained glass world-- MiMi is free to do whatever she wants to now!


Steve got his second Sunflower Suncatcher ground, wrapped, and soldered before moving over to his copper wire frame that required the use of a blow torch.  If I'd have realized that the only left to go on this was the wire work I would have finished it for him!  Next week for sure.   


And with all of her pattern traced out in its entirety, Sheri is ready to start working on one of the flowers in her Peony Window.  Top or bottom flower I don't know but we'll surely find out upon Sheri's return.


And there you have it.  This is an early post due to the fact that Monday is a Holiday and I didn't want this post to be hanging over my head.  Expect another tip at the end of the week which will put us back on schedule.

Paul

Saturday, July 2, 2022

Cutter Maintenance

Your glass cutter is the most important piece in your stained glass tool kit.  Although your cutter is small and can easily be hidden in your pocket you should never overlook it or take it for granted.   Cleaning your cutter will make your glass cutting go much smoother. 

First, let's identify the cutter parts.  Yours may not look exactly like the one in the picture below but the same parts exist and are located in the same place no matter what brand of cutter you may be using.  The scoring wheel is at the extreme bottom of the cutter.  It's VERY small and resides in a slot that the wheel's axle is mounted to.  The cutting wheel actually spins while you are cutting.  If it can't spin freely your score line will be disjointed which results in erratic breaks.  As the wheel is spinning, small bits of dirt and dust particles become trapped in the slot above the wheel.   Once the slot is packed with dirt and grime your cutter stops performing well.  It's your job to clean it out so that your score lines run smoothly.


Cleaning is very simple and takes less than 5 seconds.  Simply take a straight pin and gently push it into the slot above the wheel to force out any grime and grit that has accumulated there.  It may take a few pokes to clean it out but when you've made a few passes with the pin you will hopefully be able to see through the slot.   If your cutter has a long oil wick you may not be able to see through the entirety of slot but you will see a lot of dirt and debris come out.  You'll know you are finished when the pin travels through the slot with very little effort.  

Always keep your cutter's wheel in a SMALL amount of oil when not in use. An old coffee mug with a circular piece of sponge lightly soaked in oil is the best place to store your cutter when it is not in use.  Just take a sponge and cut it into a circle that fits snuggly in the bottom of the mug.  Again, make sure the entire bottom of the mug is covered or your cutting wheel will slip off the sponge and onto the bottom of the mug thus defeating the purpose.

Paul 

Bayou Salé GlassWorks

Tuesday, June 28, 2022

Trottin' Around The Problem

Let's Hummingbird and Flower Window turned out wonderful!  For a new(ish) student Let has just jumped into the deep end of the stained glass swimming pool and started swimming with the best of them!  Beautiful work indeed.


Lisa's created two feathers using assorted colors which I suspect may very well be small scraps that she might have had just lying around.  Scraps or not the end result is splendid and Lisa's work on this pair of feathers is equally resplendent.


Robert is the king of the 'Transom Window' and this week he got yet another one completed (along with two others started.)  I will be downright upset if he doesn't manage to get at least one more of these completed when he comes back in.


Steve's got his first Mini Sunflower Suncatcher finished with another one pretty far along in the queue.  I've got to call out his excellent wire bending abilities as well as his skill at adding a solder drop at the end of the wire to cover any sharp ends.   He's easily got twice as much lead on his ends as I  normally apply and I like his look a WHOLE lot better than mine! 


To wrap up our finished projects we look at the newest 'Pendant' Fleur De Lis window that I made.   I made a very similar design way back towards the end of 2018 but this time around I enlarged the design by 15% and changed the color scheme to give the FDL a more 3D effect by utilizing three similar colors instead of two.


Okay so wait until you see this.  Cindy is working on a bowl design using a series of irregular shapes (and openings.)  She's using a stainless steel bowl to curve the design and in a complete stroke of ingeniousness she is building it inside the bowl rather than on the outside as one would 'normally' do when making something curved like this.  I've made so many lamps that my mind was stuck on building on the outside of the mold but Cindy's method is amazingly craft-- and so is her design!  I'm hoping this is finished next week because I can't wait to see it completed.


As I suspected, Judy has finished cutting all of the glass for her Teddy Bear Window and has moved along to grinding each of her pieces.   She's well under way and soon we'll see exactly what this Teddy Bear is going to look like.   She's worried that he might look a bit mean but I think it's only because the snout of the bear is black.   We're going to re-cut those two pieces out of a dark brown and I believe that color change will soften this bear up immensely.


June has the majority of her Nursing Window wrapped which means that next week she'll be able to get this tacked together and then get the background cut to square it all off.  With a little luck she'll also be able to get a border cut as well.  I certainly have my fingers crossed.


Susan D's Flower/Plate Window came into the shop completely ground.  That means that Susan put  her glass saw to work during the week because some of these pieces would have been a bit hit or miss had she tried to cut them by hand.  As you can see she has the center tacked together and her first border cut out and ready to be ground and wrapped.   The end is near!


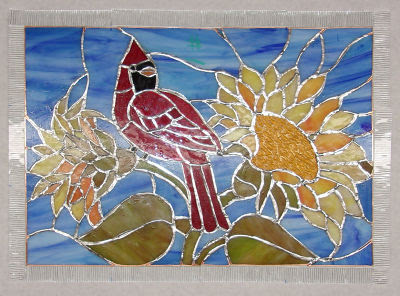
In a similar state of completion we next look at Mary's Cardinal and Sunflowers Window. She finished wrapping her pieces in class, tacked it together and then (like Susan) got her first border cut out.   Once her clear border is attached she'll move on to the second, wider border which will be cut from a darker blue glass.


Kerry has all but two leaves ground in his Circular Magnolia Window.  When he began grinding this I explained to him that the outside edge was the most important part of the pattern to follow and he obviously took my words to heart because this has been ground PERFECTLY.   Next week we'll easily see these pieces getting foil applied to them which will then lead to his tacking it together so he can fit the rounded border to it.  Circular windows are never easy but Kerry is making this one look downright simple!


MiMi has only one row of hexagons left to grind before she can begin wrapping the pieces for her final Hexagon Window.   When she began this project last year she cut out hundreds of hexagons in assorted textures so that she could just assembling everything without stopping to cut more glass (hopefully).  Well, it turns out that she only has around 40 extra hexagons which means that for a rough guess she did incredibly or downright amazingly  well!  I want her around the next time I see that old 'guess how many jellybeans are in the jar' contest.  


Barbara's Flower Panel Lamp got two more panels ground this week leaving her with only two more to go before she can assemble this.   The assembly will go fairly quickly so I'm thinking that she has only 2 or possibly 3 weeks worth of work left to go on this lamp before it will be ready to light up a room.


Lara has the first top most flower of her Peony Window all cut, ground, wrapped and tacked together.   By working with just one flower at a time she's reduced the complexity of her pattern and made the grinding of the leaves, branches and background pieces much easier to fit into place when she begins grinding them.


This might look familiar.  It's Betty's rendition of my 'Pendant' Fleur De Lis pattern only this one has been cut out of two shades of blue.  She started making this using just one piece of glass for the blue but when I showed her how much better it would look adding a second similar color she agreed to re-cut 7 of her pieces using a darker blue.  The end result has much more depth and Betty was happy to make the somewhat time consuming change.


This week Cheryl tacked together her Tree Of Life Window and then traced it all out to create a new pattern so that she could fill in the pieces that were missing.  We've changed things here and there so her original pattern pieces no longer fit into place but now she's right back on track to getting this bright and colorful window hanging up! 


Cindy's Landon Blue Angels Box is so very close to being completed.  It only needs some solder on the back side of the lid and then Cindy will be able attach the hinge, wash it and call it complete.  To achieve the lettering we simply printed the word LANDON onto a special decal paper, affixed it to a piece of glass and then fired it in the kiln over night.  She had hoped to use an iridised white but the lettering flat out refused to adhere to the iridised coating.  Luckily we suspected that might be the case so we had also fired the lettering onto a plain piece of white as well.   Plan ahead!


Here's a look at Martha's version of the Cardinal and Sunflowers Window.   She got everything ground while in class and hopes to wrap it  between classes but she's gone on vacation for a weekand I really don't expect her to come in with this all foiled and ready to be tacked.   Vacations are supposed to be for relaxing, not wrapping glass!


With almost all of her Peacock foiled I believe that it won't be long until we see Mary Grace getting some background cut for this second Peacock Window.   And when I say that 'it won't be long' I'm thinking that it might even begin happening next week.  Time will surely tell...


I had no clue how close to completion Susan R was on her newest Rosebud Ornament.   I thought she only had it tacked together but she's got it all soldered save for the final edge work which involves the 'tap tap' method as our students like to call it.  This will surely be completed within minutes when Susan walks back in the door next week!


And to wrap things up here we take a look at the Peony Window that Sheri has begun working on.   Like Lara, Sheri will be working on this one flower at a time and we'll see that first flower get some glass cut out for it when we return in our next post.


And there you have it.   Although this has been posted on time I have no way to send out the notification email because my computer died during a Thunder Storm last night and I can't access my email addresses.  Hopefully the new power supply will arrive Thursday and I can get things back to normal because working on this laptop is killing me.  Nothing is set up the way I'm used to and I'm having to locate and type in passwords for everything I do!
 
Paul