Monday, October 6, 2014

The P Sheet

This week we're going to start off with a quick and easy tip that needs to be mentioned.  Always work on your windows with the widest length running from left to right.  This may situate the window sideways to you but that's fine.  Many students think that the window needs to 'face them' while they are working on it making the student stretch across the table to reach far sections that would be closer if they'd just turn their window a quarter of a turn.  And never be afraid to reposition your window while you're working on it.  My windows spin around dozens of times especially when I'm soldering.


Okay, so Myrt's Sunflower Window is turning out to be popular among the other students AND with one of the teachers!  Russ is thinking that this might be a great fusing project to do with frit.  All I know is that Myrt works at a steady pace and knocks out one perfect window after another.  She's got  lot more planned and will begin working on her some clear beveled transom windows when she comes back in.


Rowena's Deer Window is officially complete and looks better than ever.  She soldered the back side of this window when she came in and made soldering look easy!  She was concerned about some lumpiness in her soldering but that was attributed to a lack of flux on the second side.  We simply added more flux, went over the bumpy lines and smoothness ensued!  Now it's a perfect window that Rowena can easily be proud of.


Mary Grace completed her Iris which looks so much brighter now that it's lit up.  Her work has improved in leaps and bounds and I think that soldering is really starting to come more easily for her. Mary Graces biggest fear has been worrying that the glass would crack if she stayed on a lead line too long.  But after a quick demonstration of how much heat glass can stand before cracking, well, hopefully MG will leave a lot of that fear behind her.  I just know that I love her Bird Of Paradise Window.


Brenda put the finishing touches on her Football Fleur De Lis Window this week and it turned out wonderfully.  Cam should be very happy with the design and the workmanship in this project.  I remember when Brenda was sure that she wouldn't be able to do stained glass and now she's going crazy making things by herself at home.


Terry went all out with  her latest Initial window. It's a fancy scripted L that she (as always) drew up herself.  The letter flows perfectly and the colors compliment each other nicely all throughout this window. Whenever I see an L done in this style I start singing, "One, two, three, four, five, six, seven, eight. Schlemeel, schlemazel, hasenfeffer incorporated! We're gonna do it!" in my head.*


Jane completed a Butterfly Lawn Ornament this week.  This is a large (12inch tall ) set of butterfly wings that are soldered as two separate pieces and then soldered together at an angle to give a 3D effect.   A brazing rod is then bent slightly at the end and attached to the bottom body section of the butterfly allowing the completed piece to be staked to the ground anywhere you please.  And the rod is sturdy enough to keep the butterfly secure during rough wind yet it's bendable enough to allow the butterfly to sway slightly.  It's a wonderful design perfectly executed by Jane.


Carols Tri De Lis is completed looks like it would fit well in any high end art store.  Carol has come so far so fast and I have to compliment her on the design of this window which she came up with on her own.  And to think that in its humble beginning it was a simple little solo Fleur De Lis suncacher that Carol's imagination ran away with.  That's how I started drawing patterns and how Carol is starting as well.  


Linda F completed 2 projects this week: a Sunflower Suncatcher and a Hibiscus(?) Flower Fan Lamp.  She did the majority  of the work on these while she was at home and only needed help with the flower stamen on the fan lamps.  A small ball of solder can usually be used on a thin piece of wire but this flower needed a long thin stamen that we made by cutting some copper foil to the correct size and then covering it with solder while we held it in place with a sturdy wire.  The we just cut the wire to the correct length and soldered it to the flower center making a beautiful fan lamp.


Bonnie's two crosses are completed and they required no touch ups at all.  She brought them in to see how the hooks were attached and then washed and waxed them before taking them home.   If we put hooks on the joint at the top of the cross it will hang cockeyed since the hook won't be centered on the cross,  and if we just center a ring it will pull off over time since it is only being held in place by the foil.  We solve the problem by burying a wire with a hook bent into it along the top of the cross to evenly distribute the weight of the cross and to allow it to come in contact with the solder joint.  I always crop off the hooks so you can't see it in the picture but I'll show it in detail when Betty returns and completes her crosses.


Shelley's Mermaids are ready for wrapping.  We've changed the size of the bubbles to better accommodate our standard  3/4 inch grinding wheel and make the grinding (and cutting) a little easier.  As they were initially drawn Shelley would have had to use the 1/4 grinding wheel to get everything to fit into place.  (And using that quarter inch wheel is never any fun.)  You can see the old size of the bubbles through the new ones which are ground into place in the picture below.


Susan has moved onto a Pumpkin Lawn Ornament which started as a repair but ended up becoming a remake.  Due the the thinness of the pieces in this particular design, it can be VERY difficult to remove a broken piece without breaking other pieces around it.  In the end Susan just took all the pieces apart and then re-cut the broken ones leaving her with what appears to be a completely new set of orange pumpkin pieces.  But some of them are from the original pumpkin so it's almost as though the pumpkin was gutted before getting a remodeling job.  (I think I may be watching too much Home and Garden Network.)


And while we're on the topic of repairing things, Martha's Beveled Window Repair is just about complete now. The  front of the window is  all soldered together and it's just awaiting some of the thinner zinc channel to arrive so we can slap it on, solder the second side, and call this complete.  The channel will be here before Martha's next class so we'll get to see Martha move on to her Iris Window when she returns. 


Lynn's 'G' Initial Window is the most complex initial design we've seen done yet.  It's almost 3 feet wide and the scrollwork surrounding the ornate setting of the 'G' is what really makes this window stand out.  Lynn is sort of figuring the colors out as she goes on this project and she's grinding it as she cuts it, so this is fitting perfectly already.  She's leaving extra glass where her jewels will be placed because we don't the jewels yet and we don't want to cut the spots for them until we have them in our hands and can ensure a perfect fit.


Brenda also began working on a new Initial Window and she got the pattern by doing the old 'trace it off the monitor' trick.   She loved the B design that Ann had made a few weeks ago and brought the picture up on her computer monitor, put some paper over the screen, and then traced the circle and the letter onto the paper.  And that's what we call ingenuity.


Linda L's got her heart mirrors all cut out and has even begun grinding them.  She was going to go with a 2 piece heart but the amount of grinding was going to be so much that she made the hearts into 4 pieces which are easier to grind without losing any of the charm of the design.  It also  means that she'll save at least one class doing these this way so it's a win-win situation all around!


Ann's got the FDL fever and only has 2 more of the corner FDL's to go before she can start mounting all of these pieces into their respective backgrounds.  And when that's finished she'll have three windows.  And that's the way (uh huh, uh huh) I like it!


I believe Cindy now has 4 sections of her 6 section panel lamp completed.  Once all the panels are completely soldered we'll just join the 6 pieces together and pretty much call it a lamp!  And Cindy has officially decided to add a small crown which I think is a great idea.  It won't be large enough to be distracting but it will help cover some of the hardware that will affix the shade to the base.


Terry came in with most of her newest initial window cut out but her daughter wanted to know if it was too late to add a strip of black glass diagonally through the center of the design.  Luckily, with just one small modification, she was able to cut and drop that black stripe into place.  The glass itself may be sturdy, put the patterns themselves are pretty flexible.


Carol is about to make a one of a kind window since LSU blood runs thick in most of our students veins.  I have no doubt that her Detroit Lions window is going to look great.  The thin line of trim that surrounds the lion seems to have Carol ever so slightly concerned but I know for a fact that she can handle it, especially after seeing how she made that horse head all by herself.  (And if you didn't see it you need to check out last week's post.


Lastly, Becky S wasn't sure what she was going to do after completing her Lady's Legs Windows last week but she was leaning towards a Fleur De Lis.  Since we have a drawer full of FDL patterns she was fairly sure she'd find something that she liked,  And she did.  However, we've had to make a few modifications to the pattern because the window was originally made to be installed into a wall and therefore didn't need any hooks to hang it by.  We're pretty sure we have the situation under control but if not, well, we'll deal with it when we get to those final edge pieces.


And that's about it.  Please excuse any spelling errors and the nonsensical sentences because this while written in the car while I was headed to Lafayette.  And no, I wasn't driving!

Paul
Bayou Salé GlassWorks

* (In case it didn't strike a chord with you, that was the theme to Laverne and Shirley that was playing in my head when I'd look at Terry's L Window.)

Wednesday, October 1, 2014

For A Splash Of Drama


Yes, we are late... VERY late, in fact.  It's been a hectic 2 weeks and things are just starting to calm down.  So let's get down to business here!

Becky S's latest window (which I want to officially name "Lady Kicking Back") turned out to be incredible.  It's such a simple design but the colors are what make it.  Those ruby red high heels are what catch your attention most but the color of the glass used for the legs is sheer perfection.  To see this in person, well, it's just one of those windows that a picture can't do justice to.  And check out those fancy hangers on top!


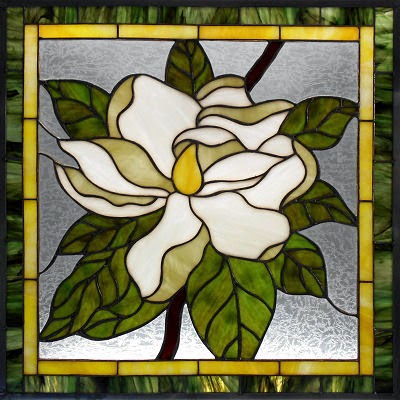
Betty completed her squared Magnolia Window and it it's also a show stopper.   Measuring close to 24 inches in both height and width, this is one large window.  It's a beautiful design and Betty is already working on a second more rounder version. 


Brenda's CC Window is also officially completed and she is really on a production frenzy here!  I think she's been making a window a week (sometimes even two a week!)  She's done this pattern once before but she managed to knock this one out much quicker than she did her first one.  Trust me when I say that Brenda is a force to be reckoned with!


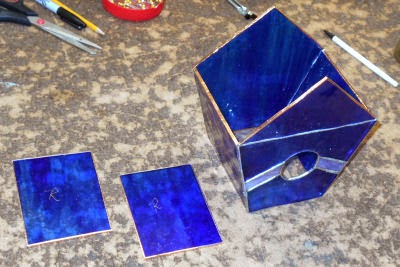
Linda L's two Breast Cancer Ribbon Boxes have been finished and the mirrored bottoms just make the clear granite glass sparkle all the more.  I've always been a fan of using mirrors for box bottoms if there's any clear glass involved because it allows light to pass into the box and then light it up as the light is reflected back outward.  You can see the effect perfectly in these two beautiful boxes.


Now this is an Elephant!  Paula reduced the number of pieces in the original design but only by about 12 pieces.   This multi-colored Elephant is 9 inches wide and consists of a whopping 64 pieces! I really want to call attention to something that really makes this suncatcher an amazing achievement for Paula: the outside edge.  Every one of the pieces line up perfectly with it's neighboring pieces making a smooth edge without having pieces poking out here and there.  Paula has come so far so very fast.  Just look at those tiny toenails that fit PERFECTLY into the feet.


Terry's latest round of Initial Windows are brought to you by the letter's R and D.  (Research and Development?)  These windows are two completely different looks that are both stylishly designed and perfectly executed.  I expect nothing less of Terry's work.


And Carol made this Horse Suncatcher in between classes while she was home during the week.  I've touched up none of the soldering (because it needed no touching up) and I have to say that Carol certainly seems to have this whole stained glass thing down pat now.   


Ann has been working on the 12 small Fleur De Lis corner pieces for her next three Initial Windows.  It's hard to decide what's harder to make, the initials or the tiny FDL's that go into each of the corners of the window.  At any rate, Ann seems to be able to breeze right through it all as evident in the picture below.


Next up we take a look at Betty's second Magnolia window as well as the Open Cross design that's proving to be so popular in class.  The Cross itself is finished save for a good cleaning, and the magnolia is about halfway complete now.  She's been agonizing over the color of the leaves but no matter what Betty decides you know that this will turn out wonderfully.


 Remember those popular crosses I was just talking about?  Well here are two more that Bonnie cut out and ground while she was in class this week.  It's hard to see the texture of the glass in the green one but it is beautiful.  Hopefully you'll get to see it better when we light this up in our next update.


Brenda came in with the majority of this LSU Football Window cut and ground.  Once her CC Window was completed she picked up work on the top name portion of this project.  I think Cam is going to love this!


Carol continued working on her Tres De Lis Window and now that the borders are attached you can really get a feel for what the finished piece will look like.  Carol toyed with the idea of using a single border with alternating colors but the idea of a double border worked really well with the size of the window and this is what everyone decided looked best.  One of the nice things about working in class is that a popular opinion is easy to come by!


Then there's Cindy's panel lamp which is moving right along.  I'm not sure what panel she's on right now but you can see that she's got this particular one fitting together perfectly.    She has a grand total of 6 sections to make and I think that this is either section 2 or 3.  That means that before you know it she'll be ready to tack these together and call it a lamp!

Janet's Tree Of Life Window is getting closer and closer to completion.  There are under 20 pieces left to cut and I have no doubt that they will be finished during her next class.  This week she wrapped the leaves and the tree and then tacked them all together.  Still having a little extra time at the end of the night we decided that she'd be able to get the inner border cut as well.  And we were right!  I have no clue what she's going to use for her background glass but I'm thinking some sort of textured clear would be perfect.


Jeanne's Stylized Cross is spectacular in a way that's easily seen now that her background glass has been cut and wrapped.  This window is almost ready for solder.  All Jeanne needs to do is to work on 'fill in's along the top and bottom and then add the border.  I love this window and all of the colors she's picked out for it.

Jeannette has her water cut and ground for her Shrimp Boat Window.  If you look at the picture you can see that she also managed to get it all tacked together as well!  There's just the sky and some clouds left to go and since the rigging is made by cutting the sky I'm thinking that the majority of this will be completed when Jeannette returns. 


Linda F began working on her version of our Standard Angel pattern.  This version has two extra cuts because the glass she is using for the dress had very staright lines throughout the piece and the 'flow' of the skirt couldn't be captured near the bottom.  But by adding 2 simple cuts Linda fixed the problem and now has an Angel Dress  that flows beautifully.


Lynn's Initial G Window is really going to be spectacular.  Other students have been eying up the pattern while it was hanging up on the wall and someone already asked me if the G could be replaced with another letter.  I love the work that Lynn got done on this and can't wait to see what colors she uses in the rest of it.


Martha has the center section of her beveled window repair all cut out, ground and tacked together.  That means that she's only got the border left to go and then some solder.  I think Martha now understands why repair work is so costly-- it's easier to start from scratch rather than trying to refit pieces and fill in broken sections.


Mary Grace got all of her borders tacked and then began soldering the front side of her Bird Of Paradise Window once her brass channel was attached.  Mary Grace has taken her time with this window and the payoff is that everything fits nicely, the foiling is uniform, and (most importantly) her soldering requires little to no touch ups!  Look to see this flower completed when she returns.


Myrt now has all of the glass cut for her Octagon Sunflower Window.  After getting the border cut and ground she wrapped her pieces and attached them all.  She's got the lion's share of this window completed so I know we'll see this as a finished piece when we see Myrt again.


And wow, is Rowena's Deer Window looking great!  The final green border was a perfect pick since it matches the green leaves perfectly.  Had Rowena used a single border she wouldn't have been able to use that green since it would butt up against the leaves.  The smaller inner border really sets off this window and Rowena's work is amazing.


I already have pictures to sort through for our next update since we're two classes into the week already.  I hate falling behind and I promise to be back to normal next week.

Paul
Bayou Salé GlassWorks

Wednesday, September 17, 2014

She's Got Wiggle Room

Let's not rock.  When grinding your glass it's imperative that you use pins to keep your glass secured to the pattern, but so many times I see people using just one pin to hold a piece in place and this mistake can easily lead to disaster.  Using a single pin allows your piece to rock or shift which will throw all your other pieces off.  I always use 3 or more pins to secure a curved pieces and two pins on straight lines.  Remember this simple rule: A single pin is NEVER enough.  The picture below shows exactly why you need two pins to secure straight edges.


Okay, it's time to get to our students work this week!  We're going to start off with Bonnie's Round Magnolia Window which is nothing short of stunning.  It's been a design that's created a lot of talk throughout the classes and Martha has already decided that she wants to make one.  The black patina against the white petals works perfectly as does the third shade of green for the border,  And I haven't even mentioned the fact that the window is round rather than square which also sets it apart from other windows.  Bonnie's soldering is top notch and her work has inspired others to make this design  which I know we'll be seeing more of in the future.


Wow, didn't Linda F's Birdhouse window turn out great?  I will admit that I wasn't initially thrilled with the border color when she picked it  but it turns out that I was 100% wrong because it fits this window like a glove.  I love when a students color choice opens my eyes!  I remember when something of this complexity would have taken Linda two or more months to complete and now she's able to finish it in less than half that time.  From her cutting to her soldering she's been turning out amazing work.


Always one of my favorite pieces, Lynn's Terrarium refuses to disappoint.  There's just something about all of that clear glass.  Of course, it IS a pain in the glass to clean (and Lynn even admitted this herself), but how can you complain when the end result looks like this?  Quite a few students have mentioned terrariums after seeing this being worked on but they've all talked about something with a little less complexity so we may be seeing a few more terrariums of a different variety being made later on down the road.


Jane completed her second Cylindrical Lampshade and here we get to see both of them side by side.  The one on the left is the new one and if you look closely you can see that the solder hasn't been colored yet-- that's something that she plans to do when she gets it home.  Now that she has these out of the way Jane plans on making 2 windows featuring two different logos (which we'll see when she returns).


And then we have Ann's latest Fleur De Lis Initial Window.  This one is brought to you by the letter B.  Her border glass has darker pieces on the top and bottom while lighter sections flank the sides.  The (large) piece of glass she selected for the border had a very irregular color pattern to it so she carefully pieced together the effect that you see below rather than haphazardly letting the differences in shading randomly destroy the flow of the border.  Careful planning always pays off, and Ann proves it in this window.


Remember what I said about the use of pins in the beginning of this update?  Well, Myrt's Sunflower Window is a perfect example of how you should use pins to secure your pieces.  Nothing is going to shift out of place on this window!  Myrt is wrapping all of her pieces now and when she returns she'll easily get her eight pieces of border attached.  Once that's done she'll be soldering.  This is what I call perfect workmanship.


And Mary Grace has her Bird Of Paradise just about ready for solder.  She has the center section all wrapped and tacked together and has the first thin amber border cut and ground.  That means there's just one border left to go and then she can begin the final soldering process.


I have to say that the black and white pattern of this window didn't move me one way or the other, but once Becky S got the legs and the red shoes cut out I fell in love with it!   The only problem is that there is no way to secure hooks to this window as it was presented on the pattern.  Sure, hooks could be added in the corners but they would certainly come loose soon after the window was made.  But we've come up with a great way to add a border without detracting from the pattern at all.  And you'll see how Becky accomplishes that when you see this again.


Carol cut out three variations of our standard Fleur De Lis suncatcher and decided to make them into one window.  She cut a length of clear glue chip glass to the size she wants the window to be (sans border) and then traced her FDL's onto the glass.  After making three vertical cuts through the centers where the FDL's will be added into the glass Carol was able to cut the glue chip into 12 pieces that all fit together perfectly.  And she also got a quick lesson in making symmetrical designs as well!  Next up for Carol, border(s).


Brenda's CC Window is all ready for its back side to be done.  When I left she only had 4 lines left to solder on the front of this window.  That means that this will certainly be a completed project when Brenda comes back in.


And Shelley's Mermaid Window really only needs a few pieces of glass ground and then some bubbles added before she starts wrapping it.  She's decided to go with the glass that I liked best for her bubbles-- a nice iridescent waterglass.  It shouldn't take long to get them completed so she may be wrapping this when she comes back in.


Meanwhile, Linda L made some great progress on her two Ribbon Boxes.  Once the the lids were completed she cut the glass for the box sides and once they were tacked together she cut out the mirrored bottoms.  With just the smallest amount of soldering left to go on these we'll surely see these completed when she returns.   Then she'll be moving onto mirrored hearts.


Terry's latest window is a decidedly Art Deco 'D' design.  She came in with it all cut out and once she completed grinding it she began wrapping her pieces.  Then she tacked it together and got her border added.  Now that's what you call a productive night.


Cindy's Panel Lamp is all cut out and I'm wondering of she may want to add a small crown to it.  Whether she does or not I know that the lamp will be beautiful.  But a crown will only add eight more pieces to the total and help hide the spider that secures the shade to the base.  I think I'll cut some out of cardboard and attach them to the test lamp that we made to see what she thinks.  At any rate, Cindy has her 'jig' all set up and has begun grinding her first panel.  What a difference this shade is going to make once it's on her base.


Just look at all of those colorful pieces of glass.  What do they form?  Well, it's hard to see right now but in a very short time you'll see that this is an elephant.   Paula has about a third of this ground but she bumped the board causing the pieces to shift just as I was about to take the picture.  Trust me when I say that this will be one of the most colorful elephants that I've ever seen (not that I've personally seen that many!)


And Janet's Window, which she now refers to as the Tree Of Life, is coming along wonderfully.  She has her outer border tacked together and firmly anchored onto her board so that the window will be perfectly square when it is completed.  When I say square I mean that the window will have four corners with perfect 90 degree (right) angles.  When she returns we'll cut the strips for the thin inner border and work from there.


Jane not only finished her Cylindrical Lampshade but she also began putting this Birdhouse together as well.  She has two different birdhouse designs cut out but accidentally brought the wrong roof sections for this particular pattern so the two pieces you see to the left of the birdhouse don't quite fit!  If they had she would have easily gotten this project together before she packed up and headed for home.


Then we have Betty's Magnolia Window which is looking great.  I just love the double border that she's chosen.  This is actually a large window -- probably bigger than you are imagining when looking at the picture.  I'll get an exact size for you when I see it again during Betty's next class.


Martha's repair is coming along but the cleanup on the glass is proving to be more difficult that she initially thought.  That cement can really stick to glass let me tell you!   The background glass has all been ground now and all the border pieces are close to being clean.   Foiling is just around the corner.


These are the next three Initial Fleur De Lis Windows that Ann will be working on.  What does W, B, C stand for?  How about White Boys Can't, or Wonder Bread Country, or Won't Be Careful, or Why Bother Counting?  Maybe it stands for Whistling Bothers Canaries, or Wrinkly Breakfast Cereal.   My personal favorite is Women Being Cruel but let's face it, the list can go on and on...


And wrapping things up this week we'll take a look at the Boat Window that Jeannette began working on. Most of the details of the boat will be comprised of lead lines.  cutting into the glass that she'll use for the sky which means that the sky may be a bit tricky to cut.  We want the grain (or flow) of the sky to be unbroken so the lead lines will appear to be ropes in front of the sky.  It won't be hard to do but Jeannette will need to take her time and work one small section at a time.


So to reiterate, let's never forget to use many, many, many pins to steady our projects while we are grinding them.  That is one of the best tips I can give which will make your pieces fit back together perfectly after they've been ground and wrapped.


Paul
Bayou Salé GlassWorks