Monday, September 6, 2021

Halloween Night With A Dog Named Chucky

Well then, as you might have suspected Hurricane Ida managed to screw things up this past week.   We were very lucky and received no damage and no water but we did tear apart the shop to prep for water and ended up spending a few days after power returned to get the shop back together.   Because of that this post is actually a week late.  As I said though, we were lucky.  Sadly, a number of our students didn't fare nearly as well as we did especially those out in the Houma area.  To our students who are in need, please know that all you need to do is ask and we will gladly help in any way possible.

So then, let's get started here.  Annette's Crow and Moon Window has a unique look that really sets it apart from most windows that we see.   Starting with the subject matter and working its way on down to Annette's wonderful work, this is a head turner to say the least.   The blood red, sparkling eye, which is less than an eighth inch round, actually commands your attention most.   Annette wasn't thrilled about making this in the beginning (someone asked her to make it for them) but in the end she and all the rest of the students in class ended up loving this piece.


Lisa's first of two Etched Bevel Panels looks fantastic!  Simple, yet incredibly charming, this panel is something that pulls you right into its beauty and elegance. The use of Fractures and Streamers glass for the background along with the beveled border just completes the look all so well.


Here's Linda F's Bee Hive Suncatcher which is actually a variation of something she found on the internet.  The original had the pair of bee's tacked on top of the hive and the stripes on the bees were painted on the glass but when you make something like this using the 'overlay and paint' method it's only visible on one side and the front just never lights up correctly.   That's why I always say 'No' to overlays and yes to putting just a few minutes more work into a project like this. but cutting everything.


Mary Grace completed her Cardinal on a Branch in a Hoop project and didn't it turn out to be stunning?  We have a new way to do cardinal eyes and I think it works perfectly, don't you?  All in all though I believe that it's the wire work that makes this stand out so nicely and really what defines this piece.


These are Pawn Chess Pieces that Susan D created for a chess board that will be raffled off with the proceeds going to Proud House. I must say that she's done us all proud with her execution of these small  yet completely recognizable three dimensional pieces.


Susan D also put the finishing touches on 3 more Flower Angels complete with wire Halos and decorative wings.  She's certainly on a roll with these and the best part is that they have been finished in plenty of time for Christmas!


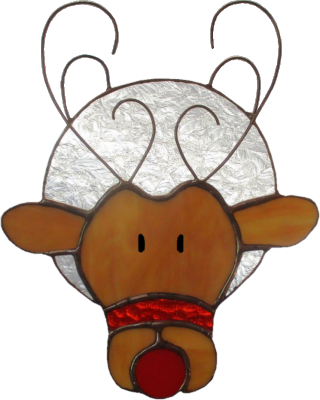
Speaking of being on a roll, Betty made either three or four (I'm leaning more towards four) more of her famous Reindeer Suncatchers.  As always the antlers are wire work (each antler consisting of 2 pieces of wire) attached to the suncatcher wherever they touch a lead line.   You may find people selling these online without having a round section of glass cut as a background but the wire work will never stay attached on those reindeer while Betty's reindeer antlers are perfectly secure.


And now we're onto projects that are currently under construction.  In just one class Annette was able to cut, grind and tack together this Dark Side Of The Moon Album Panel.  She'll be coloring the lead with black patina which means that those lead lines coming off of the triangle bevel will almost completely vanish against the black glass background giving this a VERY authentic album cover look.   Pink Floyd-- you just can't go wrong with them in my book.


Meanwhile Shawn ground all of her Colorful Butterfly Suncatcher.  After that was done we redesigned the body so that this would be completely sturdy as a suncatcher.   She's also got half of this wrapped already which to me means that we'll see this completed when Shawn comes back in.


Here's another Butterfly that's under construction and this one is being made by Linda F.   This will be a 3D flowerpot Ornament which will be attached to a stake which means that we want a nice straight line running down the center of this Butterfly.  Once it's wrapped and the wings are soldered separately she'll tack them together at an angle to the stake and then add a body on top of the butterfly to hide the straight line which (because of the stake) will give this piece its strength. 


What's this?  A third Butterfly!  It would seem that we have a new popular theme here in class.  With almost the entirety of her window ground Melissa began wrapping pieces this week.   Why wrap before she's finished cutting and grinding?  Well, Melissa forgot to bring along her orange glass which meant that she couldn't fill in the three missing pieces but they will fill in quickly enough when we next see her.


I have to say that Martha's Build A Better Life Window is coming together at break neck speed and her cutting is nice and exact.  She mixed two different greens for use within her trees and ended up just mixing them randomly throughout the window.  Just that small extra splash of color is really going to give this window an incredible look when it's finished.  In stained glass it's always more about subtle differences than HUGE contrasts.


Next up I have to say the word 'incredible' because Cindy's pair of Ice Cream Cone Windows is just that!  Although you can only see one of them in this picture they are both wrapped and ready to be tacked together.  Man do I want some ice cream now!
 
  
 .
 
Linda L has one Angel Window completely tacked together and the second one just needs to be wrapped.   She's used Clear Sandblasted glass for the background of these angels and that tends to stain a slightly if you leave the flux side on the textured side for too long so Linda tacked the first window and then wiped it down before moving along to her second angel.  Better to be safe than sorry!


The hexagons are taking over MiMi's house but with each passing week she joins more and more of them together to make more windows.  Her latest (a window we call Number Six) has been completely ground and she has about a third of it all wrapped up in copper foil.


Susan R's Bathtub Lady is all ground and ready to be wrapped.   She's picked a perfect color for the border that will surround this and I'll show you just what that color is when Susan returns and gets this tacked together and borderized.  I love all of the detail she got in all of those bubbles!


Now I just HAVE to saw that this is certainly not your normal looking Halloween Witch!  At least not from behind anyway.  She's downright attractive when you get right down to it and this is just her back side.  As she stands this witch is completely ground and awaiting some foil so she can get tacked together and then soldered.  Will Kerry be able to complete this in time for Halloween?  I have NO doubt about that at all!


The Cardinal that Judy is working on is all tacked together and the intricate, fancy border is just about completely cut out as well.  Judy will wrap and grind all of these border pieces when she comes back in and then this Cardinal will be ready for some serious soldering.


Last week I noticed that Shelley had taken her cats home to wrap and tack together without having the noses cut into place.  Luckily I got in touch with her before she had a chance to tack this together which means that this week she was able to cut three little cat noses and fit them into their proper places.   All this needs now is a border and then a little solder to finish off these three wise cats. 


This picture doesn't really allow you to grasp just how large Barbara's Beveled Window is.  I think the next time I take a picture of this I'll put a dollar bill in the shot so you can more easily tell just how large this window is.   This week Barbara tacked it all together and then added the final border before she began soldering.  It won't be long now!


Susan has the spirit of Christmas in her and now that her Angels have been completed she's going to move along to these four Beveled Christmas Ornaments.  Two of them are already close to being completed so that means we should see the four of these at the top of our next post along with any other projects that are completed.


Here's a look at Sheri's latest Yippie Flag Window along with a hard to see pattern for a Green Bay Packers Football Helmet.   Sheri had a slight problem with her Yippie Flag when she stumbled with the board it was on and ended up scattering numerous pieces.  Sadly there was no way to determine which piece went where so she had to re-cut two of the leaves and now has to wrap all of those pieces again.  Still, it could have been much, MUCH worse!


To wrap this all up we come all the way back to Lisa who not only completed an Etched Bevel Panel this week but also got a second one completely cut, ground and tacked together.   It was certainly a productive class for Lisa wouldn't you say?  And this one easily looks just as good as the first one does!


So there you have it.  A week later but here on your computer (or phone, or tablet) screen nonetheless.  See you all next week!
 
Paul


Monday, August 23, 2021

Anything Can Happen

We've been seeing quite a few broken pieces happen during the soldering process due to heat and I think it's time to pass this tip along in the blog.   Heat cracks happen due to stress points in the glass.   These occur naturally and are a by-product of cutting glass.   The only way to reduce these stress points is to make sure that you grind the edges of all of your glass thoroughly.  Just a quick pass over the grinder wheel is not enough.   Below you can see that although this piece of glass has been touched by a grinder wheel, it has only been ever so slightly ground.  The blue arrows point to the few areas that have been ground with only the arrow on the left being ground correctly.   The white, matte edge is what should appear COMPLETELY around the glass.  That matte finish reduces glass stress considerably.  Also in the picture below are green arrows pointing to deep chips that have been created by pressing too hard on the cutter while scoring your glass.  These 'deep chips' may be less than a 1/16th of an inch deep but these are chips which easily become cracks while soldering.


Here is the same piece of glass after being ground with just a fair amount of pressure along the entire edge against the grinder wheel.  Note the matte finish along the entire edge.   People ask me how hard should they press against the grinder and the answer is simple:   Enough to make your edges appear as shown below.  


Okay then, Sheri's first Yippie Flag Window has been completed and her use of red and green cathedral glass set inside a solid black background makes this as striking at possible.  The picture below captures most of  the stark contrasting colors but the effect is so much more pronounced when you see this window in person.   Sheri has one more of these flags almost completed and it won't be long until that one sees the light of day as well.


Judy's Wine Ladies are toasting to the fact that their 'portrait' (so to speak) has been completed in such a wonderful way!  I have to say that the colors used in this are as vibrant and full of lifeas the ladies are themselves.  This is a fun window to make and it's also a fun window to look at as well.


Cindy's Nicholls Suncatcher was also finished and you can see that she did decided to add a red border to it.   Matching the border glass perfectly to the N that the sword runs through was pure perfection.  Since this window is an oval there is no channel surrounding it since you can't stretch the channel in such a shape.   Sometimes people won't make oval windows because they feel that without channel the window will look unfinished but as you can see that's not the case at all.


Next up we have Linda F's Single Sunflower which was completed both quickly and efficiently.  There are no flaws in this window which features curved inner corners.  That means that a strip cutter can't be used to cut the border since 6 of the 11 border pieces aren't made out of purely straight cuts.  That said, even cut by hand Linda's borders came out looking like they were machine made!


Beth B is back and she's finished up the fish suncatcher that she began working on when she last attended classes with us.  In her first class back she was able to grind her remaining pieces and then wrap, tack and solder this fish together to create one beautiful suncatcher.


Susan D is blazing a path straight through towards Christmas with her four Flower Angels and 2 Van Gogh Spiraling Christmas trees.   Next up for her will be at least two beveled and leaded Christmas Ornaments.


Martha has begun work on a 'Build Your Life' Window that was inspired by a painting by Dylan Hines who is a 7th grader that created the painting for his grandparents.  I will post a picture of that painting after Martha completes this so you can see side by side of just how wonderfully I know this window will look when compared to the original work.


Kerry started a Witching Window and got it all cut out in just one class.   Of course grinding this will take some time because we don't want that red haired witch to look as though she's deformed and we also want all of those straight lines to be straight as well.


MiMi is back in class and so are her hundreds of thousands of Hexagon-like pieces!  This is Window number six and she's already past the halfway point on grinding it.  It's good to have her back.


Susan R's Woman in a Bathtub is really taking shape now that it's essentially ground save for the bubbles.   She's decided to put a border on this when she's finished since it isn't going in a hoop anymore and I feel that will really set this off nicely.   I tend to feel that a window looks a bit empty without a border around it.


Lara, who always inspires with her unique designs and artistic vision, is making a Flowered Hair Ornament section of a Geisha Girl with just the smallest amount of face showing under all of those colorful flowers and hair.  It's a piece that will raise eyebrows for sure!


Speaking of colorful, we also get to look at this vibrant Butterfly Suncatcher that Shawn began.  She's decided to make a few smaller projects now that she's completed what she calls her best piece yet-- her Octagon Diver and Stingray Window.   I think she's really going to like making this though as she can be as free as she wants to be with her color choices.


Linda F cut out this large Beehive Suncatcher that she found on the internet after we changed it up  substantially by making it all one piece and eliminating all of the paint that was in the original picture that was the inspiration to this design.  The changes we made allow the bees to be seen from both the front and the back of the suncatcher, eliminate all the paint used in the original, and make this far, far more structurally solid.


With all of her Round Magnolia Window cut out Tracey is now ready to begin the grinding process on her newest rendition of this timeless classic.    This pattern has become so popular that I had to re draw it since the original had fallen into tatters!  Tracey makes this pattern look so spectacular that I may end up having to re-draw it again in the near future since other students are apt to decide that they need to make it as well.


Shelley's got her Voxel Cats Window all cut, ground and ready to be wrapped.  Or at least I thought so until I looked at the picture and realized that we forgot to cut the noses into place!  I've called her and told her NOT to wrap the heads unless she wants noseless cats and luckily I got to her before she tacked them together.  Next week well get a border on this and three kitty noses as well.


Bee's Flowerpot Window is coming together at a nice pace of speed while all the while maintaining Bee's need for detail and accuracy.   You can see that the pots have all been ground and that the flowers in the pot on the left have also been ground and fitted.   I don't think that this window will take Bee much time at all now to complete.


Judy M started this Cardinal Window that ever so slightly resembles a window that she found on the internet.   Yes, they both feature cardinals but this bird bears no resemblance to the monstrosity that she originally saw.   In fact, only the border on this window is similar and even that's been changed for the better.   Once this is completed, which will probably be very soon,  I'll show you what inspired it and let you decide whose looks best.  Biased as I may be, my money is on Judy's!


Jan got her Eagle/Flag Window all cut and ground.   Well, maybe not ALL cut.  Jan discovered that one piece was missing, one piece had been cut a little too short and a third had a piece broken off that she didn't realized that until she began grinding her window.   These things happen-- I'm making a window right now and discovered that two of my pieces had broke incorrectly and I hadn't realized it until I was grinding.  I just consider these things to be a SLIGHT setback and work onward from there. 


I scream, you scream, we all scream for ice cream! It's impossible to see here but Cindy is making two of these windows and they're both at the exact same point in the creation process as they are both shown here in the picture, one stacked on top of the other.  I have to say that her colors are stupendous and make me hungry for Ice Cream!


Linda L made great progress on her two Angel Windows and has the blue angel almost completely wrapped in copper foil while the second pink angel has been ground and is just awaiting foil before it can be tacked together and 'borderized'.  There were a lot of deep cuts to be made in the background glass, some of which needed to be ground out rather than cut out, but Linda handled them with ease and her background glass (as well as the angels) look wonderful.


Barbara tacked her Beveled Window together and in the end decided not to replace the rounded sections with a different glass.  Why?  In the end she felt that the introduction of a new texture drew too much attention to the four rounded pieces and distracted from the overall flow of the window.   She's all set to begin soldering this large piece when she comes back in.


Mary Grace trimmed her tree branches and ended up a number of nicely curved leaves for her Cardinal Hoop design.  With everything cut and ground save for one piece of black glass that surrounds the bird's eye Mary Grace will be able to begin foiling all of her pieces and then work on soldering this together upon her return.     


Betty's on the road to Christmas also as she has cut out and essentially ground four Christmas Reindeer Suncatchers.  The antlers on these will be made with a little creative wire bending but for the life of me I can't recall where the hooks went on these!  Hopefully Betty has a better memory that I do or if that fails then perhaps she still has one of these around that she made last year that we can examine.


And in the end we have Annette's Crow and Moon Window.  It's finished save for a final bath in black patina which we like to let set on the window for at least a half hour and even up to 45 minutes to get a nice black coating.  The only reason she didn't get this completed on Wednesday evening was due to this extended wait time.  We'll unveil this striking window when we see you again next week.


Until then, have a good one! 

Paul 

Bayou Salé GlassWorks


Monday, August 16, 2021

Unhinged

Foiling is a very important part of making a stained glass window.   Often I see students rush through the foiling process without regard to how it looks because they feel the lead will cover it.  This is truer than you might believe.  Lead follows your foil perfectly.  Any flaws that you have in your foil show up in the lead as well.

Below we have a picture with two large problem areas.  The red arrow points to a stair-step which happens when the starting and ending points of your foil don't line up correctly.   Any lead that you apply on top of the stair-step will take the same shape.  It won't hide the problem.   Next, the green arrow points to a section of foil that has been flipped upside down so that the adhesive side is upward rather than against the glass.  I've used black backed foil so you can easily see that the black back side of the foil is facing upward.  This often happens in corners if you aren't careful enough to tuck one side of the foil under the next side as you would wrap a Christmas present.

Here's how to fix these problems.  First off we need a SHARP razor knife or Exacto knife to trim off that offensive stair-step.   To do that we start at the large overhanging area by butting the blade against the foil we want to match and then traveling downward along the dotted line I've added to the picture.  Once the stair-step is removed you can simply use your fingernail in the upper right of the piece to flip the small area of tape so the back side is facing downward.  If you can see the adhesive side of the foil no lead will cover it. 

Remember, solder will not hide bad foiling but instead highlight any and all of your problem areas.  Your soldering will only ever be as good as your foiling so foil carefully.


So first off we look at Lara's Caduceus Window which was completed in just 2 weeks from start to finish.   Now we did rush a bit on this but in the end you can't tell at all because Lara's attention to detail outweighed Lara's need for speed.  When she asked what color would work well as an accent border with all of that white in the center I knew instantly that blue was the answer-- especially when she said that the window was being made for a man.  Perfection.


Lisa was unfortunately skipped over last week due to a filing error on my part so this week you get to see her four seemingly instantaneously created Frog Nightlights all finished and ready to illuminate!   For your viewing pleasure I've included a shot of one of the Frogs all lit up and perched on its nightlight stand.   The other three will be attached to nightlights of their own when Lisa gets home.


Peace out man.  Sheri should be able to sell these far out Peace Hands for a cool amount of dough and stick it to the man by bringing in some bread on the side.  And the colors, wow, they're totally trippy and psychedelic!  There's a whole vibe here that really blows my mind. Right on, dude, dig it if you can. Oh, and keep on truckin'!


Mary Grace completed her 3D Diamond Spinner which I discovered is somewhat difficult to photograph.   Still, I think you get the idea.  If you looked at this piece the from the top you'd see something that looks like +.   Interestingly enough, even though we didn't plan  for a specific item to hang from the center, the crystals that Mary Grace brought it fit inside it like a glove!


Betty knocked out another pair of Cardinals Hoop and then made another Heart Sunflower as well.  Look at that nice flowing line that makes up the curve of the heart shape of the Sunflower.   That's attention to detail and we're going to get into that as a tip of the week soon enough.


With just 42 days left to go until Christmas arrives Susan D is working feverishly on her Christmas Tree Suncatchers to get them out in time for the holidays.  You know what they say don't you?  Slow and steady wins the sleigh race!


Martha made enough Feathers this week to make it look like my back yard when one of the chickens begin to molt. Alas, these feathers are far more colorful and fun to look at and Martha made them all in the best way possible:  first she cut out ALL of the feathers, hen she ground ALL of the feathers and finally she soldered ALL of the feathers.   When making more than one item you should always cut everything at once.   Trust me when I say that cutting out the first one, then grinding it, then wrapping it, finally soldering it and them moving along to cutting out a second one is sooooo VERY much slower!


Now this is what Lisa's four frogs looked like when she left class last week.   She had managed to get them all cut and ground (all at once) and then took them home to wrap in foil.   This week we saw her solder them all and attach them to their nightlight bases.    Showing you this picture in this postafter you've already seen them completed is my way of saying 'Better late than never.'  Right?


Linda L has been very busy cutting and grinding two Angel Panels (that she cut all at once) and she's gotten quite far along in the process just two weeks into this.  If you look closely you'll see that the blue Angel is about halfway ground.   Those wings make for a lot of deep grinds but they don't appear to be slowing Linda down at all.


Cindy finished cutting and grinding her Nicholl's Logo Panel and at this point I'm unsure if she's going to add a border to surround this or not.  I guess it all depends on how large she wants it to be.  Normally I say a border is necessary mainly for hanging purposes but the N creates lead lines at nice even intervals where we can attach hooks if Cindy chooses to forgo a border.


Jan is back and she's got her American Flag Eagle window all cut out and ready to be ground. Unfortunate circumstances have forced her to change out the glass that forms the white stripes of her flag but in the end I think that the finished window will look better for it. 


Shelly began work on a Cat Window with a twist.  Or should I say a lack of a twist because there is not a single curved line in the entire window.  But as I type this I realize that the noses of these 3 squared off cats will be somewhat heart shape.  I guess we'll see what this becomes in the weeks to come!


Unlike Shelley's Window, curved lines abound in Tracey's newest Magnolia Window which she began cutting glass for while in class this week.   Tracey's made this before and each time she makes it it comes out a little bit better than the last one.  And since her work is always perfection just imagine how good this is going took by the time it's completed.
 
 
Susan R's Bathtub Lady has really taken shape this week as a lot of the bottom area and the tub has been ground.  I've always loved this window and Susan has inspired me to make it again but in a new way.  Meanwhile, don't you just love those curtains!  This is a popular pattern for a reason and Susan's rendition of it will only help make it even more popular.


Mary got the lion's share of the grinding done on her 'Dueling Hummingbirds' Suncatcher while she was in this week and now she'll wrap everything in copper foil and then tack it together before fitting in the clear glass background pieces that will give this beautiful Hummingbird project some extra stability.  


Susan D has two more Christmas Tree's and four more Beveled Ornaments left to go before calling it a wrap on the assorted Christmas Ornaments that she's been busy assembling.   I think we'll be seeing these completed very soon now as most of the work is finished on these.


With all but four pieces ground for her Butterfly and Louisiana Iris Window, Melissa is almost ready to begin foiling.   There are still a few cuts to make to form the Butterfly's Antennas but they're go quickly and won't slow down the final glass cutting step where she adds a border to this stunning window.


With her background all cut and ground for her large clear Beveled Window Barbara has taken her pieces home so she can wrap them in foil and get this tacked together upon her return.   She's thinking that she might add one more texture to this design in the rounded sections in the center part of the design but we'll see what happens next week when this is tacked together. and we can see the window a lot more clearly out of our mind's eye and into our real eyes.


Sheri has one Yippie Flag completely tacked together and ready for solder while the second one only needs to get it's leaves pin striped.   She's really flown through the cutting and grinding of these two windows and it looks like she'll be completing them before you know it.  I have a sneaking suspicion that one of these will be completed when we see Sheri next week.

 
Mary Grace has turned her artistic eye towards her newest Humming Bird Hoop design and has decided to change the shape of the leaves to something a little more curvy.   We'll see what they look like when she resumes work on this piece next week.   Meanwhile she also cut out two Heart Suncatchers that you can see to the left of the picture, one in pink and the other in a flamingo.


And in the end all I can say is that all's well that ends well so I'm outa here!

Paul