
On Saturday morning at 9am we got to meet Martin, Jessica and Chuck, none of whom had ever made a window before. After introductions were made we all settled down to a hands-on glass cutting lesson which lasted about an hour and a half. We started by cutting a straight line, then a curve, a compound curve, a circle and ended with a deep inside curve. We learned how glass breaks and how to predict it's path and use this knowledge to our advantage. The first hour generally tells me how well things will go and I am pleased to say that all three of our students were wonderful at cutting glass. With the hardest part out of the way, Martin, Jessica and Chuck picked up their scissors and started cutting their paper patterns in pattern pieces..
We're going to start off with Chuck's window only because I have one extra picture of his progress that I somehow skipped over in the other two windows. Chuck had decided to make our most popular design: The Geometric Window. I think the appeal of this windows is that it's a classic stained glass design that incorporates nice bright colors. This is Chucks pattern.

After cutting up the poster board copy Chuck placed all of the pattern pieces onto their respective colors of glass, traced around them using a permanent marker (which isn't very permanent on glass), and then began to cut out the shapes that he traced onto the glass. Chuck started with his diamonds first, because they were the easiest things to cut, and finished by cutting out the harder clear background glass pieces. Here's his window all cut out and ready to be ground.

After spending a good two hours or more at the grinder Chuck had everything fitting together wonderfully. The hardest part of this window is making sure that all of the lines are straight, which Chuck achieved with ease. Once everything was fitted together he began wrapping all of his pieces with copper foil. Lead won't stick to glass so we need to apply foil to give the lead something to melt onto. At the end of the first day Chuck left with his window looking like this.
Classes resumed Sunday morning and the first thing Chuck did was to tack his window together with a light (but even) coating of lead. We use 50/50 which is against the norm since most stained glass crafters use 60/40, but I've found it to be much easier to work with and I think Chuck agrees. Once the window was tacked together we used a strip cutter to cut out his border pieces which he then wrapped, tacked into place, and added a brass channel around the outer edge to protect the glass. This picture shows Chucks window ready to be soldered. Sadly, I don't have pictures of Jessica or Martin's windows at this point but here's a look at Chucks before he puts a finished bead of lead on all of his lines.

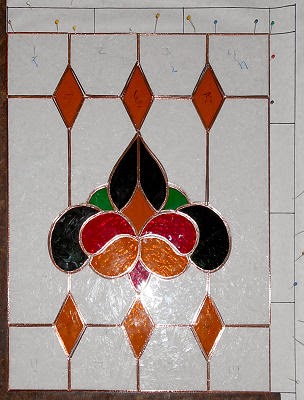
Once everything was soldered Chuck washed off his window, dried it and then went over it with a chemical called Copper Sulfate
which turns the lead from a shiny silver color to a bright coppery
finish (which is more easily seen when the window doesn't have light
behind it). After one more bath to remove the excess sulfate, Chuck waxed his window and called it a day! And here's his finished window. Chuck caught on to each step easily and really made short work of this project. His attention to detail helped lift this window from a simple completed project to a work of perfection. All in all it's a job VERY well done. Chuck should be very proud of his work.

Next up we take a look at how Jessica did with her sailboat window. This is the first time that this pattern has been done in our workshop so I was anxious to see how things would go. Even before Jessica started it I knew that it would turn out just fine because her glass cutting abilities were clearly better than average. I always worry a little when a new student picks up a cutter for the first time but in this workshop I had nothing to worry about. Here's a look at the lone drawn pattern that Jessica picked to make.


Jessica still needed to grind all of her pieces so the foil would stick to the edge of the glass but in this case a simple skimming of the glass made for a perfect fit. Once all of her pieces were ground she wrapped everything in 7/32 copper foil and what you see below is what she accomplished with just one day of work with us. I never expected these windows to be wrapped on the first day so it was no wonder that everyone finished ahead of schedule the next day!

I distinctly recall Russ asking me if I took pictures of Jessica and Martin's windows after the borders were attached, but I also recall me saying that I'd take the pictures as soon as we got the brass channel applied. Of course, I forgot about taking pictures just 30 seconds later. Let me tell you--It's Hell getting old. That said, once Jessica had her border tacked to her window she picked up her soldering iron and began melting lead onto the copper foil that is visible between each piece of glass. Once that was finished (and I think that all of the soldering was completed by 4:30) she then washed off all of the water soluble flux using a wet sponge in the oversized sink that we have in the shop. Jessica felt that the silver solder against the blues and grays of her window looked better than it would if she changed the color of the lead to a copper color, and we all agreed. Instead of applying Copper Sulfate she just skipped straight to the part where she applied some Turtle Wax to her lead lines. After a quick buffing Jessica had this beautiful window to show for her two days of work. All of the curves in this window are smooth and flow gracefully and that is what this sailboat window is all about--Flow. I've got to say that you did a GREAT job, Jessica!

And last, but certainly not least, we take a look at the window that Martin decided to make. Like his wife, Jessica, he had picked a pattern that had never been done in the workshop before. I was a little bit apprehensive about anyone doing this pattern because it contains more pieces than any of the other patterns and if Martin had any issues cutting glass, or grinding, or foiling, or even soldering, it could have slowed us down in a big way. But Martin's technical knowledge came through in spades and the word 'problem' wasn't in our vocabulary on this weekend.


We always use a square in the bottom left corner to be sure that our window will have four perfect right angles for corners. We put the square in place when we begin grinding and we always pin the square down so it won't shift. Any time your glass shifts while you are grinding you will have a problem. Stability is the key! If you look closely you can see a little section of the metal square running along the left side and across the bottom of the window. Martin made sure that the width along the bottom of his window matched the width along the top, and that the height was the same on the left and right sides thus making his window a perfect rectangle. Once he wrapped his pieces we tacked it all together, added his border (which is the same color as Jessica's but with a different texture), and then got ready for the final solder.

Let me state for the record that I love to solder. There's no better feeling than knowing that I have a BIG window to solder that will take most of the day to work on. My mind is always a million miles away when I'm soldering because I tend to do handle that step while on 'auto-pilot'. And I have to say that even though Martin was new to soldering (and he had to concentrate on what he was doing) he ended up with lead lines on his window that were better than people who have been soldering for months. His work was easily better than any stained glass that I've seen in stores lately. And here's his completed window to prove my point. Martin has a perfectly symmetrical lighthouse made of nice straight lines with a perfect bead on all of his solder lines. All in all, another job WELL done!

We had a great time in class as everyone was always joking around and laughing. Russ made some great food and everyone enjoyed that as much as the stained glass part of the weekend. I always look forward to our Weekend Workshops and this experience with Martin, Jessica and Chuck ranks a 10 out of 10. I want to personally thank each of them for making my job so stress free that the idea of it being work was never factored into the equation. I wish them all the best!
Paul
No comments:
Post a Comment