So then, our first finished project this week involved more than just glass cutting and soldering. Beckey S's Cheetah Window has wires soldered to it to form whiskers and spots 'painted' on it! To achieve this effect Becky traced the outlines of each of her ground pieces of glass that would have spots on them onto paper. She then drew in spots by hand with a sharpie marker. We scanned the images into the computer and then printed them onto a special Decal Paper that works only with a laser printer (an ink jet printer won't work). This Decal Paper was then cut up to match Becky's glass pieces again (which was why we outlined them in the first place.) Next Becky briefly soaked the paper pieces in water and then slid the decal off of the paper and onto her glass pieces. After drying (for a day) the glass was fired in our kiln overnight and the end result became pieces of glass with permanent spots. We even went so far as to blur the spots before we printed them to give them a less sharp edge. All in all it worked WONDERFULLY as you can see by her finished piece below. Beautiful!


This week we also got to see Terry complete her humming bird window and the colors are spectacular (as is the rest of the window). Terry always catches people's eyes with her work and this window is no exception.

Betty put the finishing touches on her Mardi Gras Mask Window this week and it's another winner. Betty flies through windows pretty quickly and she tends to donate most of them. That's a heart of gold right there.


Bonnie completed her Butterfly Lawn Ornament by attaching the stake
that will anchor it to the ground. Once that was done she washed it,
gave it a coat of wax for protection,and took it home to put in the
yard. Don't bother looking for the stake in the picture though-- I photoshopped it out as I do with the hangers that we attach to completed windows as well.

And our last completed project this week was this Rabbit Lawn Ornament which was made by Rowena. this is a sister piece to her other Rabbit Lawn ornament and has something slightly different about it that is hard to spot unless you see the two of them together-- this is a mirror image of her first one! When I went to draw the eye on it I knew there was something 'off' about this one! lol


Carol got all but the borders cut, ground, wrapped and tacked for her Waterlily and Reeds Window this week. She'd decided to go with a double border on this piece and got the first thin, clear accent border attached. She then got a second green border cut and sized and she's taken those pieces along home with her to wrap. When she returns she'll be able to attach the final border, add some channel and then start soldering.

Ann made some major progress on her Fancy Fleur De Lis Window this week. She won't be cutting out her background glass until the corners and the Fleur De Lis are tacked together. This will help make her grid work line up. It's nice and colorful and the window is BIG!

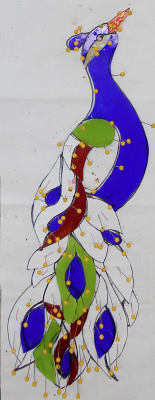
Cindy started working on a Peacock Suncatcher/Window(?) and has a great portion of the bird cut out already. She's begun grinding her pieces which means that this will soon be completed-- especially of she keeps up at this pace!
Next we look at Terry's newest Cross. As you can see it's already been foiled so this will surely be a completed project when we return again next week. She's going through these crosses so fast I can barely keep track of them!

Jeannette has all of the subject matter for her Humming Birds and Fuschia Window all tacked together and the original game plan was to cut the background out from one piece of glass; however, the background glass that Jeannette wants to use was cut in half the wrong direction so it's too small to cut everything from. (If you look closely you can see the cut running down the center of the glass.) Rather than making three separate passes of cutting, grinding wrapping and tacking to get things to fit nicely it will be far easier to just cut pattern pieces for the background and cut each piece individually. She may have lost the battle but she WILL win the war because you can already see that this window is going to be beautiful.

Myrt has officially finished cutting all of the glass for her Two Cardinals Window and even managed to get all of the pieces tacked together. The double border system that she used really sets this piece off nicely. I guess this means that Myrt will begin soldering this when she comes back to see us next week.

Next up there's Mary Grace who started working on a smallish beveled panel. She's really catching on to this Stained Glass stuff because before class was over with she had it all cut and ground. Her center is even tacked together already leaving only the border left to wrap and then attach. This will end up fitting into a frame that she has and the sizing is perfect. Not only did Mary Grace do an excellent job on cutting and grinding this piece but she also got two Angel Suncatchers cut out as well! That's what I call progress.

Mary is moving along nicely on her first window with us. She got her
final border attached as soon as she walked in the door and then got
some brass channel attached to the window as well. After that was over
with she began the 'scary' task of soldering but you know
what? Mary wasn't afraid at all and she did a wonderful job on the
front side of this project. Next week she'll complete the back side
(which, as you can see, is already started) and then take this home with
her!

Jan started her class by wrapping and then tacking the four pieces of background glass to her Baseball Diamond. Once that was done we remeasured the size for her border to make sure the finished window will be the proper size (measure twice, cut once.) We put her sheet of border glass on the strip cutter and within a minute we had all of the strips needed to make her border. We then cut the strips into equal smaller lengths and then Jan skimmed those border pieces on the grinder. Jan will surely begin soldering this window next week because she's taken her border pieces home with her to wrap.

Tracey, like Mary, tacked the border to her Jester Window and then watched as I demonstrated how to cut and attach a brass channel to it as well. After a quick soldering lesson Tracey was raring to go. Later when I came back to see how she was doing I discovered that Tracey took to soldering like a fish to water. With just the back side left to go I won't be surprised to see this be finished when she comes back next week.


Betty not only finished her Mardi Gras Mask, she also tacked together her Christmas Bells Window as well. Once the center was tacked together we were able to strip cut her border and then cut them down to their individual pieces. Betty chose a green glass for her border and even added some glass globs to form Holly Berries in the bows. Nice.


Bonnie not only completed her Butterfly Lawn Ornament-- she also worked on this mystery piece as well. All I can safely tell is is that she has the center section all cut out and mostly ground. The rest of this story will be revealed at a later date.

Jeanne has decided to make a few Butterfly Lawn Ornaments and started out by picking out her color schemes. Over the years we've seen this popular pattern done in many different colors with many different color placement variations. In the end Jeanne settled on my favorite rendition of it and you can see in the picture some of the different glasses that she'll begin cutting out next week.

Bayou Salé GlassWorks
No comments:
Post a Comment