We had a Weekend Workshop WAY back in July that I've yet to write about. With another coming up on us TOMORROW(!) I figured I'd best get off of my butt and commit this Workshop's activities to the internet. As per usual we had four students. Out of those four we had one newcomer, one two timer, and two six timers! Below are the windows that were made, now let's see how they all came together.
Emily took a Workshop with us back in 2016 and since she signed up again for a third Workshop I'd say that we have a yearly date with her! She had decided to make a Beveled Fleur De this time around and she wasn't going to use any color at all in it-- just clear textures. The first thing she did was to wrap her Fleur De Lis bevels and then pin them to the pattern so she could solder them together as one piece.
Next she cut a rectangular piece of Glue Chip and laid her cluster on top of it. Once it was correctly positioned she traced around it and added 6 lead lines that run to the edges of the rectangular piece. She cut along those lines and then skimmed the pieces of Glue Chip on the grinder ensuring a perfect fit. We then used a strip cutter to cut 1/2 inch strips to form the inner border and then Emily wrapped them and prepared to tack them to the window as well.
The final border was cut the same as the inner border but with one difference--we made it twice as wide. Once everything was tacked together some brass channel was added to the edges of the window and then Emily began soldering. The solder goes on as a silver color but that will change after the window is all cleaned up.
Once the soldering looked good Emily washed the window and them colored the lead with black patina. The black takes about 45 minutes to set so Emily found herself with a little time to sit back and relax a bit. An hour later she had washed her window for a second time, waxed the lead to prevent it from tarnishing, and then hung it up for this picture. Emily did great and she was a pleasure to spend a weekend with.
Next we look at what Janelle (our new student) made with us. She decided to do the Stylized Fleur De Lis Window and below you can see that she's begun tracing her paper pattern pieces onto a piece of glass with a permanent Sharpie marker. How does the marker come off of the glass if it's permanent? Well, quite easily, actually! There's not much that can mark glass so even a permanent marker comes off easily with water.
With her two shades of amber glass and her brown glass all cut out Janelle then moved along to the eight pieces of background glass.
After her glue chip background was cut out Janelle spent about two hours at the grinder to get everything fitting together perfectly. Once that was done she wrapped the edges of each piece of glass with copper foil and then tacked the center section together with solder (lead). Normally this window is made with just one border but Janelle saw that everyone else was going with two borders and decided to follow suit. Once they were both attached (borders take very little time to do) Janelle began soldering her window. Here you can see her at work with the soldering iron in her hand.
Once everything looked good we washed her window and then colored the lead copper since it matched the colors of the window so nicely. For a first time student Janelle did wonderfully. I was a little concerned that she might get worried if the other students moved along quicker than her due to their having done this before but that never happened. Janelle more then held her own in class and ended up leaving with this beautiful Stylized Fleur De Lis Window. What a GREAT job!
As a 6 time workshop attendant, Angie decided to go with a Cardinal Window this time around. Angie cut out the two birds first and then built the background of the image around them.
She didn't cut the lead lines through the top red Cardinal because we wanted to grind everything else and then make the cuts to form the lead line branch. this ensured that eack of the lines would connect to one another perfectly. It's an advanced technique that really helps make aligning things so much easier. As you can see, the red cardinal currently looks like it's floating but it won't when this is completed.
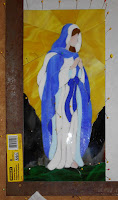
So, lastly we look at the Virgin Mary Window that Roxane made. It's a beautiful design and in this first picture you can see that Angie started cutting her green ground first. You can cut your glass in any order you want but I always recommend cutting the glass that you know you want to use first so you can match other colors around the glass you know that you like.
And here's her window just 45 minutes later all ground and fitting together. Grinding can go very quickly if you just cut off the line while cutting! Look at the picture above and this one-- they are practically identical because Roxane started with pieces that already fit together.
Here's Mary all completed with a double border surrounding her. The colors are wonderful and so is the finished window. Roxane does wonderful work and this window proves it.
We all had a great time in class (as we always do) and even though a lot of work was accomplished there was still plenty of time for laughter as well. When you know what you're doing as these ladies do, well, things just go smoothly from start to finish!
Paul


No comments:
Post a Comment