I often show photoshopped images of suncatchers that have been 'constructed' using glass that has harsh straight lines throughout it but this week I have an actual example from a lap that I repaired. In the pink flower below you can see that the petals were cut from glass that consisted of straight lines. Then, to make matters even worse, it was cut from one continuous piece of glass so that all of the lines join perfectly through the flower petals. Yes, this made the flower VERY easy to grind but it also makes the flower look like a sheet of glass rather than a soft beautiful, flowing flower. And every flower in this lamp looks the same-- if you look closely you can see that the darker flower to the left of the lamp has the exact same problem. :-(

Now on to something done beautifully. Jeannette completed her large Pumpkin Window and it is a window that just can't be ignored. There's just something about earth tone colors that strikes a chord with me (and most other people). The soldering on this window was also exquisite as I really had nothing to touch up at all. A beautiful job all around for sure. (And a big thanks goes to Angie for the picture!)

Jeannette also completed this Santa Moon along with her Pumpkin Window. She's practically knocking them out faster than I can keep up with!

Rowena made this new Peacock Suncatcher from a picture that she found on the internet. After printing it out she just put a piece of paper on top of it and traced around all of the lead lines to make her pattern . The end result is a very graceful Peacock!

Terry's Santa Face is living large! This is bigger that the picture suggests (as is usually the case.) And Terry always makes turns out a quality product which is also usually the case! But Santa isn't all that Terry managed to complete....

Terry also made two Crosses that she designed herself. They underwent one or two minor design changes as she's re-made them but the design is now perfect. These are truly beautiful and their owners will surely be pleased with them. Also, be sure to notice the Louisiana Disc that she made as well. It is the perfect size for a tree ornament.

Melissa got this beautiful teal colored Stained Glass Cross made all in one short night. Rather than using bevels for the four ends of the cross Melissa used a single bevel in the center and then four iridized pieces of glass cut into the shape of bevels. Unfortunately, she had used an older version of the cross pattern and it wasn't 'optimized' so things had to be ground to get the perfect fit you see below. I've given her an updated pattern so that the rest of her Cross cutting will go far smoother over the weeks to come.

Angie began work on this Calla Lily Window and already has it all cut out. She's begun grinding her pieces and has taken it home so that she can get it ready for it's border. She hopes to finish this when she comes back in next week and if it's all wrapped when she walks back into class I have no doubt that will happen.

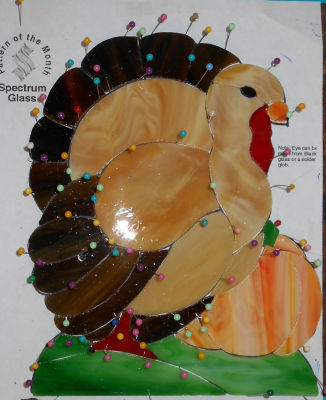
As you can see, Bonnie doesn't waste any time while she's in class because she cut and ground her Thanksgiving Turkey in one 3 hour session. She's taken it home to wrap and possibly even solder.

Cindy's Mermaid is tacked together and ready for its background glass. She's hoping to get some letters fired on to the hat and we'll see how that goes next week because that is one small hat. It's in the kiln as I type this so by the time you read this we'll know what happened.


Mary was a cutting fool throughout class as she completed cutting out all of her flowers and leaves. Now she's working on her background glass and that should be very easy for her since the glass she picked cuts far easier than the other glass that she's used in this window.

Susan R began cutting out this small Pumpkin Panel which is somewhat reminiscent of Jeannette's larger window. Pumpkins are fast becoming a popular subject here in class and Susan's is going to be beautiful. This week Susan saw how putting too much pressure on the glass as you score it can cause BIG problems when trying to break it. Sometimes just a little is enough.

Mary Grace started a Tree of Life Window and she's moving along wonderfully on it. She's got the majority of it cut out already and I'm proud to say that she has randomized her color placement of the leaves without overthinking it. Random Color Placement means that two neighboring pieces may very well be the same color. Systematic Placement would prevent neighboring pieces from being the same color. Interestingly enough, many people don't realize there's a difference.

Betty got her Geometric Window all ground and then tacked it together so she could cut her first border and fill in two missing pieces. See, once you've ground your pieces it's ALWAYS best to avoid re-cutting any pieces from your original pattern beause you can get a more accurate fit by tracing out the opening once the window is tacked. I've watched many people waste a lot of glass by ignoring this simple piece of advice..

Linda F decided that an artists license isn't all that it's cracked up to be because when she cut her holly berries out of yellow glass she just didn't like the look. So she found some red that had a different hue and texture from the red she's used for her background and cut the berries out of that. She was able to get her entire window ground before she left class and I must say that her cutting abilities have grown by leaps and bounds.

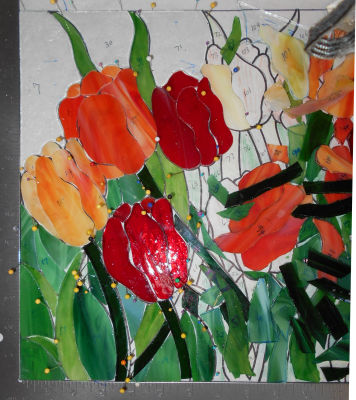
Barbara H worked some more on grinding her tulip window and learned how important it is to pin your pieces into place. We discovered that things had been shifting continually to the right so we nipped that problem in the bud by pinning down all of the pieces that she had ground and then refitting them at the grinder. By the time Barbara left she had a much better understanding of the grinding process and I have come up with a great way to illustrate it. We will be showing that to our students next week.
Myrt is well on her way to the soldering stage of her Ribbon Bordered Fleur De Lis Window. Now that everything has been ground she's begun wrapping all of her pieces. She's taken this home with her in the hopes of getting some work done on it over the next two weeks because Myrt won't be in class next week. The Margarita Club will be having a meeting that conflicts with glass class and, well, a woman has to have her priorities. ;-)

Linda L has her second LOVE panel cut, ground, wrapped and tacked together. She'll certainly finish this when she comes back in and will then move on to another Mickey Mouse Window.

Shelley got her Kokopelli Window tacked together and then added the perfect border to her already stunning window. It's been cut from a baroque glass that fits in perfectly with the two other colors that she's used. She's taken this hone with her and may even get it completed when she returns.

Martha's Day Lily is looking incredible. She's taking her time while cutting this and as you can see it's already fitting together. When you keep your cutting wheel inside the line that you've traced onto the glass you are able to grind your window by simply skimming the pieces. Martha will be able to do that with this window.

Rowena not only finished her Peacock Suncatcher-- she also started work on a new window featuring a beveled letter C in an oval. This one is bigger than the last letter window that she made, but it will undoubtedly be just as beautiful.

Terry's working on a new Caduceus Window and after drawing her pattern she cut out the paper pieces and started tracing them onto her glass. Although there's only one piece of glass cut here I'm sure we'll see a lot more cut out when Terry returns.

Brenda began working on her second Transom Window and already has her background glass cut out, ground and ready to be foiled. She's almost finished with this pair of windows and she's doing them in record time.

Beth has decided to make a Tree Window as her first project with us. There are a lot of tiny pieces in this but Beth is going to take it one piece at a time until it's completed. I have no doubt that she'll do a wonderful job on this. She's already got her brown tree trunk traced onto her brown glass and will begin cutting it when she comes back in.

And to wrap things up we look at Jan's new Madonna pattern which I'm pretty sure will turn into a popular design here in our classes. Although the picture we saw of this was squared off, Jan thinks that she's just going to make this as a large suncatcher. I think it's going to look great!

And there you have it. A weeks worth of classes in one small easy to digest blog entry!
Paul
Bayou Salé GlassWorks
No comments:
Post a Comment