Running Pliers are easy to use if you know the simple rules to using them.
1) Set your pliers. We're going to go a bit out of sequence and cover that long winded lesson next week.
2) Position your pliers on the glass so that the score you made with your cutter lines up perfectly with the mark in the center of the pliers. The score must flow smoothly into that mark as if both the mark and the score were one continuous line. Don't hold your pliers at an angle to your score line.
3) Don't push the glass all the way into the jaws of the pliers as you see on the left side of the image below. Your pliers should be near the edge of the glass as you can see on the right side of the image.

Lastly, don't hold your pliers near the center of the grip as shown in the top most image. Instead, hold them towards the back end of the pliers. You'll find that the handle curves towards the back so that holding them this way is comfortable. Holding them as shown in the very bottom image allow you to apply as little pressure as possible when breaking you glass. Score lines will break far easier and accurately when you apply the least amount of pressure to them. In other words, you'll break less glass this way!
Okay then, Martha's first of three Wedding Boxes has turned out spectacular indeed. These boxes are each made to specifically match the invitation that is encased into the lid of the box so that no two are ever the same. Look at the flower in the upper left of the invitation and there it is recreated in a glass panel to the right of the invitation. These make a perfect wedding gift because of how personalized they are.
Linda F's Louisville Cardinals Window proves that if you follow the pattern exactly you'll always come out a winner. The graceful curves of the red granite glass pieces that make up the letter 'L' is akin to perfect penmanship. What Cardinals fan wouldn't want this in their window?
When Annette asked if I could draw this Crow and Moon pattern for her I said, 'sure' and then she countered with the fact that she really didn't want to make it because the theme was too 'dark' for her tastes. Myself, I liked the pattern but saw where she was coming from. A day or two later she called and said not to bother drawing it but I did so anyway because I really felt that it had a Stephen King's The Stand vibe about it (which I love). A few weeks later Annette saw the pattern and after seeing it drawn up and colored in she decided to go ahead and make it. Here we see her with 3 hours of work involved. Yep, it's all cut out already and it looks great!

With the grinding of her Cardinal Window almost complete (I think there are less than 5 pieces to go) I'd say that Tracey is figuratively flying through this window faster than a humming bird flaps its wings. As I suspected, it looks fantastic. There's something about the size of this window that makes it look better than ever-- it's not too big and it's not too small. I may make one of these for my next show. Good pick, Tracey!
Susan R has got a Garden Gnome in the form of a Bee well underway here. Everything has been cut out and ground which means that she'll be wrapping this and then soldering it upon her return. This little bearded guy is a cute one!
Kerry only has four pieces left to grind and then his Butterfly and Sun scene will be ready to be wrapped. There will be a beveled border surrounding this and there's a very good chance that we'll see that attached when Kerry returns next week because this is close to being finished already.
Rowena started this Buck Window while she was at home and this week she
wrapped it, tacked it, and got a border cut out for it.
We tried numerous colors for the border and in the end EVERYONE agreed
that this forest green and tan mix was the perfect color for the job. With
just some soldering left to go on the rear side of this I'd say that it is just about ready to hang in a
window.
Lisa's making four Harry Potter Sorting Hat Nightlights and she has three of them ready to be foiled with just one more left to grind.
"Now slip me snug around your ears-- I've never been wrong.
I'll have a look inside your mind and tell you where you belong."
Linda L's Plate Flower Window is really coming together quickly. She only has a few pieces of background left to grind and then she'll wrap and tack this together. We're going to leave holes where the plates should go when she solders this so the window will lay flat on the table on both its front side and it's back. Once everything is soldered we'll add the plates and turn this into a 3D project once and for all.

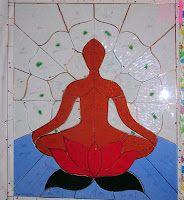
In the end Sheri's tumble last only broke a few pieces and a little bit of her pride. Since some of the glass can't be obtained any more she had to replace all of the glass you see marked with green dots. All in all I like the new glass even better than what she originally picked. Sometimes bad things work out for the best. Sheri, Like Linda L above, will also leave holes in her Chakra Yoga Window while she is soldering it because she has jewels that will poke out close to 2 inches running down the center of this window. It's easy to solder the front side with the jewels in place but they would hold the window in the air while trying to solder the back side so we'll just ignore placing those jewels until the very end.

Kate's Dragonfly Window is also moving along nicely. She found just enough iridized glass for the wings and then spent time finding 3 blues that match nicely. On paper they appear darker than they really are but those water ripples are going to look spectacular. For a new student she sure cuts glass wonderfully and as of this week she's leaning more towards the orange dragonfly body.
With her Cardinals ready to be wrapped and her double Sunflower almost completely ground I think Mary Grace will be taking home some more Hoop projects next week. Would it sound too much like a dad joke if I said that she's on a roll with these Hoop designs??
Bee has just three more pieces to grind and then she'll move on over to foiling and then tacking together her Dove. Once it's tacked she'll trace it on top of her background glass and then cut the radiating rays (lines). That part will go very, VERY quickly!
Speaking of rays, Susan D's Remmus Window just has a few lines left to be soldered on its back side (which you see below) and then it will be ready for framing. We've already checked the size and it fits into its wrought iron frame as perfectly as it can so we'll surely see this completed next week.
MiMi ran out of a few different textures of glass hexagons so rather than putting her latest insert together and omitting textures that are clearly visible in the other windows MiMi cut out scores of more hexagons. She's got another tray full and that means that her new insert will be completely balanced in regards to the other inserts that she's already made and the ones that she WILL be making. Consistency is a very important thing.
Shawn almost has her Scuba Diver Window completely wrapped now which means that she'll be tacking this together when she returns. Once tacked we will redesign the head of the diver and then deal with the final border. Easy peasy.
Shelley is dealing with the beak of her Flamingo the same way that Shawn will be dealing with her diver head. Shelley's pattern was changed as she was making this so the beak has been left empty (for now). Once tacked together we will trace out the remaining pieces by placing the glass that she wants to use under the opening and then tracing around it. Things will fit perfectly and there will be no guess work as to how things will look since we can see exactly how the glass will show up since it will be under the window before we cut it.
Cindy's Franklin Street Light Window is all cut out and that sky looks amazing! It's all one continuous cut from a single piece of glass so the patterns in the sky match perfectly. At first Cindy was unsure about the dark blue border she picked but I think it looks wonderful and wouldn't change it for the world.
Linda F resumed work on her Flower Hoop after she completed her Louisville Cardinals Window and as you can see, all but the leaves have been foiled. That means that this will most likely be permanently affixed to its hoop the next time you see it!
Mary has the front of her Red Fish Window soldered and will flip this over to do the second side whens she comes back in. I think there's going to be a very good chance that she takes it home with her for good when she returns. Look to see this among out completed projects in the next edition of our Blog.
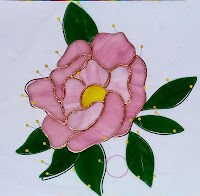
And there you have it. We may have only had two completed projects this week but you have to admit that they are both quality pieces and that's what stained glass should always be about- quality.
Paul
Bayou Salé GlassWorks


No comments:
Post a Comment