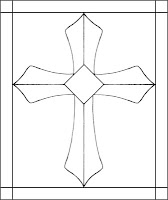
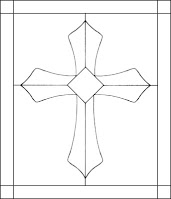
One of the hardest things in designing a pattern is to determine why and where to place the lead lines that will make your window possible to cut. In all actually, there is no right or wrong. It's all about aesthetics. That said, in most cases the trick is to minimize lead lines so your windows look less busy. Extra lead lines can be distracting. Below is a standard Cross Pattern that actually contains extra lines that are actually unnecessary. Those are lines which can easily be removed. The four lines radiating outward from the center of the cross to each corner of the window are inessential because the corner pieces can easily be cut without them. To me they only distract the eye and remove focus from the cross itself.
Below we've removed those unnecessary lines and now the cross stands out much better. If you want your subject matter to be the absolute focus of the window, extraneous lead lines need to go.
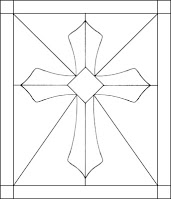
We can take the above example a little bit further though. The small lines that radiate from the four points of the cross can be removed if we make the cross touch the border of the window as you see below. To me, this is much cleaner and the cross is clearly seen as compared to the first pattern design.
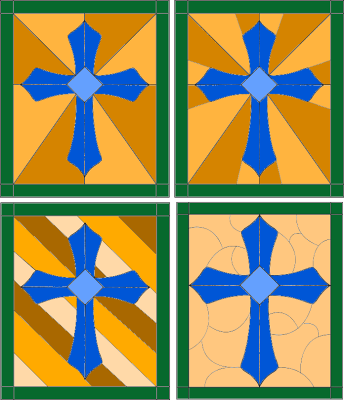
Lastly, I need to say extra lead lines may be added to make a statement or for stylized effect. In this case I believe that the first pattern we showed would be fine if you were using two alternating background colors. Believe it or not, I'd actually add more lines to achieve that effect so that the colors form a radiant pattern. Here are a few examples that help prove that there really is no right or wrong when it comes to lead lines. Sometimes you just want to be fancy (as in the bottom right). It's all a matter of preference.
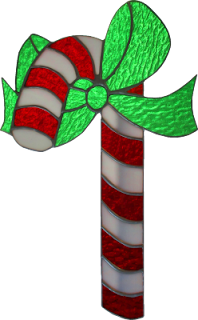
Susan R is saying Merry Christmas in a big way with her oversized Candy Cane Lawn Ornament. She's maintained her curves and her straight lines on this and the soldering on her edge work was top notch! This will surely decorate her yard for years to come.
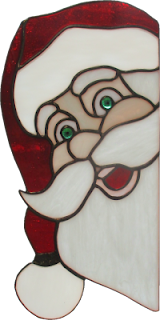
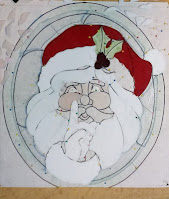
Linda L is taking a different approach to decorating her house for the Holidays with her Santa Head which appears to be looking into your house when mounted along the side of a window. She's made three of these and is only keeping one of them for herself so two people are going to be very happy when they receive their Santa Faces.
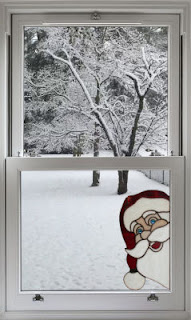
And here's what Santa looks like when he's 'installed'!
Next up is a very modern take on a Crucifix that I made in the spur of the moment. I really do like the look of it so I thought I'd post it here for inspiration. Also, you wouldn't believe how light weaight this is, or how delicate!
My Grinch Who Stole Christmas Suncatcher is another 'I have about two free hours, lets make this' kind of project. That green hand with pointed fingers is instantly recognizable and the neat thing is that there's a real Christmas Ornament at the end of that chain. My only complaint is that it's just a wee bit to small so I've fixed that and any others you see made here will be scaled to size correctly .
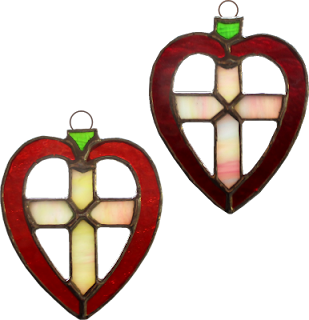
Cindy made several (six or seven) of these Apple/Cross/Hearts as gifts for teachers this year. It's a great idea and the best part about them is that she made them all out of scrap glass that was piling up on her work table which means that no two are alike, and she has a cleaner working space!
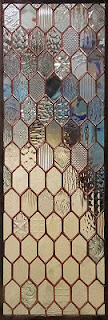
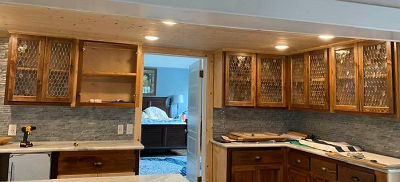
MiMi got her eighth (ocho) insert completed before she left class and we got a nice picture of how the textures of the clear glasses she used distorts EVERYTHING behind it. You wouldn't believe the mess that this door is concealing when we took its picture there in the shop. Luckily it went home in a nice new shiny red car that MiMi has named Salsa. And now you know the rest of the story.
And here's Ocho installed in MiMi's house. I believe it might be the one on the far left.
Annette made another JOY Suncatcher with Holly Leaves and Berries. She's used an iridised White glass for the letters and I think that this is possibly the best color scheme I've seen this done in yet. I think she said that she had another one under construction so I'll be looking forward to seeing what color Joy will be when we see it next.
Linda F got all of the glass cut for her Traditional Victorian Stained Glass Window and is now working on the grinding phase of its creation. The colors look great and her use of cathedral glass throughout give the window a very authentic antique feel.
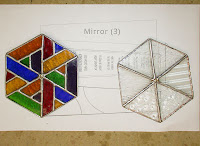
Melissa has begun assembling her Kaleidoscope and the two image wheels are already soldered and ready to be mounted as soon as the body is completed. Why is one clear? That's the texture wheel which is mounted between the color wheel and the mirrors. Rotating that wheel gives each view six different textures to chose from.
Cindy also worked on her mini Fleur De Lis Panel. It's taking shape now as she begins cutting out the actual Fleur De Lis itself.
Kerry is very far along on his Santa Claus Window. Santa is completely cut and Kerry has already got a good portion of him ground already. Will it be done in time for Christmas? I have no doubt about that!
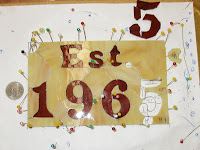
Susan D has only five more pieces left to grind and then she'll be ready to foil the pieces that make up her Nameplate Panel. Interestingly enough, I just noticed that she has 5 pieces left to go and they are all pieces that make up the number 5. The conspiracy theory portion of my mind wonders if that means anything...
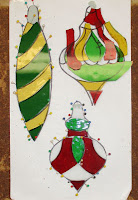
Get your Christmas Ornaments here! Shawn has another three cut out and one of them is completely ground already. She wastes no time while working on these, that's for sure.
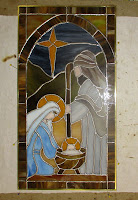
Betty's Nativity Scene Window is all assembles and is just awaiting solder now. In fact, I won't be surprised if this gets completed when she comes back in. I think the colors on this are perfect as it IS supposed to be a night scene. I shake my head every time I see nativity windows with a star surrounded by beautiful pale blue skies with well lit hills before them. It's just wrong.
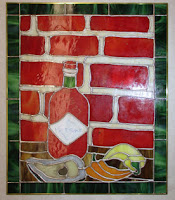
And lastly we have Judy's Louisiana Hot Sauce Window which is now completely soldered on the front with just the back side to go. There's only a little touch-up work to go on this and I'm fairly certain that we'll see this completed when we see it again one week from now. I can't wait!
And there you have it. It was a odd week in the shop with classes being transferred here and there all throughout the week. Thanksgiving always throws us for a loop since we have classes on Thursday. Still, we managed and our students turned out some spectacular work.
Paul


No comments:
Post a Comment