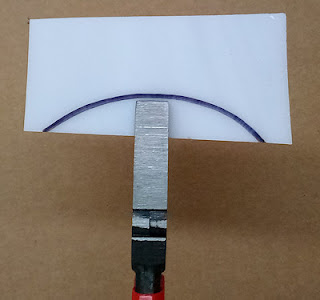
I see so many people using their Breaker/Grozier Pliers incorrectly. This leads to their break not following the score line. In the picture below the score of the cutter runs along the curved black line. This should be easy to separate because it follows the 3 to 1 curve rule, however the pliers are incorrectly placed which will most likely cause the score to fail. Never place your pliers in the center of a curve. Unless, of course, the curve is only as wide as the pliers (and even then I tend to hang the pliers off of the glass a bit.)
Always position your pliers at either end of the score line that you made as shown below.
When you start from the center the glass has to break in two directions at once. On a straight cut you could succeed with that method but on a curve you'll probably lose one or both the the points at the ends of the score line. Even with a straight line it's most desirable to start at the edge of the glass. Always start at the beginning of your cut. If it doesn't separate then try from the other end. If it still won't break it's most certainly a bad cut that needs to be redone.
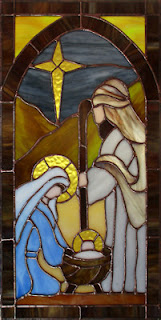
Well, there aren't any bad cuts in Betty's Nativity Scene Window which is now finished and up for sale. I like how she picked colors that represent the scene for what it is rather than the image that people have in their head-- the night sky and dark, softly blurred mountains create a still and peaceful setting for a glorious event.
Lisa made a Clown Fish (Nemo?) Nightlight as well as a Teddy Bear sleeping on the moon that I just can't get enough of. Embellished with tinned wire Curly Q's (yes, that's their technical name) Lisa also took the time to drill a hole into a yellow star and hang it above her serene, sleeping bear.
Annette got her Angel with a broken wing that she made last week repaired and then set her sights on a green Joy Suncatcher and a Mary, Joseph and Baby Jesus Suncatcher as well. Someone is really becoming well prepared for Christmas!
Speaking of Green, Shawn made this Grinch Hand with an Ornament in just one night and still had plenty of time to work on her other Ornaments as well. We've enlarged this pattern ever so slightly and that makes the curves easier to cut as well as better fitting the hand for a standard sized ornament. (But then again, only the Whos know how big the Grinch's hands actually are.)
Up next we have a Butterfly Suncatcher that Steve made this week. He's used all clear textures and a black patina on his lead for some great contrast. Steve sort of knows what he's doing because his wife is Lisa (who made the Bear on the Moon up above) and he's been watching and getting his hands into it a bit while she's been working on glass at home. Steve decided to come in for a while and make a few items and judging from his work on this I'd say we can expect big things from him!
Ann's latest batch of Christmas Ornaments are finished and I have to say that their pictures came out so much better than what showed on the camera viewfinder while I was taking them. She's used the same color scheme on all of the ornaments she's made and that means that every single one of them mix and match nicely with each other.
Susan R started work on two more Angled Flower Yard ornaments. She's altered this one to be a Poinsettia and she already has all the cutting finished for this pair. She may have just begun this project but already the end is near.
Sheri has decided that Grinch Hands are where it's at so she's begun cutting out six of them. Her cutting is very much spot on because you can easily see that they already fit together nicely even though they haven't been ground. The only thing left to cut to finish these are the red sleeves and the two white pieces that form the cuff.
Kerry's Santa Face has come together in a spectacular fashion this week. His eyes haven't been fitted into place yet but I always like to have the face tacked together. Having the pieces around the eyes tacked together prevents them from shifting out of position. We wouldn't want a cross eyed Santa now, would we?
Well now, this is very hard to see due to the use of white glass on top of a white pattern. What you are looking at is the state of Georgia cut out of red glass and set within white glass which will then be bordered by black glass and some bevels. Everything has been cut and ground so this is ready for Lisa to begin wrapping in foil.
Melissa said that I couldn't share a picture of the sides of her Kaleidoscope because she doesn't like the way it looks right now. Luckily, her pair of image wheels that will make the reflections in the mirrors of her Kaleidoscope were completed so I'm showing you a picture of them instead. Below you can see how the Textured clear glass helps distort and refract the colors to create incredible images.
Betty also had time to work on this commissioned piece based on the letter 'N'. It's all tacked together and it only needs to be soldered at this point. The 'problem' to this piece was that the customer wanted to avoid color in the finished piece. We'll take a look at just how Betty made this window stand out once we see it completed and hanging up in two weeks (alas, she won't be able to make it into class next week).
Linda L came in with a picture of a stained glass Succulent(?) that was displayed in an actual flowerpot. "Could we make a pattern like that," she asked? Of course we can, but we're also going to make it the way I always like to draw up patterns-- better than the original! This single Succulent will be made up of three overlapping layers to give it much more depth than the original could ever have. Here's the start of it and very soon you'll see just how it all comes together.
This is another window that's hard to see right now but once you know that it's an Old World Santa Claus you can see it pretty darned well. The tree, at this point, is still completely missing but that will be rectified as soon as Jan finishes Grinding each of these pieces. There's a name for this style of art but for the life of me I can't come up with it right now (no matter how much Googling I do.)
With her Fleur De Lis all cut and ground Cindy is ready to start foiling her pieces. A penny for your thoughts? How about a quarter for scale instead. Yes, that's a quarter along the bottom of this window to give you an idea of the size (or more so the lack of size) of Cindy's latest project.
With her borders all attached and only some soldering to go I'd say that Martha is quickly running towards the finish line on her Build Your Life Window. After agonizing what colors to use for her double borders the best choice was to use a heavily textured clear glass for the inner border and a solid green for the outer border. And, as you can already see, it all comes together wonderfully.
Susan D now has all of her Date Plaque Panel ground. She's begun foiling the minuscule pieces that form the background and the letters 'Est'. She's concerned that it isn't as straight as she'd like it to be but we aren't going to do anything about that until the bottom section is wrapped and tacked. Once that's done we can get down to the nitty gritty and make sure that everything is perfectly aligned along the top row. (Sort of like with Kerry's Santa's eyes.)
With all of the large feathers in the train of Mary Grace's Peacock being ground she is now ready to focus on the smaller, inner 'eye' sections. The trick here is to keep everything flowing gracefully so Mary Grace is taking her time to make sure this looks perfect.
With everything ground and fitting together perfectly Linda F has started foiling the pieces of her Victorian Window. You can see she's started in the lower left corner and is working her way upward and outward from there. Is this the correct way to do it? People always ask me where they should start but there is no right or wrong-- it ALL has to be done and the order in which the pieces are foiled matters not.
I'm so used to seeing this pattern made as a suncatcher that can fit on a single piece of paper. Shelley's altered that though and it causes me pause when I see just how much larger Shelley has made this rendition of the mermaid. And that's not the only thing that is larger (wink, wink!) This is one voluptuous looking Mermaid!
These are the three Christmas Ornaments that Shawn resumed work on after completing her Grinch Hand. There are only a few pieces left to grind so she'll surely be foiling these when she comes back in.
MiMi has a name for her new Octagon window (just like she did for her last one) but it's not Nueve as you might expect (since her last window was known as Ocho). This one apparently has German heritage. Neun! When I took German in high school Frau Robinson always told me that there shouldn't be an exclamation point at the end of everything that I spoke in German, but I couldn't seem to break that habit. In this case both MiMi and myself agree that Neun should be spoken with as much force as one can muster.
NEUN!
And there ya go! Christmas isn't just around the corner-- it's only a few days away at this point. We have a lot of Christmas projects under way and we'll see the ones that need to be completed by the 25th finished, and others will carry over to the New Year a bit to remind us that it will be coming around again in a very short year from now.
Paul
Bayou Salé GlassWorks


No comments:
Post a Comment