Kerry's Large Butterfly turned heads while he was working on it but now that it's complete I know that there's going to be even more talk about it. Many were impressed with its size and others wondered how it was going to stay together since it isn't a window but rather a large suncatcher (18 inches wide). At the end of this post I'll show you exactly where the re-bar stripping went in which supported the wings and made the entire piece impressively sturdy.
I have to say that this is a first here in the shop. Linda F asked if I happened to have a Yankee's Logo pattern but I didn't however, the logo was very easy to turn into a glass pattern. Judging by how quickly she turned this out I'd say that it's not a very hard pattern to make either, but then again Linda has some mad stained glass skills so I know that I need to take that into consideration.
Judy made easy work out of her three layer border as well as the Cardinal itself. The end result is perfect and easily recognizable which, judging by some of the stained glass cardinals (and other assorted birds) that I've seen on the internet, may not be all that easy to accomplish!
Angie wrapped up her Long Tall Santa Panel and her Frosty The Snowman as well. She even learned how to dot her eyes while making her Santa. Just one quick drop of glass paint or some nail polish and you're good to go!
Cindy made a slew, a batch, a flock, a heap, or whatever you call a bunch of crosses this week and only two of them use the same glass. Since those two lavender Crosses are made from completely different patterns you might not even notice the color similarity. I do believe that the center one is the standout though.
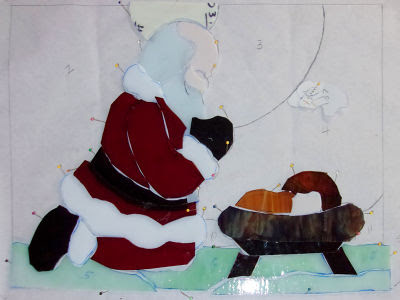
And now we move along to projects that are still under construction starting with Ann's Kneeling Santa. I already liked the pattern (whose inspiration came from a string of Christmas lights) but seeing it here cut out with everything but the sky 'colored' in I have to say that I like it even more. I'll bet we see more of these being done in the weeks to come.
After finishing her Crosses Cindy began working on a new Stained Glass Bowl. Using assorted odds and end of glass which she sometimes tweaks for a 'perfect' fit, Cindy builds these inside of a stainless steel bowl. She tacks her pieces together one row at a time and once it is at the height she wants she just turns the bowl over, and out it pops!
Lara was back this week and her Louisiana Collage is looking to be halfway or even more than halfway completed. She is literally grinding this to complete perfection. If you look at the large picture you can see how exactly her ground pieces match the lines on the pattern.
Susan R's Large Christmas Ornament has now been completely cut out and she's ready to begin grinding this festive window decoration. She's used a beautiful piece of white iridised glass for the bow as well as the stripe on the ornament which is really going to set this off nicely when light hits it from the front.
Betty is skipping Christmas and moving right on over to Mardi Gras. Or at least she is during this week and next week. It's hard to see but she now has her glue chip background all cut and ground which means that there's only a green border left to go and then she'll be able to solder this and call it a window.
Cheryl also made great progress on her LSU Tower Window. After getting her border wrapped and attached she then set upon soldering her purple and gold window. When class was finished her front side was completed which means that this will most likely be finished when she comes back in.
Linda L is making another 3D project and this Succulent design is based on something that she saw on the internet and then drew up herself. It's hard to tell how many petals she'll need to made three layers but we both feel that five petals in three different sizes will do the job. We'll find out when she returns because this is just about ready to be assembled.
Lisa N traced out her paper pattern, cut it up and then began cutting actual glass for the Texas Window that she drew up all by her lonestar lonesome. The positioning of the star and the yellow rose required a little bit of resizing here and there but that's generally the case for most stained glass patterns. All in all I give her an A+ for her pattern designing skills!
June's Razorback looks more and more impressive (and ferocious) with each passing week. I think she's going to be very happy with this when she gets to see it finished and hanging up. And she won't be the only person happy with it since I know that this is going to be gifted to an Arkansas Razorbacks fan.
As predicted, Susan D has her Peacock all tacked together. She wants an inner border of bevels to surround this so she will construct the border and then cut and grind the background to fit it. That way she won't have to worry about possibly having to grind bevels or spacing them out due to sizing errors that stock bevels are sometimes afflicted with. After that the background will get cut very quickly.
Let has the front of her Tiger Eye Window all soldered and the back is ready to go. Since Let manages to get a lot accomplished throughout the week while she's at home I have a sneaking suspicion that this will be completely soldered when she brings it back into class.
Everything is cut, everything is ground, everything is wrapped, everything is tacked, and the front side of Bee's Deer Widow has even been soldered. We added channel along the straight edges of the outside perimeter and low and behold those antlers that hang out of the window have lead lines in just the right places which make them nice and sturdy. We'll see this hanging up in out next post.
Here's a perfect example where someone assembled the inner beveled border BEFORE she cut her background glass. Martha's Yellow Rose background glass is a perfect fit and she also managed to get her final border attached as well. With the front and back side soldered this will easily be completed upon her return.
It's looking like there will be no shortage of completed projects next week because Melissa's Kingdom Hearts Window only needs to get some channel on it and have a few touch ups here and there before she can call this finished-- and that won't take very long at all.
Sheri has a Frosty The Snowman Panel and two out of four(?) Poinsettia's cut out and well on their way to being completed. She has no problems soldering and that's all that's left to do on these pieces. Have a Sheri Merry Christmas!
Next we look at some of Steve's glass choices for his Southern Belle Window. Now that he has things pretty much squared away in terms of color he says that he'll be ready to begin cutting actual glass when he returns. I, for one, can't wait to see his beautiful, original design come together.
Lastly we examine how Kerry's bracing was applied to his butterfly. Without the bracing the wings and the body would certainly pull apart from each other just by their weight alone but we've added a wire-like metal called Re Strip (or Flex Bar) between the pieces of glass where the green lines indicate. These prevent the wings from 'folding' along the body and pulling loose. These 'wires' are between the glass and invisible once solder is applied. The purple line that travels along the bottom half of the body is a thin wire that prevents the body that pokes out below the wings from bending. All in all Kerry has a very stable Suncatcher!
And that as they say is that!
Paul


No comments:
Post a Comment