Sunday, May 11, 2014

Introducing The Solder Shovel!

In this Special Edition Post we'll be covering our latest Weekend Workshop which happened on May 3rd and 4th. We had three people sign up and by 5:00pm on Sunday we had three windows completed and ready to be cleaned up to be taken home.  Here's a look at the finished windows.


On Saturday morning at 9am we got to meet Martin, Jessica and Chuck, none of whom had ever made a window before.  After introductions were made we all settled down to a hands-on glass cutting lesson which lasted about an hour and a half.  We started by cutting a straight line, then a curve, a compound curve, a circle and ended with a deep inside curve.  We learned how glass breaks and how to predict it's path and use this knowledge to our advantage.  The first hour generally tells me how well things will go and I am pleased to say that all three of our students were wonderful at cutting glass.  With the hardest part out of the way, Martin, Jessica and Chuck picked up their scissors and started cutting their paper patterns in pattern pieces..

We're going to start off with Chuck's window only because I have one extra picture of his progress that I somehow skipped over in the other two windows.  Chuck had decided to make our most popular design:  The Geometric Window.  I think the appeal of this windows is that it's a classic stained glass design that incorporates nice bright colors.  This is Chucks pattern.


After cutting up the poster board copy Chuck placed all of the pattern pieces onto their respective colors of glass, traced around them using a permanent marker (which isn't very permanent on glass), and then began to cut out the shapes that he traced onto the glass.  Chuck started with his diamonds first, because they were the easiest things to cut, and finished by cutting out the harder clear background glass pieces.  Here's his window all cut out and ready to be ground.


After spending a good two hours or more at the grinder Chuck had everything fitting together wonderfully.  The hardest part of this window is making sure that all of the lines are straight, which Chuck achieved with ease.  Once everything was fitted together he began wrapping all of his pieces with copper foil.  Lead won't stick to glass so we need to apply foil to give the lead something to melt onto.  At the end of the first day Chuck left with his window looking like this.
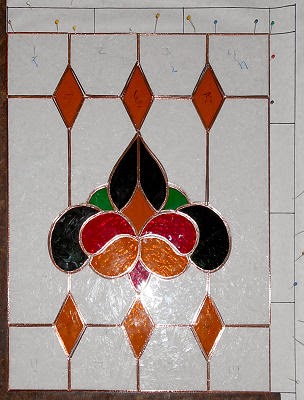

Classes resumed Sunday morning and the first thing Chuck did was to tack his window together with a light (but even) coating of lead.  We use 50/50 which is against the norm since most stained glass crafters use 60/40, but I've found it to be much easier to work with and I think Chuck agrees.  Once the window was tacked together we used a strip cutter to cut out his border pieces which he then wrapped, tacked into place, and added a brass channel around the outer edge to protect the glass.  This picture shows Chucks window ready to be soldered.  Sadly, I don't have pictures of Jessica or Martin's windows at this point but here's a look at Chucks before he puts a finished bead of lead on all of his lines.


Once everything was soldered Chuck washed off his window, dried it and then went over it with a chemical called Copper Sulfate which turns the lead from a shiny silver color to a bright coppery finish (which is more easily seen when the window doesn't have light behind it).  After one more bath to remove the excess sulfate, Chuck waxed his window and called it a day!   And here's his finished window.  Chuck caught on to each step easily and really made short work of this project.  His attention to detail helped lift this window from a simple completed project to a work of perfection.  All in all it's a job VERY well done.  Chuck should be very proud of his work.


Next up we take a look at how Jessica did with her sailboat window.  This is the first time that this pattern has been done in our workshop so I was anxious to see how things would go.  Even before Jessica started it I knew that it would turn out just fine because her glass cutting abilities were clearly better than average.  I always worry a little when a new student picks up a cutter for the first time but in this workshop I had nothing to worry about.  Here's a look at the lone drawn pattern that Jessica picked to make.


When all of her cutting was completed she put all of her glass pieces on top of her pattern and discovered that everything pretty much fit together already before she even took her pieces to the grinder.  I had stressed the importance of cutting the marker line off the glass when you cut and everyone did a great job with that.  Any line left on the glass needs to be ground off so why don't  people just cut it off in the first place?  Well, I happen to know for a fact that the common fear is that cutting behind the line will make the pieces too small.  Trust me, it won't.  As you can see in the picture below Jessica cut all of the lines off of her pieces and the end result is this wonderful fit.


Jessica still needed to grind all of her pieces so the foil would stick to the edge of the glass but in this case a simple skimming of the glass made for a perfect fit.  Once all of her pieces were ground she wrapped everything in 7/32 copper foil and what you see below is what she accomplished with just one day of work with us.  I never expected these windows to be wrapped on the first day so it was no wonder that everyone finished ahead of schedule the next day!


I distinctly recall Russ asking me if I took pictures of Jessica and Martin's windows after the borders were attached, but I also recall me saying that I'd take the pictures as soon as we got the brass channel applied.  Of course, I forgot about taking pictures just 30 seconds later.  Let me tell you--It's Hell getting old.  That said, once Jessica had her border tacked to her window she picked up her soldering iron and began melting lead onto the copper foil that is visible between each piece of glass.  Once that was finished (and I think that all of the soldering was completed by 4:30) she then washed off all of the water soluble flux using a wet sponge in the oversized sink that we have in the shop.   Jessica felt that the silver solder against the blues and grays of her window looked better than it would if  she changed the color of the lead to a copper color, and we all agreed. Instead of applying Copper Sulfate she just skipped straight to the part where she applied some Turtle Wax to her lead lines.  After a quick buffing Jessica had this beautiful window to show for her two days of work.  All of the curves in this window are smooth and flow gracefully and that is what this sailboat window is all about--Flow.  I've got to say that you did a GREAT job, Jessica!


And last, but certainly not least, we take a look at the window that Martin decided to make.  Like his wife, Jessica, he had picked a pattern that had never been done in the workshop before.  I was a little bit apprehensive about anyone doing this pattern because it contains more pieces than any of the other patterns and if Martin had any issues cutting glass, or grinding, or foiling, or even soldering, it could have slowed us down in a big way.  But Martin's technical knowledge came through in spades and the word 'problem' wasn't in our vocabulary on this weekend.


Now if you look at the picture above closely and then this one below (after Martin had cut everything out) you might say to yourself, "Hey! Is that an extra cloud in the sky?" And I'd say that you have good eyes for picking that out.  Martin's window is the perfect example of how we change things as we're working on them to cover any little slips that may occur.  In this case Martin had a small break on the top part of the bottom portion of sky to the right of the lighthouse.  We were going  to recut the piece when he suggested that we cover the mistake with an extra cloud.  And to be honest with you, that's exactly what I would have done if I were in his shoes.  He cut out a fourth cloud and simply used it to cover the mistake making his window perfect once again.   And since the value of a stained glass window is largely determined by the number of pieces in it, Martin's little slip ended up making his stained glass worth even more than it was supposed to be! Now that's what I call making lemonade out of lemons. :-)


We always use a square in the bottom left corner to be sure that our window will have four perfect right angles for corners.  We put the square in place when we begin grinding  and we always  pin the square down so it won't shift.  Any time your glass shifts while you are grinding you will have a problem.  Stability is the key!  If you look closely you can see a little section of the metal square running along the left side and across the bottom of the window.  Martin made sure that the width along the bottom of his window matched the width along the top, and that the height was the same on the left and right sides thus making his window a perfect rectangle.  Once he wrapped his pieces we tacked it all together, added his border (which is the same color as Jessica's but with a different texture), and then got ready for the final solder.


Let me state for the record that I love to solder.  There's no better feeling than knowing that I have a BIG window to solder that will take most of the day to work on.  My mind is always a million miles away when I'm soldering because I tend to do handle that step while on 'auto-pilot'.  And I have to say that even though Martin was new to soldering (and he had to concentrate on what he was doing) he ended up with lead lines on his window that were better than people who have been soldering for months.  His work was easily better than any stained glass that I've seen in stores lately.  And here's his completed window to prove my point.  Martin has a perfectly symmetrical lighthouse made of nice straight lines with a perfect bead on all of his solder lines.   All in all, another job WELL done!


We had a great time in class as everyone was always joking around and laughing.  Russ made some great food and everyone enjoyed that as much as the stained glass part of the weekend.  I always look forward to our Weekend Workshops and this experience with Martin, Jessica and Chuck ranks a 10 out of 10.  I want to personally thank each of them for making my job so stress free that the idea of it being work was never factored into the equation.  I wish them all the best!

Paul


Tuesday, May 6, 2014

I Want To Be Free Range!

It's been a hectic week here and the weekend was just as full which might explain why this post is a day late.  We've got things under control now so let's just jump right into the work that our students have accomplished.

Jeanne's Horse Head Window is officially completed!  Cutting out that huge inside curve that forms the neck of the horse was a tedious affair but Jeanne didn't let it daunt her and pushed her way through the cutting and grinding of all that glass which resulted in this beautiful window.  And her soldering was on this project was equally wonderful.  Another Fleur De Lis Window is next on the the list for Jeanne and we'll check that out when she comes back in.


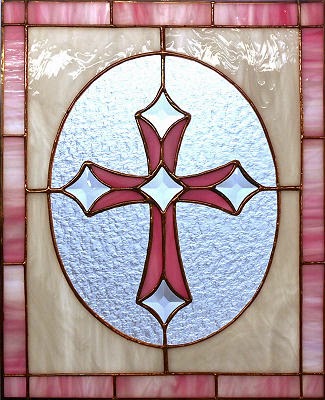
Jeannette managed to complete the two cross suncatchers that she began cutting out last week and as you might have suspected, they turned out to be beautiful.  These are smaller versions of the cross that appeared in the large window that finished two weeks ago.  Since these were a smaller the pieces were a tad harder to work with but she did a great job.  It's a common stained glass misconception that smaller projects are easier to build when the fact is that larger pieces are far easier to deal with.    Next up for Jeannette will be a grape window.


Brenda has got yet another Cross Window under her belt and the red glass that she used really makes it look rich and elegant.  The combination of deep red and clear textured glass makes a winning window every time!  The little flourishes at the top and bottom of her oval that the cross is set in adds so much to this design.


Bonnie's Cross Circle/Square Window is really looking good.  Bonnie added the final outer border and picked a glass that was SLIGHTLY different from the black that outlines the cross itself.  I love the added border and think that the extra work was well worth the time since it really helps define the cross.  Bonnie's taken this home with her to solder so I'm assuming that it will be completed when she returns.


After completing her cross window Brenda began working on this Double C Window while she was in class but I can't recall for sure what the logo actually stands for although Central Catholic is ringing a bell in my head (so that's probably wrong!)   For the record, the two C's are cut actually cut out in the picture below--you just can see them because they were cut out of white glass.  I don't think it will take long for Brenda to get this one finished.  I know she's thinking about using white for the border but we'll know for sure when she brings this back in.


Carol's Winnie The Pooh Window is so close to being completed that I can almost taste the honey.  With the front side soldered and only the back side to go I'd say that she has this under control.  The bright cartoon colors are a huge part of what makes this window stand out and I can't wait to see this one hanging in the window with some light behind it.  And I have to say that I love her choice of red for the border because it draws from the smallest amount of color in the actual window itself (the red shirt that Pooh has on).


Cindy's Magnolia Window is looking great, but that shouldn't be any surprise to anyone who regularly follows Cindy's work with us.  She has all of the flowers and branches cut, ground, wrapped, and tacked together.  Now she's working on the background pieces.  I talked with her on the phone today and she said it's already completed.  Pictures will certainly follow in out next weekly update.


This is the fourth (out of four) Fleur De Lis Transom Windows that Janet has been working on.  As you can see she just has 2 more pieces of border glass to grind and she'll be ready to solder this one.  She says that she's ready to move onto something new and I can hardly blame her-- working on four of anything can get a little monotonous no matter how great they look!  I hear there's a guitar in her future.  I can't wait to see how that turns out-- I think she's really going to have fun making it.


This is Paula's Iris Window and it's another project that only needs to be soldered before we can call it completed.  This is actually Paula's first window with us and I have to say that she's done a great job along every step of the way.  The front side has a good amount of solder on it so there's a chance this could be completed next week. 


I hate to say things like what I'm about to say because it can be taken the wrong way but I have to say that Rowena really impressed me with the work she accomplished this week.  She came in, colored and then waxed her Cross window and then began working on this larger version of Martha's Humming Bird and Hanging Fuschia Window.  By the time she left she had all but the background not only cut out, but cut out beautifully!  She'll be working on the grinder when she comes back in and then she'll cut out her background glass.  I don't think that this window is any sort of challenge for Rowena at all.  And I only just noticed that she has her leaves ground already.  Wow!


Shelly tacked the center portion of her Bird and Flower window and was going to add a simple yellow border to make this a nice bright window when I suggested that she also add a small, thin green border to it as well.  She liked the way it looked and jumped on the idea as soon as she saw it.  I think that having the green separate the yellow border from the yellow bird really makes it more vibrant and look more professional.  But I've always been a sucker for a double border.


With almost all of her fill-ins in place, Susan has redrawn the top section of her window and will begin cutting that out when she returns.  We're talking about seeing the light at the end of the tunnel here!  I'm going to have to really start thinking about how we're going to mount the bottles in place...


Terry's latest duck window is really beautiful.  She also went above and beyond  by drilling out small holes in the duck's head for the small glass circles that form the ducks eyes.  It sounds simple enough but there's a good deal of skill involved when it comes to making sure that the hole is where it's supposed to be,  Just being an eighth of an inch off the mark will make the duck look odd or deformed, but Terry positioned them perfectly. 


And I'm afraid that Ann got short-changed this week because after she left I realized that I never got a picture of what she's been working on.  I guess I'll just tell you that it's a Fleur De Lis and let you see what she's accomplished when she returns next week.

Our next post will cover the Weekend Workshop that we had this past weekend.  We had three people come in and make three different windows in the span of two days.  We're going to cover that sometime before this coming weekend so expect an extra post soon!

Paul

Tuesday, April 29, 2014

It's Hip To Be Square

Making a window is one thing-- making sure that your window is square is another.  Most windows that have four straight sides need to be 'square' which means that each of the 4 corners measure 90 degrees.  It's something that carpenters build to and something that all windows should aspire to be.  Almost everyone knows that there's a tool called a Square and that it looks like a large metal L.  The angle on a Metal Square is a perfect 90 degrees.  Interestingly enough, ou don't need four Metal Squares to make sure your window is perfectly square-- just one will do.  But having two Metal Squares makes things easier though.  So let's see how we do that.

First off, a 'square' window has only 2 measurements, its height and its width.  Neither of these measurements will vary throughout the window.   If your window is 9" tall on the left side it should be 9" tall on the right (as well as in the center and all point in between).  The same goes for its width.  If your window is 12" wide on the bottom it should also be 12" tall across the top edge.  If it isn't then your window is not square. It's as simple as that.

If you have just one Metal Square you should place it in the bottom left corner and build your window inside it.  (The diagrams below have the Metal Square removed from the outline of the windows to simplify the diagrams.)  If you know that one corner is square you can easily line up the rest of your window with a few simple measurements.

If you know that your bottom left corner is a perfect 90 degrees all you need is a tape measure or a yardstick  to make sure the rest of your window squares up.  The left side measurement should be exactly the same as your right side measurement.  The same goes for your top and bottom measurements.  It's VERY important that top and bottom match, and then left and right match.


One of the biggest mistakes in using two Metal Squares is placing them in opposing corners.  This does NOT ensure that your window will be square!  As you can see in the diagram below the top Metal Square is off considerably.  If you think that you can tell when your two Metal Squares are properly placed just by looking at them, think again-- you can't.  That's why Metal Squares exist.


If you have two Metal Squares the diagram below shows the best way to use them.  By overlapping the bottoms you can ensure that your two bottom corners are perfectly square.  One your have that done all you have to do is measure the height of your window to make sure the top two corners are perfect.


As you can see below we have a perfect 9 inches running all the way across our window.  This means that  we've ensured that all four corners are a perfect 90 degrees using just 2 Metal Squares

If you don't have a Metal Square and you plan on making more than a window or two you really need to purchase at least one.  They're relatively inexpensive and will make your life easier, especially if you are making a window that fits perfectly into an opening.

DO remember this:  Almost all rectangular or square patterns that you purchase (or that I draw for you) are drawn perfectly square.  If you don't have a Metal Square then follow the lines on your pattern precisely and you should be fine.  It may sound complicated at first, but once you start paying attention to squareness while you are building a window you'll see that it becomes second nature to you.

Okay, with that out of the way let's take a look at what our students were up to in class on the first week after Easter.

Well, Linda F has completed her Christmas Wreath Window and all I can say is, "Let it Snow, Let it Snow, Let it Snow!"  Because without snow there's no way this window will remind you of Christmas at all.  And that's a good thing because Linda really wasn't looking to make a seasonal window.  She wanted something she could hang year round and I do think that this window fills the bill..


Rowena completed her Beveled Cross Window and it's another smashing success.  (Figuratively speaking, of course.)  She took her time soldering it and all in all I have to say that she's done extremely well.  She's got all the basics down and with each new project she makes she'll fine tune all of her skills.  As you can see, there's nothing wrong with this window!  Expect to see Rowena start a Humming Bird Window when she comes back in.


Betty's Iris and Dragonfly Window really looks spectacular.  Her use of color, her cutting and her grinding are perfect and I suspect that I am going to love this window when it's finished.  I do see a slight problem with it that we'll fix when she comes back in-- nothing major but something that obstructs the flow due to a single untraced line.  Can you spot it because this is your last chance-- it will be fixed when you see this window again in its finished form.


Bonnie resumed work on her Round/Square Cross Window but she's doing hers a little differently from the ones we've seen done in the past.  Bonnie has added a thin border to the beveled cross which helps pull it out of the background.  And speaking of background, she has hers all cut and ground already which means that she'll be working on the final border when she comes back in.


Carol's Winnie Window is really looking great.  This is the first Winnie The Pooh Window I've seen done in years and I can honestly say that Pooh's arrival here in the shop is long overdue.  Carol got the final piece of sky cut and tacked into place before cutting her red border.  She'll be soldering this when she returns and since she's taken her border pieces home with her to wrap she'll start soldering right away.


Jeannette came in and colored the large Beveled Cross Window that you saw completed last week--  I the lead just wasn't colored yet which never stops me from taking a completed picture of a window.  Once that was done she set her mind on making two smaller beveled cross suncatchers using the same design only without a background.  She got them both cut out and learned how to use pattern section replication to her advantage.  She also started grinding them and as you can see she has the first one almost finished already.


After completing her Christmas Wreath Window Linda F resumed work on her Oval/Square Cross Window.  She's already soldering this project so it's safe to say that she has no problems when it comes to cutting, grinding or wrapping.  And judging by how much she got soldered I won't be surprised to see her start yet another project next week.


This black poodle that Linda L is making has suddenly jumped to life.  She only has to add a final border to it and then she'll be set to solder this window.  As you can see she fixed the piece of glass on the neck and it made a world of difference.  The flow of the grain is such an important part of stained glass.  If  you're making a window and something looks 'off' never be afraid to change it.  With the re-cut neck piece this window is now flawless.


Shelly finished the main work behind her latest Bird and Flower Window so all she needs to do is a border as well.  She's already picked a color but I think I may have an idea to run past her when she comes back in that will help set this window off a little better while a minimal amount of extra work while still maintaining its overall style.


And that wraps things up this week but be sure to join us again in our next update which will include tips on setting your borders corners correctly as well as a bevy of pictures from a full week of classes.


Paul

Wednesday, April 16, 2014

Hakuna Matata

This is going to be a real quick update because we only had one class this week.  That said, we still have 6 projects to look at with two of them being completed so let's get started.

Terry's Scar Window is finished and it turned out exactly as I expected it would-- incredible.  I don't know what it is about cartoon characters and stained glass but they always seem to go together well.  Maybe it's the similar art style or the colors, but whatever it is you can see it in action here.


Jeanette finished this large Beveled Cross Window last week but there were so many windows completed I felt that I needed to skip at least one of them so it wouldn't just get lost in the flood of completed projects.  And knowing that this week would be a short one I decided to hold back unveiling Jeannette's window so it could get the spotlight that it deserves.  She did a great job on this and she likes it so much she's already begun making smaller versions of just the cross itself which you'll see when she returns.  This is another job well done.


Cindy is making some incredible progress on her Magnolia Window.  With the three Magnolias not only cut out but ground as well, Cindy will have this completed before you know it.  I love her colors and know for a fact that she'll be using clear Glue Chip for her background.  


Martha came in and surprised me when she was holding this Louisiana State Trooper Badge Window.  As you can see she has this almost completed already and she just started it yesterday.  She's grinding as she's cutting so almost all that you see here is fitted into place already.  I'm in awe of the work that Martha has been accomplishing.


Myrt's Cross window is so close to being completely ground that I can almost smell the copper foil on it already.  She's a little concerned that the cross won't stand out against the glass she's picked for her background but Myrt has nothing to worry about-- her background is clear and the cross is opaque so once this is off the table and has some light behind it the two will differentiate beautifully.   


And lastly we take a look at the newest Oval Beveled Cross Window that Brenda is making.  She has her oval all tacked together already and that means that all she needs to do now is grind the four corners and then add a border.  In other words, all the hard work is done!  This is the first time in a long while that I've seen someone use a lot of granite red in a project.  I used to use it all the time and love how it contrasts with clear glass.  What you see below isn't even back lit and it already has a rich look look about it.  I can't wait to see it completed!


And that sums it up for our classes for the week before Easter.   We want to wish everyone a happy Easter and we can't wait to see all of our students next week.

Paul
Bayou Salé GlassWorks

Monday, April 14, 2014

She Doesn't Like Accolades

Our students certainly are productive.  Each week we have more and more to see, and more and more to write about!  A lot of the students enjoy the other student creations so much that they want to make the same window (with perhaps different colors) for themselves, but lately we've been having a hard time tracking down patterns.  I'd like to remind everyone that if we draw a pattern for you the pattern becomes the property of the shop so others can also benefit from it.  If you want to copy a pattern you can certainly trace it out any time you'd like and then keep that copy for yourself.  Drawing a pattern is a very time consuming deed so please remember to put patterns that we draw for you into one of the pattern containers when you've finished your window.  And do remember that imitation is the sincerest form of flattery!  (Or so says Charles Caleb Colton.)

Let's start this off with two windows that have drawn a lot of attention.  Cindy's Bentley and Beau Dog Windows have officially been completed.  Everyone loves them and thinks that Cindy really captured something in their eyes (which are always difficult to do).  She simply took her time, didn't rush them, and replaced anything that looked wrong whether or not it fit.  As I always say, your pieces may fit together but that doesn't necessarily mean that they line up correctly.  And having pieces line up is the most important thing of all when it comes to making stained glass.  Just ask Bentley or Beau!  Another job well done, Cindy. 


Terry's Pelican Window is 100% Complete and looks 100% perfect.  What a great job she did on this window and although you can't see it in the picture, it's really a perfect perfect size that we don't see very often.  It's smaller than our standard 16 x 20 window size but not small enough to be called a suncatcher.   I love it!


Becky B completed her Fleur De Lillie this week but to manage that feat she needed to come in on Wednesday AND Thursday!  As luck would have it we had an opening on Wednesday morning that allowed Becky to come in and get her border wrapped and then tacked onto her window.  She also got the front side soldered as well and then called it quits for the first day of the week with us.  The next morning she returned, finished soldering the back side, washed it, colored it, washed it again, and waxed it.  And the results of these efforts are what you see before.  Wow, what a great job.  This window really shows how changing colors can really effect the overall feel of a window.  It's one way of making sure that the window you made is YOURS!


Brenda's newest Beveled Cross Design was a bit easier to make than her last one but that doesn't make it any less attractive.  Once again the overall  design was drawn by Brenda and both the design and craftsmanship is wonderful.  You'll see ANOTHER variation of this further along in the Blog.


It's a bird... it's a plane... it's a Candle Holder!   Bonnie wrapped this one up while she was at home and it required not one single touch-up from me at all.  Bonnie's 3D Soldering is perfection and whether she wants to hear it or not I'm giving her one of the two best soldering jobs of the week awards.  Both she and her husband get a free trip to wonderful Yugoslavia! Great job, Bonnie!


Ann's Latest Letter Window is complete and she gets an honorable mention for her soldering which has really improved.  Soldering is the worst part when it comes to making stained glass.  If you cut badly you can fix it with the grinder, but there's no covering a bad solder job.  And as you can see this is a GREAT solder job so Ann should be proud of this window.  She must really love those little FDL's in the corners though because her next window is going to have them as well!


Janet came in hoping to get her Rosebud Window completed in time for Easter.  She anxiously (and nervously) began soldering and managed to overcome her worst fear because her soldering gets her the second best soldering job of the week award!  What did I have to touch up?  Nothing!  Janet has really hit a turning point with her stained glass abilities because her soldering is no longer anything that she needs to worry about. There's nothing to complain about with this gorgeous window. And I'm sure she's going to be more relaxed in class now that she knows she's conquered her biggest fear.


Check out Winnie The Pooh!  Now that he's all wrapped with foil you can easily see where the lead lines are going to be.  The face paint has been applied so what you're looking at below has not been applied with a marker that will wash off the moment water hits it-- this face is ON THERE!  When Carol comes back in she'll tack this all together and then cut her final piece of sky.  In other words, this window is just about finished!  Carol has really done some great work on this especially when you consider that this is only her second window.  I'm already seeing great things in her future with us.


Becky S has made a lot of headway on her Boot Window.  In fact, she has it completely cut out and ground at this point in time.  She's replaced a piece of glass for aesthetic reasons and I agree with her choice 100%. She's going to begin wrapping this while she's at home so it will certainly be finished quickly now.


This is a preview of the latest window that Cindy is beginning to work on.  She only got the pattern traced and the paper pattern cut out but she'll start cutting on actual glass for this Magnolia Window before she comes back in.  It's a nice flowing design (The artist is nothing short of amazing) and I have no doubt that Cindy will more than do it justice.


And Mary Grace's Large Fleur De Lis Window is moving along wonderfully.  She has the front side almost completely soldered and although she's pointing out flaws to me they are minor flaws that only she would notice.  She'll be working on the back side of this when she returns after Easter so I think she'll be starting another project shortly.


Abita, meet lead.  Yep, it's official-- Susan has started tacking her window together which has become so very important at this stage in the game for her.  Especially when I saw the board she had this on bowing as she carried it into the shop this week.  Now her pieces have no chance of getting tossed around and mixed up, and better yet, the window is now solid enough to continue along without having pins in the way.


Now meet Scar from The Lion King.  Terry's making this from a drawing that her grandson, Caleb, drew and hoped could be done in stained glass.  Well, I'd be hard pressed to see something that Terry couldn't do and this is turning out beautifully.  Of course, she started off with such a wonderful drawing that it couldn't help but turn out any other way.  I love this window already and it isn't even wrapped yet!


This is the latest Beveled Cross Oval that Brenda is making.  It's a tad more fancy than the one she finished up above only because the oval now has flourishes on the top and bottom but other than that it will be very similar.  Nonetheless, when this is completed you will see what a difference six little pieces of glass can make to a window.   There will also be a few pattern adjustments along the way that are common to a second version of a window because, no matter how perfect that first one is, there's always something that the artist sees that will be fixed if it's ever made again.


Betty now has all but 2 pieces of glass cut for her Iris Dragonfly Window.   She cut a rectangle of her background glass, placed her flowers on top and then traced around everything.   The background is clear and hard to see in the picture but it's essentially all cut out now.  And the best part of using this method of cutting backgrounds is that she only needs to skim the pieces to make everything fit.  I really like this window and Betty's pretty sure that she's got the border picked out already (and I like the idea she has for it).


Linda F got home last week and planed to do some soldering on her window before she brought it back in but then she discovered that she had left her soldering iron here in the shop.  So she took the week off and began soldering this as soon as she got back in class.  She's moving along nicely, too because she already has most of the front side done.   I know her soldering iron went home with her this week so there's a good chance that this will be completed when she comes back in.   I can't wait to see it lit up!


Jeanne has her Horse Silhouette all tacked together and has her channel attached.  All that's left to do is solder it and she plans on doing that while she's at home this week.  And rather than waste any time she's taken along a Fleur De Lis Bevel and some glass to use for a background.  It sounds to me like Jeanne is enjoying this!  Me, I'm dying to see her horse completed which could easily be in two more posts.


Paul's Iris looks wonderful.  Yes, it's missing a flower petal but that's going to be fixed when she comes back in.  She got everything tacked together and even got the first of her two borders cut and ground.  She's taken this home and will be ready for theat flower petal and final border when she comes back in.  Then it will just need some some solder!


Rowena certainly accomplished a lot this week.  She has her Beveled Cross window all cut out and ready for solder!  This is a variation on the smaller windows that Martha made just before Christmas and is the same design that Jeannette is making right now as well.  And we haven't forgotten Jeannette-- more about her at the end of this post.


This is Myrt's Square/Rounded Cross window and she's got it all cut and mostly ground.  She's taken it on home with her so she can work on it throughout the week so I would expect some major progress on this when this comes back in.  


Bonnie is also in the process of making one of the Square/Rounded Cross windows and this is the cross that will sit in the center of it.  The cross itself is a little different from the one that Myrt is making but the idea is essentially the same.  This week she learned the joys of cutting angled pieces from one another to form borders.  You just have to cut one piece at a time while you grind along the way to ensure perfect fits.


And just look at how cute Linda L's Poodle Window looks.  There's just the neck and seven pieces of background glass left to cut before she surrounds this with bevels and then perhaps a final border.  Linda is already talking about tackling a Mickey Mouse Window next, something that she was afraid of trying earlier but is now certainly ready to accomplish (with ease I might add).


And Martha is moving quickly and succinctly through her two Stylized Fleur De Lis.  She even went so far as to place some of her pieces on the glass in ways that would have had me scratching my head on how to  cut them out without breaking anything.  And then she cut them out effortlessly!  Yep, Martha's time has come!


So, you might be wondering, "So, where is Jeanette's Cross Window.  I thought you said it would most likely be finished this week?" Well, her window HAS been completed but I'm saving it for the next update which will happen on Wednesday morning (in just 2 short days) since it will be just a small post with only one class being covered due to Easter occuring this coming weekend.  I just want to be sure that I have a completed project to highlight in the Blog and since this post is already filled with windows it will give Jeannette's first window a chance to shine in the spotlight  So look for another update in just 2 short days!

Paul
Bayou Salé GlassWorks