This weeks
tip explains how the angle of your soldering iron controls how much
leads flows off of it. Many times I see students soldering with the
iron almost parallel to their project. When you solder with your iron
low to the surface of your window the lead can't flow off the tip of
your iron and your bead won't be smooth.


With that in mind, when you touch up your window after all of the soldering has been completed you may find that you have excess solder in places. To move that solder to other areas that might not have enough solder simply angle your iron so that the handle is closer to the window and the lead can be 'pulled' to other areas. So then, while soldering you next window play with the angle of your iron and pay attention to what the solder does because you may find you have a new trick to help make your lead lines look better than ever.
First up in our completed projects is Roxane's Compass Rose Window which was certainly worth the wait because it is a stunning piece of work. Roxane hasn't lost her soldering talents because the lead work on this window is every bit as great as the design itself. Rumor has it that Jeannette is working on one of these also. I'll know for sure tomorrow when she comes into class.

Next we have Mary Grace who put the finishing touches on her Birdhouse and Blue Birds Panel. Those finishing touches included adding two glass beads for eyes so that her birds weren't blind. You just solder a thin piece of wire where you want the eye, thread the bead onto the wire and then snip the wire so it reaches the nearest lead line before soldering the loose end to secure the bead. Hmmmmm, that sounds like it could easily become a tip of the week shortly!


Susan D was able to complete one of her Dragonfly Suncatchers as well as a 3D Humming Bird. She's got her second Dragonfly all wrapped and pinned into place on a work board so don't be surprised to see that in with our completed projects next week.

Sheri resumed work on her second circular Butterfly Window and even managed to complete it before she called it a day. The differences between this and her first Butterfly are subtle but noticeable when pointed out. In this version the border is made from a clear textured glass, and the butterfly's body has been made out of blue glass globs. Very nice indeed.


And we finish our completed projects this week with an Address Window that I made for Roxie who is a a former student. The one she made is still in use 8 years later and she wanted her son to have one as well, albeit with his numbers rather than hers. We may see more of this design later on because two students commented how much they liked this when they saw it hanging in the shop.


Susan R came in and tacked together the flower and the leaves in her 20's Lady Window and then started cutting out the hat and hair. I keep playing around with the lips on her pattern so you'll be seeing them change week to week. Currently I feel that they look too pouty, but I'll get them perfect by the time Susan needs to cut them out-- don't worry about that.

Our second 'Lady' window is being made by Brenda who began cutting glass for this Salon sign. She's making the hair out of assorted (but matching) colors to give this a colorful and playful look. I don't think that this will take Brenda very long because aside from the numbers in the lower left the rest of the cuts are Nice 'n Easy.

Patrice is VERY much into the whole stained glass experience because, as you can see, she's almost finished with her Houston Texans Logo and she's only two weeks into it! She's soldering the back side of it now and she's already got her next pattern picked out so she's ready to move along.

♪ ♫ O Tannenbaum, o Tannenbaum,
wie treu sind deine Blätter!
Du grünst nicht nur zur Sommerzeit,
Nein auch im Winter, wenn es schneit.
O Tannenbaum, o Tannenbaum,
wie treu sind deine Blätter! ♫ ♪
wie treu sind deine Blätter!
Du grünst nicht nur zur Sommerzeit,
Nein auch im Winter, wenn es schneit.
O Tannenbaum, o Tannenbaum,
wie treu sind deine Blätter! ♫ ♪

(Christmas Tree by Carol)
Lara is working on a pair of Cabinet Door inserts for her Kitchen and the design matches her backsplash perfectly. She's got two thirds of the first window cut out already and the center sections of the second one ready to be ground so this will be a nice quick project for her.

Tracey moves very quickly these days and managed to get all of her Mother Mary And Child Panel ground while she was in class. She'll wrap this while at home between classes and when we see it again she'll surely get a border attached and start the soldering process!

Jan's Three Trees Window was sort of cut out when we last saw it but this week she was able to get ALL of the glass cut, ground, AND wrapped! That's a lot of work in a little time but there's a trick to cutting this window which I promise to show you soon. Now that this is all cut and fitting together I can say that I was correct-- this IS a stunning window!

Mary is so very close to finishing her Santa Clause Window. This week she tacked it together and then attached not one but two borders. The only thing left to do is cut the glass for the face and eyes. We saved that for last so she could tack all the other pieces together which would prevent the eyes from shifting as she works on them. Nothing screws up a face more than eyes that aren't positioned perfectly. She cut the beard in the same way that she'll do the face and as you can see the beard turned out beautifully. First she cut one piece of grey to the size of the beard and then she cut that one piece up into the 12 individual pieces to give it some 'texture'. You can see the piece before it was cut in the lower right of the picture.


With her background all cut out and tacked into place, Rowena is now working on her double borders. She's already got the first one cut and the second one will go on when she returns. I'm loving it!

Becky B got even more glass cut out for her Japanese Magnolia Window and it's starting to take shape now so you can really get a feel for the colors. Once the green leaves are in place the flower itself will really stand out from the pattern it's placed on so this is only going to look better and better with each passing week.

Barbara H is working on her version of the Santa Claus again and she managed to get a lot cut out in one class. She's working on her cutting skills and it looks like she's getting the hang of it now because by the end of the class she was getting some nice complex cuts out pretty easily. You can see that Barbara has Santa's beard still in one piece. She'll cut that down into its individual pieces after everything is ground, wrapped, and tacked.

Martha only has a few pieces left to grind before she starts wrapping her pair of Cardinals Window. I'm still loving how she's getting things to fit on this project and as you can see she's only got 12 pieces left to go.

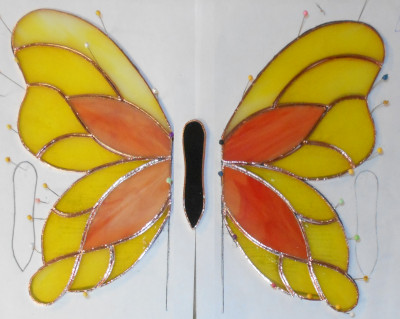
Becky S had to put her Egret Window on hold as her son needed a Butterfly Lawn Ornament for a gift. In just one night Becky traced her pattern, cut out her 23 pieces of glass, ground all of those pieces, and then wrapped them. Whew!!! This will surely be completed upon her return.
Cindy is working on a new clear Cross Suncatcher although this one has a slight amount of color in it since she's using iridized glass. Surprisingly enough, it's actually showing in the picture (which is something iridized glass rarely does in pictures).


And there you have it. We have only two more weeks worth of classes before Christmas gets here so expect things to heat up as students finished their Christmas orders!
Paul
Bayou Salé GlassWorks

No comments:
Post a Comment