Blue Sharpie Ultra Fine Point Markers are the best marker to use for your stained glass needs but they have delicate tips which must be taken care of. Here are my 5 simple rules which enable me to use the same marker for weeks at a time.
1) Never trace along the edge of a piece of glass that hasn't been ground. If you trace along a sharp edge you will almost surely ruin the tip of your marker. Grind it (and dry it) before tracing along any piece of glass.
2) Apply on the slightest amount of pressure when marking your glass. Pretend you are drawing a line on a new born baby because using any more pressure than that will only blunt the tip of your point.
3) Never go over a line back and forth numerous times. This only makes the line wash off quicker when grinding the piece. One pass is enough.
4) Never draw a line on wet glass. You can only do that about 10 times before the marker is permanently ruined.
5) Put the cap back on your marker! Also, when you throw a marker away keep the cap so you have one to use as a spare. It's amazing how quickly you can lose your marker's cap.
Okay then, Lara's finished her Fleur De Lis and it features a French Curve motif setting it apart from most of the other FDL designs that we usually see. It's twists like these that make standard traditional designs look fresh again. Gorgeous colors, perfect symmetry, and an always impressive double border help make this a VERY elegant window.
Robert's third Door Insert was completed this week and it follows a design that matches his first two windows only being much, much smaller. It's still very impressive (size matters not) and the beveled border sets it all off spectacularly. To me though, the highlight is that purple accent trim along the center bevel.
Last week Cheryl had the ten sections of her Bird House soldered and ready to be joined together. This week she did just that. The only problem we had was with the roof. She really liked the staggered panels from a birdhouse that she saw on line but when it came time to attach them we realized that stability was going to be a big issue. In the end we reinforced the edges of the roof with wire which then looped down (almost invisibly) so it could be soldered into the corner lead lines of the house. When it was finally finished the roof was as sturdy as ever. This proves the fact that that just because you see something on the internet it doesn't mean that it's a good, solid design. That said, we did fix it and if this is ever done again I know exactly what has to be done to make it sturdy from the get-go.
Lisa's newest Spinner was completed this week and this one forms a flower. Still photo's never do a spinner justice so be sure to click on the play button to see this in its full glory!
Judy has made short work of her Circular Beach Flip Flops Panel and the pastel colors work perfectly with the multi-colored border that she used. Judy always doubts her soldering abilities but I say she's doing wonderfully-- The proof is in the flip flops!
Cindy made an LSU Plaque but hers is slightly smaller from the others that we've seen in the past few weeks. First of all, hers is only 13 inches wide and second of all she's filled in the areas behind the letters to make the finished piece even more stable as well as much easier to solder.
With her first Humming Bird Panel completed Mary has learned that she needs to make 3 more of these to give as gifts to teachers before the school year ends. That's a VERY nice gift if you ask me! And I have to say that Mary's speed and work ethic was top notch on this panel.
Sheri may have had surgery but she's still busy making stained glass. She had a request to do one of these Easter Rabbit Suncatchers slightly larger than the normal size. As you can see, it turned out perfect and was possibly even easier to make since she was dealing with bigger pieces.
Cindy also spent time working on her Blue Heron Window which is being made in assorted grays. The bird itself has been completely cut and ground so Cindy next looked upward to the sky and started filling that in. She hopes to have the bird all wrapped and tacked together when she comes back in because doing that will prevent any feathers from shifting out of position and make grinding the background elements much easier.
Linda F is working on an Initial Window but rather than making a simple boring letter she's covered it with morning glories. Even though they obscure part of the initial it is still plainly visible partly, in fact, due to the brilliant yellow that she used to make it. That DID present a small problem though-- she initially cut the yellow flower centers from the same yellow glass that she used for the 'M' but that made it appear as though you were seeing through the flower and looking at the letter behind it. The simple fix for this problem was to use a slightly different yellow glass for the flower centers. Perfection.
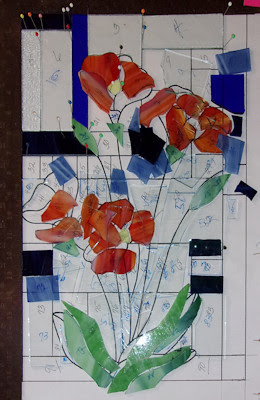
Let is making a window that will surely catch some attention in our other classes. The Poppies may be the center of focus but the background also demands attention as it uses assorted blues and clears cut into various rectangular shapes creating a fresh modern approach to a simple flower window. She's already got everything cut and now Let has moved on over to the grinder to make sure that all of these pieces fit together perfectly.
June has begun making a Nursing Window which consists of a nurses cap, a stethoscope, a hypodermic needle and an ECG Wave which will be cut into the glass after everything has been ground and fitted together. This week June began (and finished) cutting out the glass for the background which forms a heart. The color she picked is representative of children's hospitals so there's a lot of imagery in this window that will take repeated viewings to completely grasp.
Kerry decided to work on three different sized stained glass Aloe Plants which he will then put into actual flower pots of various sizes. The largest is only 4 inches wide which helps you see just how small that smallest one is in the upper left corner of the picture.
Judy worked on a Cardinal after she finished her Beach Flip Flops and she's very close to having it completely ground. We're going to change the pattern ever so slightly to fix the hinging problem that the tail creates where it attaches to the wing. This is a popular pattern on the internet and it always has a stability issue. Luckily we know how to fix that and you'll see how we do that when we return next week.
Annette's decided to go with an elaborate border for her Transom Window which features bevels entwined in glass. She has the first two rows of the three row border attached and will likely get the final border pieces affixed upon her return. That means that she's going to be able to solder this soon!
With everything but the sky/background cut out for her Heron Window, Melissa has shown to us how you can use contrasting colors to help define busy sections of a window. All of these pieces could have easily bled together and lost focus but everything is sharp and defined here. What a great job!
Ann is working from the center out on the circular background of her Cross Window. You can clearly see how well the center fits together as Ann works to achieve perfect fits. She's also cut the four small elongated dimondesque like pieces that make the center of her Cross so it's safe to say that Ann is well under way with this project.
Lisa is on a Spinner roll as she worked on grinding the 30 pieces of glass that make up her next Spinner. She's ready to start wrapping these now since she managed to grind all of her pieces before calling it a day.
Meanwhile, Lisa's husband Steve worked on making another Fused Door Suncatcher. This one has changed ever so slightly from his previous three doors because he's added eight 45 degree angle cuts to the bottom part of the door to match the original better. This one won't get fired until he gets two more ready for the kiln. He's managing one per week (precision cutting takes time) which means that in two or three more weeks (depending on when they get fired) we'll see these completed.
Jan's first Plate Window is officially tacked together and just waiting for its four corner pieces to be added. Those will cut and tack quickly which means that Jan will be soldering this when she returns. This shouldn't take that long to solder so who knows what it will look like when we see it next.
Here's another Aloe Plant which will reside in an actual flower pot when you see it next. Susan R is so close to finishing this that it isn't even funny. This one, however, is nowhere near as small as Kerry's are because when these three sections are tacked together they will stand (or perhaps 'tower') at 12 inches tall.
Martha's Butterfly is all cut out and she even figured out the measurements for her border pieces all on her own. That may not sound like much but it actually involves a bit of math that intimidates our students so much that I usually break down the pieces for them. I guess I need to walk away from that old habit-- Martha has proven that our students are perfectly capable of doing the things that they fear doing.
Lucky number 13 is WELL under way with MiMi's latest hexagon window and I suspect that we'll see some foil being applied to these pieces real soon now. MiMi has proven that she has the fortitude of a triathlete when it comes to finishing this project. She's never lost sight of the finish line and she's never wavered from the course.
Betty's got another Owl underway and this is being done in assorted grays which compliment the almost teal/blue eyebrows and neck feathers. These Owls are becoming quite popular.
Three arms down and one to go! Shawn's got a good handle on this multi-armed window. We ran a small test on the brown fusing glass that she used for the first arm by leaving some flux on it for a week. Sure enough, as suspected, it left some marks. That's why we aren't going to tack anything together until Shawn only has background pieces left to cut. With a little luck we can get most of those pieces cut and ground in just one night.
This beautiful Fall Window is, for all intents and purposes, completed. Susan D only needs to add a small amount of wire work to this before she washes it, patina's it, and then waxes the lead to a beautiful black sheen. This will be a featured piece when we return next week to show you everything that happened during our classes for the second week of May.


No comments:
Post a Comment