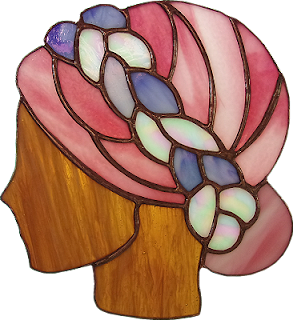
Lara always makes windows that are thoroughly distinctive and this Profile Of A Woman is no exception. Does it take a couple hundred pieces to make someone do a head turn to look at your design? No. Sometimes it's all about restraint and how that simplicity is executed. The ever-so-slight accent 'color' that Lara used in this is the iridized white that runs throughout the ribbon. Perfection all around.
Cindy finished her Deer Heads Window but had a small problem with it when she first walked in the door. The right side of the face on the buck was a perfectly straight line which ruined the flow of the face. What to do? Well, she knocked the offending piece out of the face, rounded out the background glass using the small 1/4" grinding wheel, and then re-cut and replaced right side of the face. Now it curves nicely and looks very natural. I just wish I had a picture of the original drawing so you could see how perfectly she's managed to capture it in glass.

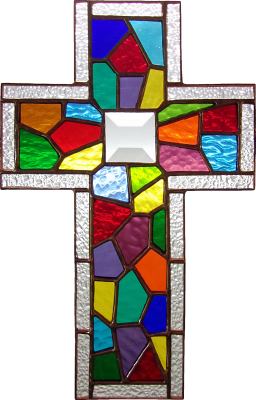
Linda F has changed up our popular Stained Glass Cross Suncatcher by substituting a square bevel in the center where a heart usually resides. This was done to make the cross look more masculine. Linda changed the pattern herself and although you might think that's an easy thing to do you'd be surprised at the number of people who wouldn't dare to attempt this feat. I slowly eased myself into creating my own patterns by first making small changes on existing patterns so this is a VERY important first step.
Susan D made two beautiful three dimensional Cactus flowers that she's put into flower pots. I didn't get a great picture of the second one but it's a duplicate of this one so just use your imagination. These three dimensional flower pot decorations are the current rage in our classes. Before we move along let me say that Susan made the assembly process of these look easy.
Susan S also designed this Moon and Stars Hoop when she found a hoop within a hoop while shopping. Her mind took off and this is what she came up with. The stars themselves actually glow in the dark and after this picture was taken Susan put some glow-in-the-dark paint on the glass that makes up the moon as well making this a stained glass piece that's enjoyable in either bright daylight or the still dark of night.
Betty made three more Cardinals complete with wire work (again, use your imagination for the other two-- they all looked the same). The trick to bending wire is to make sure that everything curves smoothly with no kinks distorting the flow of the wire. As you can plainly see Betty's stained glass skills AND her wire bending skills are formidable.

Lisa worked on four Monogram Panels (of which I got four good pictures) and she got each one ground, wrapped and tacked together perfectly. Next came her borders with corners that match the color of each respective letter. The borders and corners just need to be ground and wrapped and then these monograms will essentially be completed (save for the simple soldering job).
Susan R loved the Rosebud Panels that she saw here in a post a few weeks ago and is putting her own spin on the design by making only the rosebud itself and then soldering it as either a suncatcher or a Flower Pot Ornament. You've got to love the red water glass that she used for the flower-- it has just the right amount of deep red that a rosebud needs.
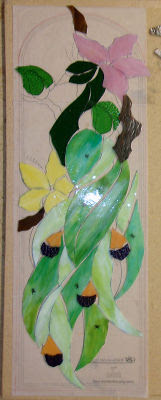
Kerry has begun work on a new project with a lot of pieces. This circular Magnolia design is always popular and has the distinction of always looking better than anyone expects it to when it's completed. This week Kerry got both the white and the darker white sections of the petals cut out. Next comes the leaves themselves where the bulk of the pieces in this window reside.
Steve Worked on replacing the glass inserts to a lantern that he picked up which had just clear glass in it. It would be a simple matter to replace the clear glass with some textured iridized glass, right? Well it's always the simple tasks that take the most time. In the end the replacement glass was too thick and after much angled grinding (on the glass) and filing (on the lantern) he decided to take a breather and work on this Sunflower Suncatcher. He got it all cut out so this is ready to hit the grinder! Oh and there will be some wire work on this as well.
Susan D also worked on a Cardinal of her own (although this one is a female) for another in the set of lead cast branches that she has. This one is all cut, ground, wrapped and ready to be attached so this will be finished when you see it again.
Let doesn't sit still for one minute. She left with just a pattern for this Margaretta Window last week and came in with all but the piece of lime cut out, ground, and wrapped! We showed her the easy way cut and grind those pieces and then she finished the day off by getting a border attached and the front side completely soldered. When this is finished I'm going to suggest that we all have a drink (or two) to celebrate!
Robert has one of his windows all ready for solder (the bottom one) while the top window just needs some background glass cut into place to finish it off. The glass that he likes most looks like it will be back in stock on the 3rd of June so we won't see the top window completed for another week or two. The good news is that Robert has got three other windows just like the bottom one all set to be tacked together so there's a good chance that will be done quickly.

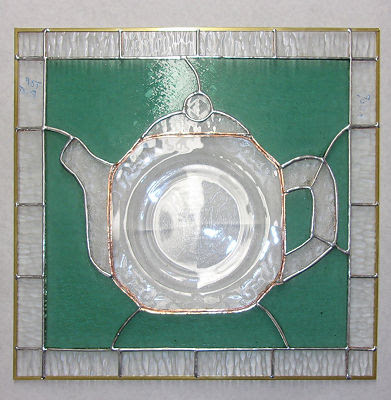
Judy did NOT have a fun night this week. Her Teapot/Plate Window was going to be finished before class ended and she was looking forward to taking it home to hang but while she was soldering the entire class heard what sounded like a small gunshot. We all looked around wondering what made that noise and then we discovered that the heat from the soldering iron caused the plate in Judy's window to crack straight through. I was honestly shocked considering how thick the middle of the plate was. But Judy isn't defeated! She has a duplicate plate at home and next week we're going to try knocking this one out and replacing it with the new plate. If that doesn't work we're just going to replace the plate with some other textured clear glass and no one will be any the wiser.
Look at this! This is MiMi's second to last Hexagon Window all ground and ready for foil. I can guarantee that there will be some kind of celebration when the last of these windows is completed, which will be very soon now!
I would swear that I took a picture of Linda L's pair of Beach Scene Windows, but then I'd be wrong. Maybe it was because we rushed to get her sky cut out before class ended but more than likely it's because I'm just flat out losing it. At any rate, Linda got her two crabs cut into place and the sky for one of the windows all cut out as well. Here's a photo shopped rendition of what things sort of looked like after she called it a day.
With only about a dozen pieces of background left to cut out Shawn is quickly approaching the next phase of the creation of her Arms Window-- the borders. Luckily they come together quickly so I thoroughly believe that the hard part of this project is over with!
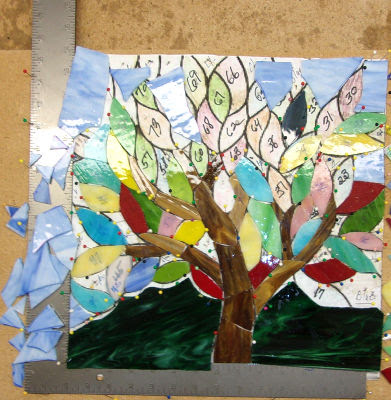
Cheryl's Tree Of Life Window is really taking shape now and there's no doubt that it will be colorful. I think Cheryl understands that no matter how many pieces there are to grind you just take them one at a time and do the work. At the end of class you'll surely see progress happening if you take it slow and steady.
Martha's Franklin Street Light Window is all cut out now. This custom order had a single request when it came to colors: make it black with some gold accents. Martha hit both requests without making a truly dark window by using Fractures and Streamers glass throughout it.
It looks to me as though Mary Grace is set to begin grinding her latest Peacock Window. I only see one piece of branch and the beak of the bird left to be cut. Only when this has been ground and tacked together will she begin to cut her background so that it will be the exact same size as her last Peacock Window. Although we don't want the same colors between the two windows we do want the sizes to be precise. Mary Grace is moving quickly through this one-- I always say that you can almost cut your time in half when you make a window a second time.

Lastly we look at Annette's Transom Window. This is the back side and it's almost completely soldered already. I have to really call out the quality of Annette's soldering- is it absolute perfect? May not quite, but is it better (MUCH better) than what you see being sold in stores and at craft shows? Hell yes! This will be completed upon Annette's return and she should really be proud of it because her skills have grown in leaps and bounds while making this!
So that's it for this week. Long story short, this is my second time writing this blog due to a technology issue that I've taken steps to squash. In my experience I've found that computers can cause just as many problems as they can fix.
Paul: "Open the blog.txt document, Hal!"
Hal: "I'm sorry, Paul. I'm afraid I can't do that."
Paul: "What's the problem?"
Hal: "I think you know what the problem is just as well as I do."
Paul


No comments:
Post a Comment