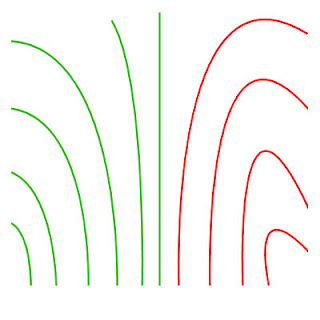
Let's start things off this week with some basic cutting rules. Curves are the worst part of stained glass. People rarely break glass when they're making a straight cut-- it's always a curve that causes all the trouble. There are numerous curve tips I can pass along but the most basic one is what I see people ignoring most. In the diagram below you can see a series of green lines and red lines. The green lines represent curves that are cut-able in one shot. The red lines are curves that should never be taken in one cut. The difference between the red and the green curves is easy to spot once you notice (or have me point out) that the red curves all double back on each other. In other words, the ends of the curves have your cutter coming back at you rather than away from you. Now I'm not saying that the red curves are impossible to cut in one shot, but I am saying that they are far harder to successfully cut unless you are very comfortable with you glass cutting abilities and you can precisely set your running pliers set screw. Above all remember that we are dealing with glass and that a gentle touch is required at all times.
Ok, now that we know what you should and shouldn't attempt while cutting glass let's look at our first completed window of the week which was made by Brenda. Her latest Beveled Cross Window is nothing short of stunning. Nice, perfect straight lines are what make this window look so great. Windows like this are all about precision because if your lines are off then the window will be cock-eyed. As you can see, there's none of that here.
Sue came in with the notion of getting two Shamrock Hat Lawn Ornaments completed and by the time she left she accomplished her goal. True, she had some of this cut out before she came into class but the amount of work she achieved while in class was VERY impressive. Two completed projects in one class is always an astounding feat no matter how much of a 'head start' you have.
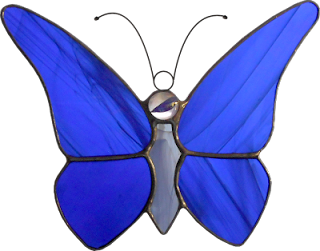
This week we introduce our newest student Jan whose butterfly is her first project with us. Things went really well with Jan and her butterfly is nice and symmetrical. She plans on making a Geometric Window with bevels and straight cuts when she returns and we'll see her progress on that in our next post.
We have another Beveled Cross Window to look at this week and this one was made by Linda F. She used all clear textured glass for this design starting with bevels for the cross, glue chip for the background glass and ending with hammered glass for the border. It's a stunning window made by a student who really knows her way around a piece of glass.
This is Mary Grace's latest American Flag Lawn Ornament which is easily her best one yet. With her working in her new work shop at home she's forcing herself to push beyond her comfort limits. This is paying off in spades for Mary Grace as you can see in the picture below.
Our last completed project this week is Betty's version of the Easter Bunny that Linda F finished two weeks ago. While Linda's was made as a window, Betty's is a stand alone bunny that will either hang in a window or rest in an easel on a table. The pattern was found on the internet and when Betty made hers we had an incident where the hat fell of of the Rabbit. This will happen whenever you have a straight line in stained glass and normally I catch these design errors but this is one that got past me. We fixed it by adding some wires on the back side of the hat and now this bunny should be nice and secure.
Becky S now has all of her Spiral Window cut out, ground and wrapped! It looks beautiful already and the missing pieces that you see are going to actually be filled with lead. It's a nice technique that's really going to make this window stand out.
Brenda's Justice of the Peace Window got its background glass cut out this week and there's only one more piece left to grind before she wraps it, tacks it, and then adds a border to this piece. Brenda cut her background out of one solid piece of glass so that the grain flows perfectly across the window. It's a nice touch that should be used whenever possible.
Gale has come back to class and she's not wasting any time at all. She's started this Magnolia Window that Becky S designed for her and is moving right along on it. All the white is cut out and she's got her green leaves traced out already so this is almost together already.
After more than a year of being on our list, Judy showed up for her first official weekly stained glass class. She's taken numerous Weekend Workshops with us so she already has a good grasp on how to make stained glass. Because of that we skipped the beginner butterfly and Judy started working on this 3D Butterfly Lawn Ornament instead. It was a good call because she got this all cut out, ground, and even wrapped before she left! All of that work in one class is pretty amazing. This is another project that will be completed next week.
Linda F's Eagle and Flag Window is another in a long line of projects that saw a lot accomplished this week. With all of her glass now cut and ground she only needs to finish wrapping these pieces and then this will be ready for solder. Linda has certainly come a long way!
Carol's bevels have arrived! She's got two of these now and she already has one all cut out and tacked into place. That means that she only has one left to go on this project. She's going to add three more borders to the other Beveled Fleur De Lis Window that she made a few weeks back so she can use it as a stand alone window. I'm sure we'll being seeing that before you know it.
Bonnie's Easter Bunny is being made with a little knowledge that comes from Betty completing hers first. We now know where there is some structural instability in this design so we'll take measures to prevent this rabbit from losing it's ears.
The Swirling Flower Window that Terry is working on is almost ready for solder. It's a large window and since Terry hasn't been able to easily transport it she's been leaving it in the shop between classes. Now that it's all cut out she's decided to brave taking it home so she can hopefully get some of it wrapped and then tacked together.
Vickie got the rest of her background pieces cut out for her Geometric Window and has even put a huge dent in grinding it. As you can see the bottom half fits together beautifully. It looks like she just needs to get the upper left corner and a few pieces in the immediate center fitted and then she'll be wrapping this.
Myrt's Cross De Lis Window is all cut out now. She tacked the FDL, cut her background, ground it and then got the background wrapped as well. She picked out glass for her border and we cut the strips into the correct lengths. She only needs to cut down the her border strips into four pieces each and then she'll be ready to wrap and solder this together.
Speaking of Fleur De Lis', Cindy's LSU De Lis is almost completely cut out now. She's been working on grinding it and she's really made a lot of progress. It looks to me like we'll see this window being wrapped when she comes back in.
Betty's got a second Jester in the works and it's ready to get it's face cut out of glass. She's toying with the idea of giving this version black eyes (as you can see in the picture). Once the face is cut out Betty will have a better feel for how the eyes look and we'll see how that all works out when we come back in our next post.
Jeanne came in and resumed work on her pair of Beveled Crosses. By the time class was over she had both of these wrapped and tacked together. It looks to me as though she'll easily complete them when she returns to class next week. She's used rough rolled glass for these which will sparkle nicely when they're held up in the light.
We had a lot of heavy rain warnings and more than a few students were wary about making the trip to Bayou Salé. However, even though we were a few students short this week we certainly had more than enough projects on the work tables to keep us busy. Next week should be clear and sunny so expect to see even more windows when we return.
Paul


No comments:
Post a Comment